background image

22

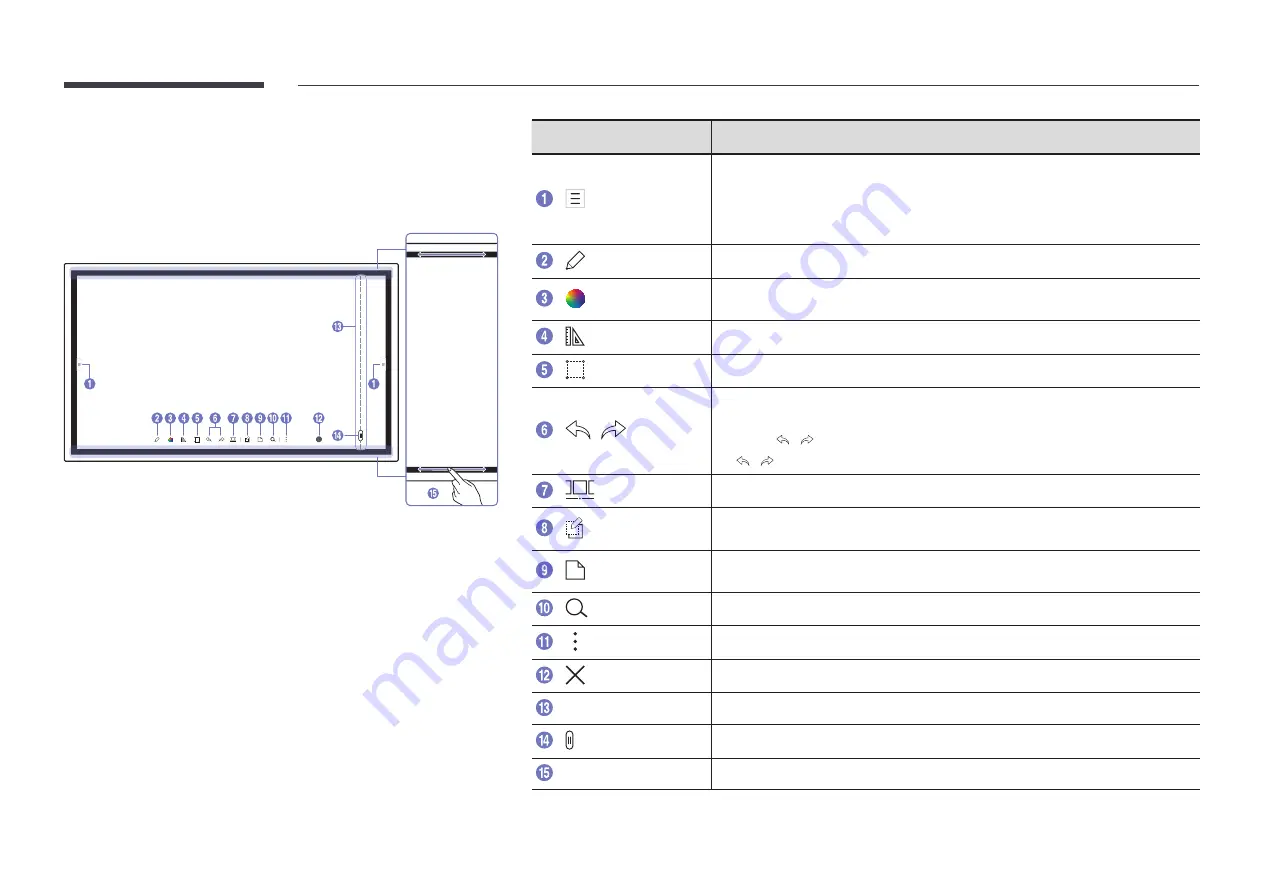
PEN MODE

Screen Elements

Buttons

Description

Tap to open the 

IMPORT

/

EXPORT

 window.

 •

IMPORT

: View the screen of a mobile device or PC connected to the product, or 

import data such as images from a connected USB or network drive.

 •

EXPORT

: Share your creations in various ways.

Tap to select a mode. You can select from 

PEN MODE

 or 

BRUSH MODE

.

Tap to open the Palette. You can select the colour and thickness of the pen and the 

highlighter.

Use math tools to make geometric constructions and take measurements.

Select and edit / capture / email / print the pen or brush content.


/

Undo or redo the last action.


• If any page editing actions such as page adding, deleting, and moving are 

found, 

 / 

 is reset.


"

 / 

 can be performed up to 20 times for each individual.

Move or edit the created rolls for each page.

Create a layer to write or draw on over the screen which can also be saved the 

captured image.
Bring out Miniboard to take notes or draw as a separate layer above the viewer or 

source screen.

Tap to search the Internet.

Manage and change the rolls and settings.

Close the current roll and create a new roll.

Page breaking line

See page lines.

Scroll through pages.

Bezel Scroll

Scroll the black area to move the pages.

Содержание Flip WM85A-W

Страница 1: ...rmation on safe disposal and recycling visit our website www samsung com in or contact our Helpline numbers 1800 40 SAMSUNG 1800 40 7267864 Toll Free 1800 5 SAMSUNG 1800 5 7267864 Toll Free Samsung Samsung owns the copyright forthis manual Use orreproduction of this manual in parts orentiretywithout the authorization of Samsung is prohibited Trademarks otherthan Samsung are property of theirrespec...

Страница 2: ... MODE 22 Screen Elements 22 Drawing 23 Erasing 23 Changing the pen thickness and colour 23 BRUSH MODE 24 Screen Elements 24 Managing Rolls 25 ROLL EXPLORER 26 Page Viewer 27 Note On Off 28 Using the Selection Tools 29 Table of contents Before Using the Product Safety Precautions 4 Safety symbols 4 Storage 5 Electricity and safety 5 Installation 6 Operation 7 Precautions for Use 8 Preparations Chec...

Страница 3: ...age Burn in 71 What is afterimage burn in 71 Recommended prevention practices 71 Licence 71 EXPORT Sending Email 41 Printing 42 Installing Flip Printing Software 42 Setting up the printer 42 Exporting to a USB Device 44 Exporting from a Network Drive 45 Sending to a mobile device 45 Sharing your screen 46 Menu Connect 47 System 55 Picture 59 Support 61 Troubleshooting Guide Problems and Solutions ...

Страница 4: ...SERVICEABLE PARTS INSIDE REFER ALL SERVICING TO QUALIFIED PERSONNEL This symbol indicates that high voltage is present inside It is dangerous to make any kind of contact with any internal part of this product AC voltage Rated voltage marked with this symbol is AC voltage This symbol indicates that this product has included important literature concerning operation and maintenance DC voltage Rated ...

Страница 5: ...t place the powercord orproduct nearheat sources A fire or electric shock may result Insert the powerplug all thewayin so it is not loose An unsecure connection may cause a fire Connect the powerplug to a grounded powersocket type1 insulated devices only An electric shock or injury may result Clean anydust around the pins of the powerplug orthe powersocketwith a drycloth A fire may result Caution ...

Страница 6: ...roduct in a kitchen orneara kitchen counter Have a technician install thewall mount hanger Installation by an unqualified person can result in an injury Only use approved cabinets Install the product at least10 cm awayfrom thewall to allowventilation An increased internal temperature may cause a fire Keep the plastic packaging out of the reach of children Children may suffocate Do not install the ...

Страница 7: ...tc into the product via thevent orinput output ports etc Be sure to power off the product and disconnect the power cord when water or other foreign substances have entered the product Then contact Samsung Customer Service Centre Product failure an electric shock or fire may result Do not place objects containing liquid vases pots bottles etc ormetallic objects on top of the product Be sure to powe...

Страница 8: ...leakage Use the product at the recommended resolution and frequency Your eyesight may deteriorate Looking at the screen too close foran extended period of time can deteriorateyour eyesight Restyoureyes formore than 5 minutes forevery1 hourof product use Eye fatigue will be relieved Store small accessories out of the reach of children Precautions forUse Be careful that ifyou use the supplied penwit...

Страница 9: ...nce of the components may differfrom the images shown Referto the installation guide forthe WMA stand orwall mount available foroptional purchase Checking the Components Quick Setup Guide Warranty card Not available in some locations Regulatory guide Power cord USB cable Touch Pen x 2 Wall Mount Adapter x 4 WM75A only ...

Страница 10: ...ting mode shortly press the Power button to switch to the screen saver mode The pen is magnetic Keep it by attaching to the marked location OPS case Sold separately Connect the OPS case to the product and insert the standard OPS module into the case You can purchase the OPS case and module separately Before inserting the OPS module make sure to remove the power cable from the product to completely...

Страница 11: ...ng a LAN cable 10 100 Mbps Use Cat7 STP Type cable for the connection Shielded Twist Pair SERVICE Dedicated to service technicians This port is for servicing only and has no user function Do not connect a cable to this port HDMI 1 Connects to a source device using a HDMI cable DP Connects to a source device using a DP cable TOUCH Allows touch based control of the PC screen connected through the HD...

Страница 12: ...nected PC 2 Connect the USB device to EXTERNAL USB 2 0 USB 3 0 3 A connection is established between the USB device and PC EXTERNAL USB 2 0 USB 3 0 USB Connect to a USB memory device TOUCH Allows touch based control of the PC screen connected through the HDMI 2 port Use the supplied USB cable to connect between the TOUCH port on the tray and the PC HDMI 2 An HDMI port for displaying input from an ...

Страница 13: ...er Service Centre for further details Installation on a PerpendicularWall A Minimum 15 mm B Ambient temperature 35 or less A B Installation on an Indented Wall A Minimum 15 mm B Minimum 25 mm C Ambient temperature 35 or less When installing the product on an indented wall allow at least the space specified above between the product and wall forventilation and ensure that the ambient temperature is...

Страница 14: ...ble for any damage to the product or injury to yourself or others if you select to install the wall mount on your own C WM85A Product Wall mount bracket Using the wall mount adapter WM75A only Install the provided wall mount adpaters as shown in the figure below before installing the wall mount kit If you are installing a third party wall mount note that the length of the screws you can use to att...

Страница 15: ...length of the screws may differ depending on the wall mount specifications Do not fasten the screws too firmly This may damage the product or cause the product to fall leading to personal injury Samsung is not liable for these kinds of accidents Samsung is not liable for product damage or personal injury when a non VESA or non specified wall mount is used or the consumer fails to follow the produc...

Страница 16: ...o a network wall outlet using a LAN cable See the diagram below Note that the wall outlet is attached to a modem or router elsewhere in your house LAN Cable The Modem Port on the Wall LAN RJ45 If you have a Dynamic Network you should use an ADSL modem or router that supports the Dynamic Host Configuration Protocol DHCP Modems and routers that support DHCP automatically provide the IP address subne...

Страница 17: ...es manually Getting the Network Connection Values To view the Network connection values on most Windows computers follow these steps 1 Right click the Network icon on the bottom right of the screen 2 In the pop up menu that appears click Status 3 On the dialog that appears click the Support tab 4 On the Support Tab click the Details button The Network connection values are displayed How to set up ...

Страница 18: ...ires devices that access the network to transmit an encrypted security code called an Access or Security Key The Security Key is based on a Pass Phrase typically a word or a series of letters and numbers of a specified length you were asked to enterwhen you set up security foryourwireless network If you use this method of setting up the network connection and have a Security Key foryourwireless ne...

Страница 19: ...r cannot be found after retrying select the Stop button The Add Network button appears 4 If the Enter the password for AP Name screen appears go to step 5 If you select a wireless router that does not have security go to step 7 5 If the router has security enter the Enter the password for AP Name Security key or PIN 6 When done select Done The network connection screen appears and the verification...

Страница 20: ...to Wireless from the Open Network Settings page 2 Select Use WPS 3 Press the WPS or PBC button on yourwireless routerwithin the next two minutes Your product automatically acquires all the network setting values it needs and connects to your network 4 The network connection screen appears and network setup is done ...

Страница 21: ...is product A roll is a file with multiple pages linked together A roll can have up to 20 pages linked together BRUSH MODE supports one page only You can open only one roll on one screen For more information refer to Managing Rolls Landscape orientation Page 1 Page 2 ...

Страница 22: ...rements Select and edit capture email print the pen or brush content Undo or redo the last action If any page editing actions such as page adding deleting and moving are found is reset can be performed up to 20 times for each individual Move or edit the created rolls for each page Create a layer to write or draw on over the screen which can also be saved the captured image Bring out Miniboard to t...

Страница 23: ...e anything you want Thin Tip Pen Type Thick Tip Highlighter Type Erasing You can use your finger or palm to erase yourwriting Changing the pen thickness and colour You can change the pen thickness and colour by touching and holding the screen with the pen ...

Страница 24: ...d use other options Dry colours to stop blending Extract the colour from the selected point Delete the selected area Select and edit capture email print the pen or brush content Undo or redo the last action If any page editing actions such as page adding deleting and moving are found is reset can be performed up to 20 times for each individual Manage and change the rolls and settings Close the cur...

Страница 25: ...RMS Change the background format This menu is only visible in PEN MODE mode ROLL LOCK UNLOCK ROLL LOCK Press a six digit password to lock the current roll UNLOCK To unlock a locked roll press the six digit password you set when locking the roll Once unlocked the current roll remains unlocked until it is locked again SETTINGS You can see the configuration menu HOW TO USE You can view How To Use ...

Страница 26: ...the default sort option By name The rolls are sorted by name of the rolls Select Select multiple rolls to export or delete File name Rename the file Rolls Browse and open a desired roll To open a locked roll press the six digit password Deleting Exporting rolls ROLL BROWSER Select You can select multiple rolls to export or delete LOC KED LOC KED LOC KED LOC KED LOC KED LOC KED LOC KED LOC KED LOC ...

Страница 27: ... differ depending on the model This menu is only visible in PEN MODE mode Parts Description Page number Displays the page number Focus Displays the page you are currently viewing When you tap a page the focus is moved to it Delete the focused page Add a new page to the focused position You can create up to 20 pages per roll ...

Страница 28: ...raw on This can be useful for adding note to content from an external source This menu is only visible in PEN MODE mode 1 Tap to add a new note layer over the screen 2 Take note on the layer 3 Tap to select one of the following options Save Don t Save Cancel ...

Страница 29: ...rea and choose from options The product must be connected to a network to use the email or print option The Search function is only available for handwriting Resize EDIT Move Rotation Editing pen and brush content The changes apply to pen and brush content only 1 Tap in the screen bottom A select box appears on the screen Drag the of the select box to adjust the size 2 Tap to enable editing for th...

Страница 30: ... OPS connection or Wireless Display You can display the screen shared from your PC mobile or tablet Import videos images native FLIP files or document files from a USB device Connect the network to access the Internet from the product like accessing the Internet from a computer Access to remote PC and yourwork resources with this function The native FLIP format iwb refers to files that are directl...

Страница 31: ...is product from the list of devices displayed on the screen The initial device name is FLIP Samsung WMA Series You can control the mobile device from the product screen HDCP High bandwidth Digital Content Protection contents will not show on the screen if PIP Capture is set to On Connecting to a PC IMPORT PC PC HDMI 1 HDMI 2 DisplayPort OPS Wireless USB PC IMPORT MOBILE INTERNET SAMSUNG WORKSPACE ...

Страница 32: ...cards can support HDCP automatically HDMI DP 2 Select IMPORT PC HDMI DisplayPort on the screen 3 To control the PC from the product screen connect the supplied USB cable to the TOUCH port on the product If used in a multi screen setup make sure you have configured FLIP as the main display TOUCH Connecting using a OPS Sold separately Touchscreen may not work properly during initial OPS Windows sett...

Страница 33: ... SMARTVIEW IMPORT SMARTVIEW You can display the screen shared from your PC mobile or tablet 1 Select SMARTVIEW 2 Once SMARTVIEW starts follow the onscreen instruction to connect with the desired device The CA certificate installation is required for the PC Client and you can download the CA certificate from the URL provided in the initial screen of SMARTVIEW If the Client device s screen aspect ra...

Страница 34: ...rchases is not supported ActiveX is not supported Only a limited number of fonts are supported Certain symbols and characters may not be displayed properly The response to remote commands and the resulting on screen display may be delayed while a web page is loading Loading a web page may be delayed or suspended completely depending on the status of the participating systems Copy and paste operati...

Страница 35: ...Office 365 Provides access to Office 365 features from Microsoft VMware Horizon Enterprise customers who won VMware Infrastructure can access VMware Horizon NETWORK DRIVE Connect the network drive to bring files You can register a network drive while the network is connected For information about how to connect to a network see Connecting to a network You can register a network drive account at SE...

Страница 36: ...e connected device or source port Adjust the volume Pause the input screen display Capture the source window This feature is not available when PIP Capture is set to Off Rotate the source window This function is supported only on Android 8 0 Oreo version or later of Samsung mobile devices Change the input screen position orview it on full screen The icon images are for position reference only The ...

Страница 37: ...nt file formats DOC PPT PDF XLS XLSX Parts Description Menu bar Drag the menu bar to move the viewer around File name Name of the currently viewing file Adjust the volume Capture the document viewer screen This feature is not available when PIP Capture is set to Off Change the input screen position orview it on full screen Close the viewer Tap to move between pages Adjust size of the viewer ...

Страница 38: ...device or network drive Parts Description Menu bar Drag the menu bar to move the viewer around File name Name of the currently viewing file Capture the image viewer screen Tap to paste the image to the roll Rotate the image Change the input screen position orview it on full screen Close the viewer Adjust size of the viewer ...

Страница 39: ... mpeg ts tp trp flv vob svi m2ts mts webm rmvb Parts Description Menu bar Drag the menu bar to move the viewer around File name Name of the currently viewing file Adjust the volume Rotate the video screen Change the input screen position orview it on full screen Close the viewer Play or pause the video Playback sliderand time details Navigate through the video and view time details for the file Ad...

Страница 40: ...sired menu EMAIL PRINT USB SCREEN SHARE MOBILE NETWORK DRIVE IMPORT EXPORT Icons Description Send your created rolls via email Print your created rolls Export your created rolls to a connected USB device Export your created rolls to a registered and connected network drive Send the roll to a mobile device Share your screen with selected devices Chapter 05 EXPORT ...

Страница 41: ...unt ID and password as well as the sender address for every email If you set SenderAuthentication to Default Account you can use the SMTP ID and password you saved to Default Account to send emails The sender address is usually identical to the SMTP ID with some exceptions depending on the SMTP server For the SMTP information required to register a mail server contact your mail server administrato...

Страница 42: ...upported Installing Flip Printing Software Follow the onscreen instructions to install Flip Printing Software The installation takes about 10 minutes and the time taken may vary depending on your PC environment PC installation requirements Supported operating systems Windows 7 32 64 bit Windows 10 32 64 bit MAC When installing the software make sure that critical Windows updates are already instal...

Страница 43: ...s a list of connected printers Select a printer to print the roll with Copies Set the number of prints Print previewarea Preview the roll to print Print Start the printing ColourMode Select the colour to print the roll with Change the page view mode of the roll to print Select the pages to print ...

Страница 44: ...ORT SAVE USB1 USB2 EMAIL PRINT USB MOBILE NETWORK DRIVE SCREEN SHARE The contents displayed on your product screen may differ from the above image Connect an external HDD or a USB storage device Your device saves files in two versions IWB and PDF formats ...

Страница 45: ...To register a network drive account you must enter the Address Username and Password To registeryour network drive account refer to Add Account for Network Drive Your device saves files in two versions IWB and PDF formats Sending to a mobile device EXPORT MOBILE View the screen of the product from a mobile device Sharing is only available for rolls at the moment Download Samsung Flip Mobile app af...

Страница 46: ... twice upon when connecting for the first time orwhen there is a change in the WMA product or source state When any device does not work change the screen resolution for SCREEN SHARE SETTINGS Picture Screen Share Wired Resolution If the UHD or FHD1 output is not available for the external device due to compatibility set Screen Share wired Resolution to FHD2 SCREEN SHARE connecting with HDMI cables...

Страница 47: ... network Reset Network Restore the network settings to the factory default External Device Manager Input Device Manager Set up keyboards to use with your product You can add keyboards and configure their settings Bluetooth Device List Keyboard Settings Mouse Settings Device Connect Manager Allow devices on your network like smartphones and tablets to share content with your product Access Notifica...

Страница 48: ...used when sending emails Personal Account Default Account Default Account Default SMTP account Password Password for the default SMTP account Sender Email Sender s email address Recipient Address Select from options to manage email contacts after successfully send emails Auto Save Do Not Save Delete All Local Address Book Import contacts from a USB device or delete them Import Delete For more info...

Страница 49: ...3 Level3 Team3 Company3 4 Connect the USB device to FLIP to import contacts SETTINGS Connect Advanced Settings Enter password Email Local Address Book Import The USB device and its contents may not be detected properly if a USB extension cable is used USB hubs are not supported Do not remove the USB device while loading If more than two USB devices are connected some of them may not be detected US...

Страница 50: ...to the latest version Add Account Add new network drive accounts Only Samba can be added to the network drive SAMBA 2 0 or later is supported If you cannot connect to the network drive update SAMBA to the latest version To register a network drive account you must enter the Address Username and Password Address computer IP address shared folder name When entering an address be sure to use instead ...

Страница 51: ...n the LDAP server The format of User ID complies with the DN format of LDAP e g cn admin dc myldap dc com Password Password that is used for authentication of the LDAP server ServerAddress IP or URL of the LDAP server Server Port Number Port number of the LDAP server Base DN Base DN that is to be used for search in the DIT Directory Information Tree when connecting the LDAP SSL TLS Whether or not ...

Страница 52: ... more information refer to How to create a text file for use of LDAP When the mapping does not match the search result does not include the attributes Server Network Settings Set up your server network connection and related functions Connect to server Connect to MagicInfo server ServerAccess Allow or deny access to MagicInfo server Proxy Server Set up your proxy server connection and related func...

Страница 53: ...1 myldap com KDC Port 88 2 Allocation of values VAL for each key User ID Enter the User ID ServerAddress Enter the IP or URL of the LDAP server Server Port Number Enter the Port of the LDAP server SSL TLS Enter Use or Don t Use Use Untrusted Certificates Enter Use or Don t Use Authentication Type Enter Basic orAnonymous The following three items will be added if you select Kerberos type verificati...

Страница 54: ... in the following manner On the left of syntax is the name that is seen in the LDAP Query Configuration menu also on the left and mapped to the values on the right side of the actual LDAP Server attributes You can choose attributes to change values For instance you can change the right side values without changing the left side values 2 Query part A is the Keyword that is used for a Search The syn...

Страница 55: ...us time related settings Clock Set Set current date and time DST Adjust clock for Daylight Saving Time Start Date End Date and Time Offset are enabled only when DST is set to On Change PIN Change your 6 digit Personal Identification Number PIN The default PIN number is 000000 Change the PIN to keep your device secure Device Name Enter Device Name You can find this name on the device being used ove...

Страница 56: ...ription Sound Output Select speakers for sound output Flip Speaker Audio Out Screen Share Wired Sound Feedback Select the volume of the sound feedback for certain options capture merge to roll etc Off Low Medium High ...

Страница 57: ...rning off after no user interaction is detected PC module power Turns on or off to sync with OPS Powerwhen the power is on or off Synced power on When the Flip is turned on the PC module is automatically turned on as well Synced power off When the Flip is turned off the PC module is automatically turned off as well No Signal No Interaction Power Off Save power by turning the device off when no sig...

Страница 58: ...ng Workspace Clone Product Export this device s settings or import from other devices URLLauncherSettings Set the URL Launcher Install Web Apps Install the web application by entering an address Install from USB Device Install the web application from the USB storage device Uninstall Remove the installed web application Timeout Setting Set the timeout period for connecting to the URL Developer Mod...

Страница 59: ...ut signal range for HDMI connections Supports resolutions up to 3840 x 2160 60 Hz with Input Signal Plus expansion set to On Supports resolutions up to 3840 x 2160 30 Hz with Input Signal Plus expansion set to Off Supported Resolutions forUHD Input Signals Check the supported resolution for UHD input signals Resolution 3840 x 2160p 4096 x 2160p If Input Signal Plus is set to Off Frame rate fps Col...

Страница 60: ...s and contrast This function is available only when the product is connected to a PC using an HDMI cable and the Source window is turned on Screen Share Wired Resolution Set the resolution when sharing the screen wired Auto UHD FHD1 FHD2 Reset Picture Restore all picture settings to the factory default ...

Страница 61: ...B device connect the USB device to the product to update Make sure you saved the update file in a top level folder Current Version This is the software version already installed in the product Auto update Automatically start software updates once your device is powered off Requires an internet connection Contact Samsung Contact information for assistance with your device Go to Contact Samsung and ...

Страница 62: ...r computer manufacturer for further details about how to adjust the screen settings The images on the screen look distorted Check the connected cable Compatibility is not guaranteed if you use a cable that has not been supplied by Samsung The screen is not clear The screen is blurry Set the resolution and frequency to the recommended level The screen appears unstable and shaky Check that the resol...

Страница 63: ...is defective A mobile device within a distance of one meter radius may cause static on analogue and digital products The brightness and colourdo not look normal From the menu select SETTINGS Support Reset All to try resetting the screen The displaylooks unstable and then freezes The screen may freeze when a resolution other than the recommended resolution is used or if the signal is not stable To ...

Страница 64: ...ce is used Check the audio output settings for the source device For example if your monitor is connected to HDMI you may need to change the audio option of yourvideo output device to HDMI Reconnect the power cable to the device and then reboot the device There is static coming from the speakers Low signal level can cause corrupted sound There is audible soundwhen thevolume is muted Audio settings...

Страница 65: ...e product HDMI 2 TOUCH on the tray I use two pens but theydo notworkwell Make sure that there is enough space between the two pens at multi touching There is a screen touch malfunction such as slowor inaccurate responding Make sure that there are no foreign substances on the screen surface Check whether the screen is broken Make sure that the product is not exposed to direct sunlight When the prod...

Страница 66: ...ds the maximum resolution of the product To resolve the issue change the PC resolution to a resolution supported on the product There is no sound from the speakers in HDMI modewhen a DVI HDMI cable is connected DVI cables do not transmit sound data HDMI Black Level is not functioning properlyon an HDMI devicewith YCbCroutput This function works only when the HDMI signal of the external device is R...

Страница 67: ...sure keep the internal temperature at 40 C or below Humidity 10 80 non condensing Storage Temperature 20 C 45 C 4 F 113 F Humidity 5 95 non condensing Applicable before the product package is unpacked Horizontal Frequency The time required to scan a single line from the left to the right side of the screen is called a horizontal cycle The reciprocal numberof a horizontal cycle is called horizontal...

Страница 68: ...This product can be set to only one resolution for each screen size to obtain the optimum picture quality due to the nature of the panel Using a resolution other than the specified resolution may degrade the picture quality To avoid this it is recommended that you select the optimum resolution specified foryour product For detailed device specifications visit the Samsung website ...

Страница 69: ...O VESA DMT 1280 x 1024 63 981 60 020 108 000 O O VESA DMT 1280 x 1024 79 976 75 025 135 000 O O VESA DMT 1366 x 768 47 712 59 790 85 500 O O Resolution Horizontal Frequency kHz Vertical Frequency Hz Pixel Clock MHz Sync Polarity H V Port HDMI IN DisplayPort VESA DMT 1440 x 900 55 935 59 887 106 500 O O VESA DMT 1600 x 900RB 60 000 60 000 108 000 O O VESA DMT 1680 x 1050 65 290 59 954 146 250 O O V...

Страница 70: ...ustomer requests software installation and setup for the product If a service technician removes cleans dusts or foreign materials inside of the product If customer requests an installation additionally after purchasing a product through home shopping or online A Product damage caused by customer s fault Product damage caused by customer s mishandling orwrong repair If a product damage is caused b...

Страница 71: ... burn in Viewing a fixed screen for an extended period of time may cause afterimage burn in This problem is not included in warranty Recommended prevention practices Viewing a fixed screen for an extended period of time may cause afterimage burn ins or smudges Turn off the product when it is not used for a long time activate the Power Saving mode or run a moving screen saver Licence The terms HDMI...

Отзывы: