background image

30 

EN

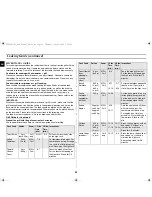
Cooking Guide (continued)

REHEATING BABY FOOD

BABY FOOD

Empty into a deep ceramic plate. Cover with plastic lid. Stir well after reheating! 
Let stand for 2-3 minutes before serving. Stir again and check the temperature. 
Recommended serving temperature: between 30-40°C.

BABY MILK

Pour milk into a sterilised glass bottle. Reheat uncovered. Never heat a baby’s 
bottle with teat on, as the bottle may explode if overheated. Shake well before 
standing time and again before serving! Always carefully check the temperature 
of baby milk or food before giving it to the baby. Recommended serving 
temperature: ca. 37°C.

REMARK:

Baby food particularly needs to be checked carefully before serving to prevent 
burns. Use the power levels and times in the next table as a guide lines for 
reheating. 

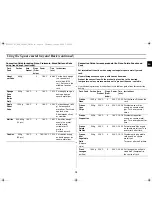
Reheating Baby Food and Milk

Use the power levels and times in this table as guide lines for reheating.

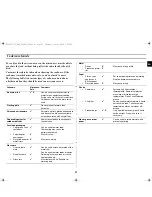
Reheating Liquids and Food

Use the power levels and times in this table as a guide lines for reheating.

Food

Portion Power

Time

Standing 
Time(min.)

Instructions

Baby food 
(vegetables 
+ meat)

190g

600W

30sec.

2-3

Empty into ceramic deep 
plate. Cook covered. Stir 
after cooking time. Stand 
for 2-3 minutes. Before 
serving, stir well and 
check the temperature 
carefully.

Baby 
porridge 
(grain + milk 
+ fruit)

190g

600W

20sec.

2-3

Empty into ceramic deep 
plate. Cook covered. Stir 
after cooking time. Stand 
for 2-3 minutes. Before 
serving, stir well and 
check the temperature 
carefully.

Baby milk

100ml
200ml

300W 30-40sec.

1min. 

10 sec. to 

1min. 

20sec.

2-3

Stir or shake well and pour 
into a sterilised glass 
bottle. Place into the 
centre of turntable. Cook 
uncovered. Shake well 
and stand for at least 2 
minutes. Before serving, 
shake well and check the 
temperature carefully.

Food

Portion

Power Time 

(min.)

Standing 
Time (min.)

Instructions

Drinks 
(coffee, 
tea and 
water)

150ml 

(1 cup)

300ml 

(2 cups)

450ml 

(3 cups)

600ml 

(4 cups)

900W

1-1½

2-2½

3-3½

3½-4

1-2

Pour into cups and reheat 
uncovered: 1 cup in the centre, 
2 cups opposite of each other, 
3 cups in a circle. Keep in 
microwave oven during 
standing time and stir well.

Soup 
(chilled) 

250g
500g

900W

2½-3
4-4½

2-3

Pour into a deep ceramic plate 
or deep ceramic bowl. Cover 
with plastic lid. Stir well after 
reheating. Stir again before 
serving.

Stew 
(chilled) 

350g

600W

5-6

2-3

Put stew in a deep ceramic 
plate. Cover with plastic lid. Stir 
occasionally during reheating 
and again before standing and 
serving.

Pasta 
with 
sauce 
(chilled) 

350g

600W 4½-5½

3

Put pasta (e.g. spaghetti or 
egg noodles) on a flat ceramic 
plate. Cover with microwave 
cling film. Stir before serving.

Filled 
pasta 
with 
sauce 
(chilled)

350g

600W

5-6

3

Put filled pasta (e.g. ravioli, 
tortellini) in a deep ceramic 
plate. Cover with plastic lid. Stir 
occasionally during reheating 
and again before standing and 
serving.

Plated 
Meal 
(chilled)

350g
450g
550g

600W 4½-5½

5½-6½
6½-7½

3

Plate a meal of 2-3 chilled 
components on a ceramic dish. 
Cover with microwave cling-
film.

mjXZ`z{mj†zh†WYZY`|†niTWXU”GGwˆŽŒGZWGG{œ™š‹ˆ SGqœ•ŒGYZSGYWW\GG^a[[Gwt

Содержание FC139STBC

Страница 1: ... Using the Auto Defrost Feature 13 Using the Junior Snack Cook Feature 14 Using the Cafeteria Feature 16 Cafeteria Settings 16 Using a Crusting Plate 17 Using the Square metal tray and Rack 18 Multistage Cooking 20 Setting a Standing Time 21 Choosing the Accessories 21 Preheating the Oven 21 Cooking by Convection 22 Grilling 22 Choosing the Heating Element Position 23 Spit Roasting 23 Using The Ve...

Страница 2: ...y turning the dial knob as required 4 Press Start button Result Cooking starts When cooking has finished the oven will beep and flash 0 four times The oven will then beep one time per minute 1 Place the frozen food in the oven Turn the Cooking Control knob to the Defrost symbol 2 Select the food category by pressing the Select button until the desired food category is selected 3 Select the weight ...

Страница 3: ...reheat feature mode 8 Auto cook feature mode 9 Mode selection button 10 Preheat mode selection button 11 Stop Cancel button 12 Language mode selection button 13 Cooking Control knob 14 Microwave mode 15 Combined mode microwave grill 16 Grill mode 17 Combined mode microwave convection 18 Convection mode 19 More Less button 20 Start cooking time adjustment button and time setting weight selection 21...

Страница 4: ...ed in the supporter rack Purpose The square metal rack is used for the convection cooking Refer to the page 18 6 Square Metal Tray to be placed in the supporter rack Purpose The square metal rack is used for the convection cooking Refer to the page 18 7 Supporter Rack to be placed in the right and left of the oven Refer to the page 18 Purpose The square metal rack is used for the convection cookin...

Страница 5: ...ified microwave service technician trained by the manufacturer Safety Precautions Important Safety Instructions Read Carefully and keep for future reference Before cooking food or liquids in your microwave oven please check that the following safety precautions are taken 1 DO NOT use any metallic cookware in the microwave oven Metallic containers Dinnerware with gold or silver trimmings Skewers fo...

Страница 6: ... microwave oven is operating without any load the power will cut off automatically for safety After standing for over 30 min you can operate the oven normally Do not worry is the oven continues to work after cooking has finished Reason This product is designed to fan for some minutes not operating microwave oven MWO to cool down the inner electronic parts when the stop button is pressed or the doo...

Страница 7: ... you are in doubt refer to the section entitled What to Do if You are in Doubt or Have a Problem on the page The oven must be plugged into an appropriate wall socket The turntable must be in position in the oven If a power level other than the maximum 100 900 W is used the water takes longer to boil Open the oven door by pulling the handle on the right side of the door Place a glass of water on th...

Страница 8: ... respected to ensure Even cooking of the food right to the centre The same temperature throughout the food 1 To display the time in Then press the Clock the button 12 hour notation Once 24 hour notation Twice 2 Turn the dial knob to set the hour 3 Press the Clock button 4 Turn the dial knob to set the minute 5 When the right time is displayed press the Clock button to start the clock Result The ti...

Страница 9: ...s do not enable you to solve the problem then contact your local Samsung customer service centre Please have the following information read The model and serial numbers normally printed on the rear of the oven Your warranty details A clear description of the problem Then contact your local dealer or SAMSUNG aftersales service Cooking Reheating The following procedure explains how to cook or reheat...

Страница 10: ...e simply by opening the door Increase or decrease the remaining cooking time Power Level Percentage Output HIGH MEDIUM HIGH MEDIUM MEDIUM LOW DEFROST LOW 100 67 50 33 20 11 900W 600W 450W 300W 180W 100W If you select a Then the cooking time must be Higher power level Lower power level Decreased Increased To stop the cooking Then Temporarily Open the door Result Cooking stops To resume cooking clos...

Страница 11: ... according to the pre programmed setting selected When cooking has finished the oven will beep and flash 0 four times The oven will then beep one time per minute Code Food Serving Size Standing Time Recommendations 1 Jacket Potato 2 x 200 g 4 x 200 g 4 5 min Take potatoes with similar size and weight of circa 200g per potato Wash and prick the skin with a fork Put 2 potatoes opposite to each other...

Страница 12: ...spectively 5 Press the Start button Result The food is cooked according to the pre programmed setting selected When cooking has finished the oven will beep and flash 0 four times The oven will then beep one time per minute Code Food Serving Size Standing Time Recommendations 1 Ready Meal chilled 300 350 g 400 450 g 500 550 g 3 min Put on a ceramic plate and cover with microwave cling film This pro...

Страница 13: ...turning the dial knob 4 Press Start button Result Defrosting begins The oven beeps half way through defrosting to remind you to turn the food over 5 Press the Start again to finish defrosting Result When cooking has finished the oven will beep and flash 0 four times The oven will then beep one time per minute Code Food Serving Size Standing Time Recommendations 1 Steaks Chops Minced Meat Chicken P...

Страница 14: ...n Place cake on a turntable This programme is suitable for all kinds of yeast cake sponge cake cheese cake puff pastry fruit cake and cream cake rolls It is not suitable for gateaux or cake with cream or chocolate topping and icing 1 Turn the Cooking Control knob to the Junior Snack symbol 2 Select the type of food that you are cooking by pressing the Select button Refer to the table on the follow...

Страница 15: ... microwave proof plastic dish in the centre of turntable Pierce film of ready product or cover plastic dish with microwave wrap Stir carefully before and after standing time This programme is suitable for ravioli as well as for noodles in sauce 3 Frozen Chicken Wings 200 250 g 300 350 g 400 450 g 2 min Put the frozen ready chicken wings or small drumsticks pre cooked and spiced on the metal rack w...

Страница 16: ...ary by pressing the More Less buttons respectively 5 Press Start button Result The food is cooked according to the pre programmed setting selected When cooking has finished the oven will beep and flash 0 four times The oven will then beep one time per minute Button Food Serving Size Standing Time Recommendations 1 Drinks Coffee milk tea water room temperature 150 ml 1 cup 300 ml 2 cups 450 ml 3 cu...

Страница 17: ...Preheat the crusting plate as described above Use oven gloves at all times as the crusting plate will become very hot 2 Brush the plate with oil if you are cooking food such as bacon and eggs in order to brown the food nicely 3 Place the food on the crusting plate Do not place any recipients on the crusting plate that are not heat resistant plastic bowls for example 4 Place the crusting plate on t...

Страница 18: ...on symbol 4 Press the Select button once or more times to set the temperature Refer to the table on the following page for a description of the various pre programmed settings 5 Set the cooking time by turning the dial knob 6 Press the Start button Result Cooking starts When cooking has finished the oven will beep and flash 0 four times The oven will then beep one time per minute Fresh Food Portio...

Страница 19: ... square metal tyar Put sliced apples on top Add almonds slices or crumbles Muffins 500 600 g 12 pcs 180 C 4 180 C 18 21 Fill muffins dough evenly in a metal muffin mould suitable for 12 muffins Set dish on rack Cookies 300 g 30 pcs 180 C 4 160 180 C 12 15 Put cookies evenly on baking paper on square metal tyar Fresh Food Portion Auto Preheat Stage From below Power Time min Instructions Frozen Pizz...

Страница 20: ...food that you are cooking by pressing the Select button 3 Set the weight by turning the dial knob the appropriate number of times 1800 g in the example 4 Press the Hold Delay button 5 Set the standing time by turning the dial knob the appropriate number of times 20 minutes in the example 6 Turn the Cooking Control knob to the Microwave symbol 7 Set the microwave power level by pressing the Select ...

Страница 21: ...n isdisplayed Hold Delay mode 2 Select the standing time by turning the dial knob 3 Press Start button Result The oven beeps when the standing time is over Traditional convection cooking does not require any special cookware You should however use only cookware that you would use in your normal oven Microwave safe cantainers are not usually suitable for convection cooking don t use plastic contain...

Страница 22: ...tter cooking and grilling results if you use the high rack Check that the heating element is in the horizontal position and that the appropriate rack is in position 1 Turn the Cooking Control knob to the Convection symbol Result The following indications are displayed convection mode 250 C temperature 2 Press the Select button once or more times to set the temperature 3 Set the cooking time by tur...

Страница 23: ...eating element to the Then Vertical position spit roasting only FC139STFC FC139STBC FC139STTC FC139STBC Pull down on the heating element Push it towards the back of the oven until it is parallel with the back wall Horizontal position convection cooking and grilling Pull the heating element towards you Push it upwards until it is parallel with the roof of the oven 1 Push the roasting spit through t...

Страница 24: ...food pieces from the skewers The multi is not suitable for cleaning in the dishwasher Therefore clean it with warm water and washing up liquid by hand Remove the vertical multi spit from the oven after use Combining Microwaves and the Grill You can also combine microwave cooking with the grill to cook quickly and brown at the same time ALWAYS use microwave safe and oven proof cookware Glass or cer...

Страница 25: ...rack which should then be placed on the turntable Close the door The heating element must be in the horizontal position If you would like to know the current temperature of the oven cavity press the Language button 1 Turn the Cooking Control knob to the Combi MW Convection symbol Result The following indications are displayed microwave convection combi mode 250 C temperature 2 Select the temperatu...

Страница 26: ... unit Do not press the Turntable on off button during the cooking process Cancel the cooking phase before pressing the turntable On Off button 1 Press the Stop and Select buttons at the same time about one second Result The oven is locked The icon is displayed 2 To unlock the oven press the Stop and Select buttons again at the same time about one second Result The icon is no longer displayed The o...

Страница 27: ...ners Paper bags or newspaper Recycled paper or metal trims Can be used to warm food Overheating may cause the polystyrene to melt May catch fire May cause arcing Glassware Oven to table ware Fine glassware Glass jars Can be used unless decorated with a metal trim Can be used to warm foods or liquids Delicate glass may break or crack if heated suddenly Must remove the lid Suitable for warming only ...

Страница 28: ...e glass pyrex bowl with lid Cook covered for the minimum time see table Continue cooking to get the result you prefer Stir twice during cooking and once after cooking Add salt herbs or butter after cooking Cover during standing time Cooking Guide for rice and pasta Rice Use a large pyrex bowl with lid rice doubles in volume during cooking Cook covered After the cooking time is over stir before sta...

Страница 29: ...ooking time and add extra heating time if necessary Heating and standing times When reheating food for the first time it is helpful to make a note of the time taken for future reference Always make sure that the reheated food is piping hot throughout Allow food to stand for a short time after reheating to let the temperature even out The recommended standing time after reheating is 2 4 minutes unl...

Страница 30: ...inutes Before serving stir well and check the temperature carefully Baby milk 100ml 200ml 300W 30 40sec 1min 10 sec to 1min 20sec 2 3 Stir or shake well and pour into a sterilised glass bottle Place into the centre of turntable Cook uncovered Shake well and stand for at least 2 minutes Before serving shake well and check the temperature carefully Food Portion Power Time min Standing Time min Instr...

Страница 31: ...re quickly Cookware for grilling Should be flameproof and may include metal Do not use any type of plastic cookware as it can melt Food suitable for grilling Chops sausages steaks hamburgers bacon and gammon rashers thin fish portions sandwiches and all kinds of toast with toppings IMPORTANT REMARK Whenever the grill only mode is used make sure that the grill heating element is under the ceiling i...

Страница 32: ... power levels and times in this table as guide lines for grilling Fresh Food Portion Power 1 Side Time min 2 Side Time min Instructions Toast Slices 4 pcs each 25g Grill only 3 4 3 4 Put toast slices side by side on the high rack Grilled Tomatoes 200 g 2 pcs MW Grill 7 8 Cut tomatoes into halves Put some cheese on top Arrange in a circle in a flat glass pyrex dish Place it on the high rack Tomato ...

Страница 33: ... function to the desired temperature Use the power levels and times in this table as guide lines for convection cooking Fresh Food Portion Power 1 Side Time min 2 Side Time min Instructions Bread Rolls ready baked each ca 50 g 4 6 pcs Only convection 180 C 2 4 Put bread rolls in a circle on the low rack Use oven gloves while taking out Stand 2 3 minutes Baguette ready baked 1 pcs 400 g Only convec...

Страница 34: ...n Cycle 160 C Without preheating 7 9 16 18 Put the cake on the low rack After baking stand for 5 15 minutes Baguettes topping e g tomatoes cheese ham etc 250 g 2 pcs Mw Convection Cycle 220 C 12 14 Put frozen baguettes side by side on the high rack After baking stand for 2 3 minutes Pizza 300 400 g 450 550 g Mw Convection Cycle 220 C 18 21 22 25 Place pizza on the high rack After baking stand for ...

Страница 35: ...COOKING PUDDING Mix pudding powder with sugar and milk 500 ml by following the manufacturers instructions and stir well Use a suitable sized glass pyrex bowl with lid Cook covered for 6 to 7 minutes using 900 W Stir several times well during cooking BROWNING ALMOND SLICES Spread 30 g sliced almonds evenly on a medium sized ceramic plate Stir several times during browning for 3 to 4 minutes using 6...

Страница 36: ... wish to store your oven away temporarily choose a dry dust free place Reason Dust and damp may adversely affect the working parts in the oven Technical Specifications SAMSUNG strives to improve its products at all times Both the design specifications and these user instructions are thus subject to change without notice Power source 240V 50 Hz AC Power consumption Maximum power Microwave Grill hea...

Отзывы: