background image

26_


Washing programmes

AT THE END OF THE WASH CYCLE

When the working cycle has finished, the dishwasher buzzer will beep shortly, then stop. In the digital 
display appears “

0

”, only in this case the programme has ended.

1. 

Switch off  the dishwasher by pressing the 

Power

 button.

2. 

Turn off  the water tap!

Open the door carefully. Hot steam may escape when the door is opened!

•  Hot dishes are sensitive to knocks. The dishes should be allowed to cool down around 15 minutes 

before removing from the appliance.

•  Open the dishwasher’s door, leave it and wait a few minutes before removing the dishes. In this 

way they will be cooler and the drying will be improved.

•  The fan always operates to dry inside the dishwasher when you open the door. Close the door 

when the dishwasher is dry.

It is normal that the dishwasher is wet inside.
Empty the lower basket first and then the upper one. This will avoid water dripping from the upper 
basket onto the dishes in the lower one.

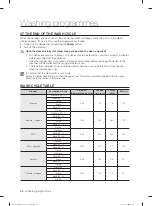
 WASH CYCLE TABLE

Program

Description of Cycle

Detergent 

(Prewash/Main wash) (g)

Running 

time (min)

Energy 

(kWh)

Water (ℓ)

Intensive

Pre Wash (50 °C)

5/30

175

1.6

17.5

Wash (60 °C)

Rinse

Rinse

Rinse (70 °C)

Drying

Int Hygiene

Pre Wash (50 °C)

5/30

200

1.65

17.5

Wash (60 °C)

Rinse

Rinse

Rinse (70 °C)

Drying

ECO *

Pre Wash

5/30

225

0.93

10.5

Wash (50 °C)

Rinse (55 °C)

Drying

ECO + Hygiene

Pre Wash

5/30

235

1.1

10.5

Wash (50 °C)

Rinse (60 °C)

Drying

Delicate

Pre Wash

5/30

130

0.9

13

Wash (40 °C)

Rinse

Rinse (60 °C)

Drying

De Hygiene

Pre Wash

5/30

140

1.0

13

Wash (40 °C)

Rinse

Rinse (65 °C)

Drying

Washing programmes

DW5500M_DD81-02437Q-00_EN.indd   26

DW5500M_DD81-02437Q-00_EN.indd   26

2019-06-25     11:13:26

2019-06-25     11:13:26

Содержание DW60M6070IB

Страница 1: ...M6070 Dishwasher user manual imagine the possibilities Thank you for purchasing this Samsung product DW5500M_DD81 02437Q 00_EN indd 1 DW5500M_DD81 02437Q 00_EN indd 1 2019 06 25 11 12 58 2019 06 25 11 12 58 ...

Страница 2: ...t all warning signs may be applicable If you have any questions or concerns contact your nearest service center or find help and information online at www samsung com IMPORTANT SAFETY SYMBOLS AND PRECAUTIONS Important safety symbols WARNING Hazards or unsafe practices that may result in severe personal injury and or property damage CAUTION Hazards or unsafe practices that may result in personal inj...

Страница 3: ...and understand the hazards involved Children shall not play with the appliance Cleaning and user maintenance shall not be made by children without supervision 3 Children should be supervised to ensure that they do not play with the appliance 4 If the supply cord is damaged it must be replaced by the manufacturer its service agent or similarly qualified persons in order to avoid a hazard 5 The new h...

Страница 4: ...e environments bed and breakfast type environments 10 The door should not be left in the open position since this could present a tripping hazard 11 WARNING Knives and other utensils with sharp points must be loaded in the basket with their points down or placed in a horizontal position 12 WARNING Some dishwasher detergents are strongly alkaline They can be extremely dangerous if swallowed Avoid c...

Страница 5: ...e rinse aid reservoir with powder or liquid detergent This will cause serious damage to the reservoir Inadvertently filling the salt reservoir with powder or liquid dishwasher detergent will damage the water softener Make sure you have picked up the correct packet of dishwasher salt before filling the salt reservoir Please only use special coarse grained dishwasher salt for reactivation as other sal...

Страница 6: ...nsult a doctor immediately if your child has swallowed or inhaled detergent INSTRUCTIONS FOR INSTALLING YOUR DISHWASHER Before setting up the appliance check it for any externally visible damage Under no circumstances should you use a damaged appliance A damaged appliance could be dangerous The dishwasher must only be plugged into the electricity supply via a suitable switched socket The electrica...

Страница 7: ... held liable for unauthorised work The integrated waterproof system offers protection from water damage provided the following conditions are met The dishwasher is correctly installed and plumbed in The dishwasher is properly maintained and parts are replaced where it can be seen that this is necessary The stopcock has been turned off when the appliance is not used for a longer period of time e g ...

Страница 8: ...the manufacturer Never open the casing housing of the appliance Tempering with electrical connections or components and mechanical parts is highly dangerous and can cause operational faults or electric shock While the appliance is under guarantee repairs should only be undertaken by a service technician authorised by the manufacturer Otherwise the guarantee will be invalidated When installing the ...

Страница 9: ...ibly to promote the sustainable reuse of material resources Household users should contact either the retailer where they purchased this product or their local government office for details of where and how they can take these items for environmentally safe recycling Business users should contact their supplier and check the terms and conditions of the purchase contract This product and its electr...

Страница 10: ...he dishwasher WASHING PROGRAMMES 25 25 Turning on the appliance 25 Change the programme 26 At the end of the wash cycle 26 Wash cycle table CLEANING AND CARE 28 28 Cleaning the filters 29 Cleaning the spray arms 29 Cleaning the door 29 Caring for the dishwasher 29 Protect against freezing 30 How to maintain your dishwasher SETTING UP YOUR DISHWASHER 31 31 Water supply and drain 33 Connection of dra...

Страница 11: ...2 7 3 6 1 3rd Rack 2 Upper Basket 3 Lower Basket 4 Duct Nozzle 5 Salt Container 6 Dispenser 7 Cup Shelf 8 Spray arms 9 Filter assembly 10 Inlet hose 11 Drain hose Accessory parts User manual Salt funnel cutlery basket DW5500M_DD81 02437Q 00_EN indd 11 DW5500M_DD81 02437Q 00_EN indd 11 2019 06 25 11 13 10 2019 06 25 11 13 10 ...

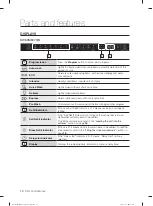
Страница 12: ...in the lower rack When you select Lower place items glasses etc in the lower rack only The dishwasher will not wash items placed in the upper rack Selecting Lower reduces both the cycle time and the amount of electricity consumed 5 Hygiene Select Hygiene button for the best possible hygiene in your dishwasher This function is available with all programs except Auto wash Quick Wash and Pre Wash pro...

Страница 13: ...lays the start of washing by one hour 11 Start To start a cycle press the Start button before closing the door Reset To cancel a currently running cycle and drain the dishwasher press and hold the Start button for three 3 seconds Once the dishwasher is reset select a cycle and option and then press Start to restart the dishwasher You can select options Multi tab Half load Delay start Hygiene befor...

Страница 14: ...ram 2 Refill indicators If Rinse or Salt Refill indicator is lit it means rinse aid or salt needs refilling Salt Refill indicator If the Salt Refill indicator is lit it means the dishwasher is low on dishwasher salt and needs to be refilled To refill the salt reservior refer to the Loading the salt into the softener section on page 16 Rinse Refill indicator If Rinse is lit it means rinse is low and needs ...

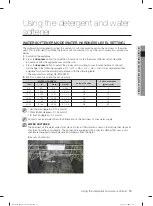
Страница 15: ... with the following table The manufactory setting H3 EN 50242 3 Wait for 5 seconds to end the set up mode WATER HARDNESS Selector Position Salt consumption gram cycle º dH º fH º Clark mmol l 0 5 0 9 0 6 0 0 94 H1 0 6 11 10 20 7 14 1 0 2 0 H2 9 12 17 21 30 15 21 2 1 3 0 H3 12 18 22 31 40 22 28 3 1 4 0 H4 20 23 34 41 60 29 42 4 1 6 0 H5 30 35 55 61 98 43 69 6 1 9 8 H6 60 1 dH German degree 0 178 mm...

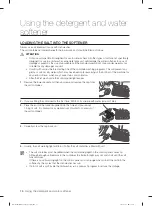
Страница 16: ... the lower basket and then unscrew and remove the cap from the salt container Open Open 2 If you are filling the container for the first time fill 2 3 of its volume with water around 1 liter 3 Place the end of the funnel supplied into the hole and pour about 1 5 kg of salt It is normal for a small amount of water to come out of the salt container 4 Carefully screw the cap back on 5 Usually the salt w...

Страница 17: ...lowed dishwasher detergent or inhaled the fumes seek medical attention immediately WARNING Keep dishwasher detergent out of the reach of children Filling the detergent dispenser 1 Open the detergent dispenser flap by pushing the detergent dispenser release catch The flap is always open at the end of a dishwashing cycle 2 Add the recommended amount of detergent to the main wash detergent compartment ...

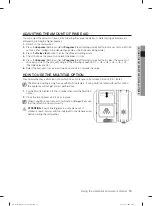
Страница 18: ...shwasher CAUTION Do not add regular detergent to the rinse aid reservoir 1 Remove the rinse aid reservoir cap by lifting up the handle Adding rinse aid to tablet detergents will improve drying performance 2 Fill the rinse aid reservoir with rinse aid Use the viewing port when filling the rinse aid reservoir CAUTION Do not fill the reservoir above the maximum level Excess rinse aid can overflow during...

Страница 19: ...ange in the following sequence d1 d2 d3 d4 d5 d1 The default level is d4 6 Select the amount of rinse aid and wait 5 seconds to complete the setup HOW TO USE THE MULTI TAB OPTION Your dishwasher has a Multi tab option which does not require salt and rinse aid but a 3 In1 tablet The Multi tab setting is only for use with Multi tab tablets If using Multi tab tablet without this option the appliance ...

Страница 20: ... while washing takes place Very small items should not be washed in the dishwasher as they could easily fall out of the racks Removing the dishes To prevent water dripping from the upper basket into the lower basket we recommend that you empty the lower basket first and then the upper basket LOADING THE UPPER BASKET The upper basket is designed to hold more delicate and lighter dishware such as gla...

Страница 21: ...des of the upper basket and push the upper basket downwards slightly at the same time 2 To raise the upper rack just pull the upper basket upwards without operating any levers CAUTION We recommend adjusting the height of the upper basket before loading dishes into the basket If you adjust the the basket after loading the dishes you may damage the dishes To lower position To upper position DW5500M_...

Страница 22: ... water to flow out The bottom rack feature fold down tine rows so that larger or more pots and pans can be loaded 11 11 13 12 10 10 DW60M6070 14 place setting 10 Dessert dishes 11 Dinner plates 12 Soup bowls 13 Oval platter IN Long items serving cutlery salad servers and big knives should be placed on the shelf so that they do not obstruct the rotation of the spray arms FOLDING SPIKES OF LOWER BASK...

Страница 23: ... utensils should be placed in the horizontal position at the front of the upper basket DW60M6070 8 4 3 3 2 2 5 7 2 2 6 6 1 1 1 Soup spoons 5 Dessert spoons 2 Forks 6 Serving spoons 3 Knives 7 Serving forks 4 Teaspoons 8 Gravy ladles WARNING Do not let any item extend through the bottom Always load sharp utensils with the sharp point down DW5500M_DD81 02437Q 00_EN indd 23 DW5500M_DD81 02437Q 00_EN ...

Страница 24: ...the opening downwards so that water cannot collect in the container or a deep base Dishes and items of cutlery must not lie inside one another or cover each other To avoid damage to glasses they must not touch Load large items which are most difficult to clean into the lower rack The upper rack is designed to hold more delicate and lighter dishware such as glasses coffee and tea cups ATTENTION Lon...

Страница 25: ...ispenser must be refilled see the section entitled Filling the detergent dispenser 2 Press Power button or Start button 3 seconds to cancel the programme and turn on it again then you can change the programme to the desired cycle setting If you open the door during a wash cycle the machine will pause The program light will stop blinking and the buzzer will beep every minute unless you close the doo...

Страница 26: ... door Close the door when the dishwasher is dry It is normal that the dishwasher is wet inside Empty the lower basket first and then the upper one This will avoid water dripping from the upper basket onto the dishes in the lower one WASH CYCLE TABLE Program Description of Cycle Detergent Prewash Main wash g Running time min Energy kWh Water ℓ Intensive Pre Wash 50 C 5 30 175 1 6 17 5 Wash 60 C Rins...

Страница 27: ...h 45 C 25 30 0 75 11 Rinse 50 C Rinse 55 C Auto wash Pre Wash 45 C 5 30 150 0 9 1 3 11 15 Auto wash 45 55 C Rinse Rinse 65 C Drying Pre Wash Pre Wash 15 0 02 4 The wash time varies depending on the pressure and temperature of the supplied water Quick Wash Continuous use of the Quick Wash cycle for an extended time is not recommended This may reduce the performance of the water softener DW5500M_DD8...

Страница 28: ...ficiently removes food particles from the wash water allowing it to be recirculated during the cycle For this reason it is a good idea to remove the larger food particles trapped in the filter after each wash cycle by rinsing the semicircular filter and cup under running water To remove the filter assembly turn it in anti clockwise direction and lift the filter assembly up The entire filter assembly sh...

Страница 29: ... for it could damage the door lock and electrical components It is not advised to use the abrasive agent or some paper towel because of the risk of scratching or leaving spots on the stainless steel surface CARING FOR THE DISHWASHER To clean the control panel use a lightly damp cloth then dry thoroughly To clean the exterior use a good appliance polish wax Never use sharp objects scouring pads or ...

Страница 30: ...oduct made specifically for dishwashers When You Go on Holiday When you go on holiday it is recommended that you run a wash cycle with the dishwasher empty and then remove the plug from the socket turn off the water supply and leave the door of the appliance slightly ajar This will help the seals last longer and prevent odours from forming within the appliance Moving the Appliance If the appliance ...

Страница 31: ...is equipped with a cord having an equipment grounding conductor and a grounding plug The plug must be plugged into an appropriate outlet that is installed and grounded in accordance with all local codes and ordinances WARNING Improper connection of the equipment grounding conductor can result in the risk of an electric shock Check with a qualified electrician or service representative if you are in...

Страница 32: ...y into the sink It will be necessary to drain excess water from hoses into a bowl or suitable container that is held outside and lower than the sink Water outlet Connect the water drain hose The drain hose must be correctly fitted to avoid water leaks Ensure that the water inlet hose is not kinked or squashed Extension hose If you need a drain hose extension Use a similar size and quality drain hos...

Страница 33: ...drain hoses that can be positioned either to the right or the left sides to facilitate proper installation Levelling the Appliance Once the appliance is positioned for levelling the height of the dishwasher may be altered via adjustment of the screwing level of the feet In any case the appliance should not be inclined more than 2 START OF DISHWASHER The following should be checked before starting ...

Страница 34: ...h the new dishwasher Replace the existing connections as necessary STEP 1 SELECTING THE BEST LOCATION FOR THE DISHWASHER The installation position of dishwasher should be near the existing inlet and drain hoses and power cord One side of the cabinet sink should be chosen to facilitate the connection of drain hoses of the dishwasher 1 Choose a place near the sink to facilitate the installation of i...

Страница 35: ...se the product may malfunction Use a rated power of 220 240 V 50 Hz Install the product while the power cord is unplugged Use a power outlet with a maximum allowable current of 16 A The maximum current for this dish washer is 11 A When powering the dishwasher ensure that your power supply has An 220 240 V 50 Hz fuse or circuit breaker An individual branch circuit serving your dishwasher After the ...

Страница 36: ...o the cabinet s height B and then determine the height of the custom panel A A 596 mm 596 mm B B C C Min 20 Min 20 A B C 670 800 mm 820 mm 20 150 mm 850 mm 50 180 mm 880 mm 80 210 mm 1 Put the installation template on the back of the custom panel and fix it temporarily using transparent tape Note that the rear of the custom panel will be attached to the dishwasher door 2 Mark 4 points guided on the...

Страница 37: ... insert the Custom panel fixers into the corresponding holes at the door Use a custom panel between 4 10Kg Make sure the skirting board does not interfere with the dishwasher s door fully opening and closing 12 15 DW5500M_DD81 02437Q 00_EN indd 37 DW5500M_DD81 02437Q 00_EN indd 37 2019 06 25 11 13 28 2019 06 25 11 13 28 ...

Страница 38: ...er into position 7 Level the dishwasher The rear food can be adjusted from the front of the dishwasher by turning the Allen screw in the middle of the base of dishwasher use an Allen key To adjust the front feet use a flat screw driver and turn the front feet until the dishwasher is level 8 The dishwasher must be secured in place There are two ways to do this A Normal work surface Put the installat...

Страница 39: ...ce 1 Place a spirit level on door and rack track inside the tub as shown to check that the dishwasher is level 2 Level the dishwasher by adjusting the three levelling legs individually 3 When level the dishwasher please pay attention not to let the dishwasher tip over If the height of the leg is not high enough use extra feet DW5500M_DD81 02437Q 00_EN indd 39 DW5500M_DD81 02437Q 00_EN indd 39 2019...

Страница 40: ... the baskets or something small has dropped into the basket To ensure everything is secured in the dishwasher Motor hums Dishwasher has not been used regularly If you do not use it often remember to set it to fill and pump out every week which will help keep the seal moist Suds in the tub Improper detergent Use only the special dishwasher detergent to avoid suds If this occurs open the dishwasher a...

Страница 41: ...the stains by hand WARNING Wait for 20 minutes after a cycle to allow heating elements cool down before cleaning interior Failing to follow this instruction may result in injury Iron deposits in water can cause an overall film Contact a water softener company to install specialist water filtration system on the water supply White film on inside surface Hard water minerals Clean the interior use speci...

Страница 42: ...d by a power supply issue Try another program before contacting for service INFORMATION CODES When a fault occurs the appliance will display information codes to inform you Codes Meanings Possible Causes 4C Water supply check Faucets is not opened or water intake is restricted or water pressure is too low LC Leakage Some element of dishwasher leaks HC Not reaching required temperature Malfunction ...

Страница 43: ...2100 W Hot water connection Max 60 C Dry type Condensed dry system Wash type Rotating nozzle spray Dimensions Width x Depth x Height 598 x 550 x 815 mm Wash capacity 14 Place Settings Weight Unpacked 44 5 kg PRODUCT DIMENSION 598 1150 815 550 DW60M6070IB DW5500M_DD81 02437Q 00_EN indd 43 DW5500M_DD81 02437Q 00_EN indd 43 2019 06 25 11 13 29 2019 06 25 11 13 29 ...

Страница 44: ...nse aid setting 5 Water softener setting H3 Dosage of the standard detergent pre wash 5 g main wash 30 g For the arrangement of the items refer below figures Upper basket Lower basket Silverware basket 8 4 3 3 2 2 5 7 2 2 6 6 1 1 1 Soup spoons 2 Forks 3 Knives 4 Teaspoons 5 Dessert spoons 6 Serving spoons 7 Serving forks 8 Gravy ladles DW5500M_DD81 02437Q 00_EN indd 44 DW5500M_DD81 02437Q 00_EN ind...

Страница 45: ...0M6070IB Fully built in Yes Built under Free standing Semi built in 1 based on 280 standard cleaning cycles using cold water fill and the consumption of the low power modes Actual energy consumption will depend on how the appliance is used 2 based on 280 standard cleaning cycles Actual water consumption will depend on how the appliance is used 3 Standard programme is the standard cleaning cycle to ...

Страница 46: ...nse aids to the inside of the dishwasher when they are needed 7 Tub Assy An internal case mode of stainless steel that makes up the basic framework of the dishwasher 8 Sump Assy The place inside the dishwasher where water is collected The injected water gathers here after circulation The sump Assy is connected to the circulation motor and drain pump 9 Tub Front Assy An internal case made of stainl...

Страница 47: ...Note DW5500M_DD81 02437Q 00_EN indd 47 DW5500M_DD81 02437Q 00_EN indd 47 2019 06 25 11 13 32 2019 06 25 11 13 32 ...

Страница 48: ...SIT US ONLINE AT UK 0330 SAMSUNG 7267864 www samsung com uk support IRELAND EIRE 0818 717100 www samsung com ie support DD81 02437Q 00 DW5500M_DD81 02437Q 00_EN indd 48 DW5500M_DD81 02437Q 00_EN indd 48 2019 06 25 11 13 32 2019 06 25 11 13 32 ...

Отзывы: