background image

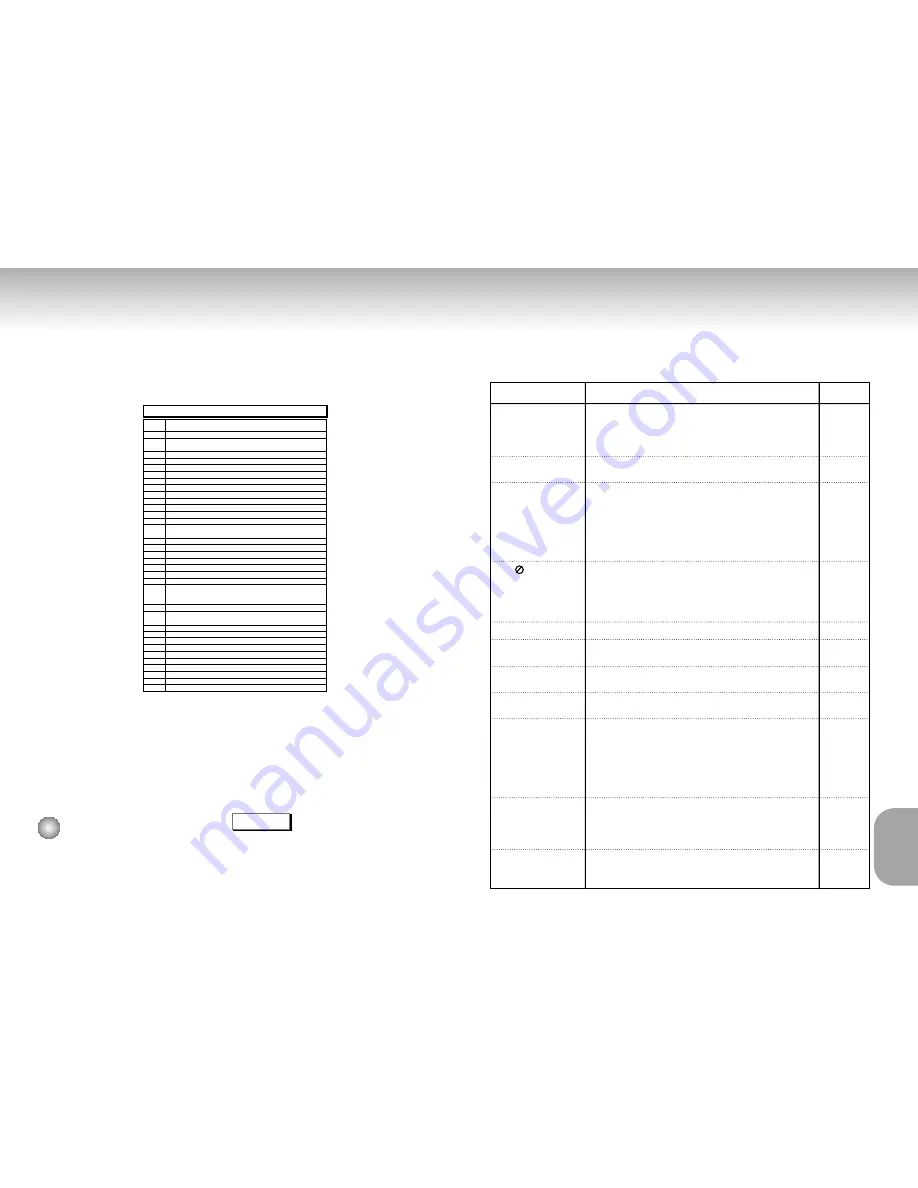
Controlling a TV with the Remote

Troubleshooting

46

47

The remote can also be set up to control most TVs. To program the remote, use the code
that corresponds to your brand.

TV Codes

CODE

BRAND

01
02

03
04

05

06

07

08

09

10

11

12

13

14

15

16

17

18

19

20

21

22

23

24

25

26

27

28

29

30

31

32

33

34

SAMSUNG_4

SAMSUNG_6, LG, LOEWE, PHILIPS, FINLUX, YOKO, LOEWE OPTA,

MITSUBISHI, PHONOLA, RADIOLA, SCHNEIDER

SAMSUNG_1

SAMSUNG_2

SAMSUNG_3

SAMSUNG_5

TOSHIBA

PANASONIC_4

GRUNDIG, BLAUPUNKT, SIEMENS

SHARP

HITACHI

SANYO, AKAI, FISHER

HITACHI, SABA, THOMSON, NORDMENDE

HITACHI, NORDMENDE, SABA, TELEFUNKEN, THOMSON, BRANDT,

FERGUSON, PIONEER, TELEAVA

SONY

TOSHIBA, SANYO, SHARP, SONY, MITSUBISHI

TOSHIBA, GRUNDIG, FINLUX

TOSHIBA

TOSHIBA

PHILIPS, PHONOLA, RADIOLA

TOSHIBA, GRUNDIG, CGE, IMPERIAL, MIVAR

PHILIPS, SABA, BANG&OLUFSEN, BRIONVEGA, FINLUX,

FORMENTI, LOEWE OPTA, METZ, WEGA, PHONOLA, RADIOMARELLI,

SINGER, SINUDYNE

NOKIA, PANASONIC, SABA, PIONEER, REZ, SELECO, SALORA 

HITACHI, NORDMENDE, PANASONIC, SABA, TELEFUNKEN,

THOMSON, CONTINENTAL, EDISON

PANASONIC_2

PANASONIC_3

PANASONIC_6

TELEFUNKEN

MIVAL

LG_2

SHARP_2

JVC

THOMSON ASIA

THOMSON ASIA

1

1

Turn on the TV.

Point the DVD’s remote at the TV.

While holding the TV POWER button down,

enter the code for your brand.

4

4

If the TV turns off, setup is complete.

Enter other codes of the same brand if

the first code does not work.

To operate the TV, use the “TV Function

Buttons” described on page 11.

e.g

For SAMSUNG 4 TVs

While holding down the TV POWER button, 

enter 0 and then 1.

The remote may not be able to control every model 
TV of the brands listed.

NOTE

Before requesting service (troubleshooting), please check the following.

No operations can be
performed with remote.

The screen ratio cannot be
changed.

No audio.

Play mode differs from the
Setup Menu selection.

Disc Menu doesn’t appear.

The      icon appears on
screen.

Forgot password

If you experience other
problems.

If you experience shaky
pictures working play and
step back and forth.

5.1 channel sound is not
being reproduced. 

Disc does not play.

•  Check the batteries in the remote. May need replacing.
•  Operate the remote control at a distance of no more than 20 feet.
•  Remove batteries and hold down one or more buttons for several

minutes to drain the microprocessor inside the remote to reset it.
Reinstall batteries and try remote again.

•  Ensure that the disc is installed with the label side facing up.
•  Check the region number of the DVD.

•  5.1 channel sound is reproduced only when the following conditions

are met. : 

1) The DVD player is connected with the proper amplifier
2) The disc is recorded with 5.1 channel sound.

•  Check whether the disc being played has the “Dolby 5.1 ch” mark on

the outside.

•  Check if your audio system is connected and working properly.
•  In a SETUP Menu, is the Audio Output set to Bitstream?

•  The features or action cannot be completed at this time because:

1. The DVD’s software restricts it.
2. The DVD’s software doesn’t support the feature (e.g., angles).
3. The feature is not available at the moment.
4. You’ve requested a title or chapter number or search time that is

out of range.

•  Check if the disc has a Menu.

•  Some of the functions selected in the Setup Menu may not work

properly if the disc is not encoded with the corresponding function.

•  The Screen Ratio is fixed on your DVDs.

•  Make sure you have selected the correct Digital Output in the Audio 

Options Menu.

•  Press power on from a cold start with no disc in the unit. Press the STOP

and PLAY buttons simultaneously on the front panel for three seconds. The
Select Menu Language display will appear. Select the desired language
button. Press the SETUP button on the remote control to select the Parental
Mode. The Parental Mode is now unlocked as indicated on the display.
Press the DOWN button to select Parental. Press ENTER and the Create
Password display will appear. You can now set your rating level and
change your password to a new number.

•  Go to the contents and find the section of the instruction book that

contains the explanations regarding the current problem, and follow
the procedure once again.

•  If the problem still cannot be solved, please contact your nearest

authorized service center.

•  Push the STOP button and play back again.

Action

Problem

Page

P4

P7

P44

P15

P40~41

P40~45

P45

P44

P43

REFERENCE

REFERENCE

Содержание DVD-S624M

Страница 1: ...A AU U D DVD PLA VD PLAYER YER DVD S624M AK68 00049X ...

Страница 2: ...temperature before use 2 Caution Never open the player or any of its components It can be dangerous for you or certain fragile components You could receive an electric shock or touch the laser beam Do not place your eyes close to the opening of the disc tray or any other opening to look inside the player 3 For your safety Be careful handle your discs with care Hold a disc with finger on the border...

Страница 3: ...h Skip Functions 16 Using the Display Function 17 Repeat Play 18 Program Play Random Play 19 S FIT Play 20 Selecting the Audio Language 21 Selecting the Subtitle Language 22 Changing the Camera Angle 23 Using the Instant Replay Function 24 Using the Bookmark Function 25 Using the Zoom 3D Sound Functions 26 MP3 Play 27 Memory Stick 29 DAM Digital Audio Manager Playback 33 Memory Stick Pull out 34 D...

Страница 4: ...ellectual property rights owned by Macrovision Corporation and other rights owners Use of this copyright protection technology must be authorized by Macrovision Corporation and is intended for home and other limited viewing uses only unless otherwise authorized by Macrovision Corporation Reverse engineering or disassembly is prohibited This DVD player is capable of playing the following types of d...

Страница 5: ...on again the light goes out and the player is turned on 2 HEADPHONES JACK You can attach headphones here for private listening 3 HEADPHONES VOLUME Use to adjust headphones volume level 4 DISC TRAY Load the disc here 5 DISPLAY Operation indicators are displayed here 6 MEMORY STICK 7 OPEN CLOSE Press to open and close the disc tray 8 SCREEN FIT 9 PLAY PAUSE Begin or pause disc play 10 SKIP SEARCH 11...

Страница 6: ...A and B 1 DVD POWER Button 2 I REPLAY Button This function is used to replay the previous 10 seconds of the movie from the current position 3 NUMBER Buttons 4 SETUP Button Brings up the DVD player s Setup menu 5 VOLUME Buttons 6 TV VIDEO Button 7 ZOOM Button 8 S FIT Button 9 STOP Button 10 MENU Button Brings up the Disc menu 11 TOP MENU Button Takes you to the menu on the DVD disc When pressing th...

Страница 7: ...nnection to a TV For Video TV Normal Widescreen Projection etc Method 1 Method 2 Analog Audio Out Digital Audio Out 2ch Amplifier Audio Input Jacks Dolby Digital Decoder Digital Audio Input Jack AUDIO DVD OR Good picture Basic Audio Better picture Best picture Method 1 Method 2 NOTE If Y Pb or Pr is selected S Video will not work If S Video is selected Y Pb or Pr will not work R1 R2 L1 L2 1 ANALOG...

Страница 8: ...n it will pick up where you left off unless the disc is removed the STOP button is pressed twice or the player is unplugged If the player is left for 5 minutes in pause mode it will stop If the player is left in the stop mode for more than 30 minutes the power will automatically shut off Automatic Power Off Function If the player is left in the stop mode for more than one minute without any user i...

Страница 9: ...ns to enter a chapter number then press the ENTER button To enter the time from which you want to start use the UP DOWN buttons to select then use the NUMBER buttons to enter the time Then press the ENTER button Use the LEFT RIGHT buttons to change the values of the current audio subtitle Angle Repeat and 3D To make the screen disappear press the DISPLAY button again 1 1 During play press the DISP...

Страница 10: ...page 27 to MP3 disc repeat Play Depending on the disc the Repeat function may not work If the title or track is completed before marking the end B the end of title or track becomes B automatically When in VCD 2 0 mode MENU ON mode this function does not work NOTE Depending on the disc the Program and Random Play function may not work When in VCD 2 0 mode MENU ON mode these functions do not work To...

Страница 11: ...k bars cannot be eliminated due to their aspect ratio ADV ADVANCED ANCED FUNCTIONS FUNCTIONS You can select a desired language quickly and easily with the AUDIO button Using the AUDIO button 1 1 Press the AUDIO button 2 2 Use the LEFT RIGHT buttons to select the desired language on a DVD The audio languages are represented by abbreviations 3 3 Use the LEFT RIGHT buttons to select Stereo Right or L...

Страница 12: ... encoded on the disc and may not work with all DVDs A DVD disc can contain up to 32 subtitle languages How to have the same subtitle language come up whenever you play a DVD Refer to Setting Up the Language Features on page 42 ENG Off Subtitle A ENG On Subtitle A When a DVD contains multiple angles of a particular scene you can select the Angle function Using the ANGLE button Press the ANGLE butto...

Страница 13: ...IGHT buttons to move to the desired bookmark icon 3 3 When you reach the scene you want to mark press the ENTER button The icon will change to a number 1 2 or 3 4 4 Press the BOOKMARK button to turn off the display Recalling a Marked Scene 1 1 During play press the BOOKMARK button on the remote 2 2 Use the LEFT RIGHT buttons to select a marked scene 3 3 Press the PLAY PAUSE buttons to skip to the ...

Страница 14: ...nals Depending on the disc the Zoom and 3D Sound function may not work When an MP3 Disc is inserted into the DVD PLAYER the first song file of the first Directory plays 1 1 To returned playback of the first song file then press RETURN to display the music files menu on the right side of the screen the music Directory menu on Ieft side of the Screen Up to 10 music Directories can be displayed at a ...

Страница 15: ...Inc and SDMITM registered trade mark of The SDMI Foundation You cannot copy such files Your DVD player only accepts one level of file directory Consequently you must choose either to save all your MP3 recording files at the root of the disc and or create folders in the directory for each artist or music type e g classical rock jazz etc Important The above recommendations cannot be taken as a guara...

Страница 16: ...dio Manager function the recorded data may become corrupted 3 To remove the Memory Stick during operation see page 36 1 Do not format the Memory Stick using your computer If you format the Memory Stick using the computer you cannot use it with Memory Stick compatible devices 2 If you need to format the Memory Stick use a Memory Stick compatible device If formatted all data previously recorded on t...

Страница 17: ...nfiguration 1 1 Press Stop if in play mode 2 2 Press the M STICK button on the remote and the screen to the right will appear 3 3 Insert the Memory Stick encoded with MP3 files into the Memory Stick Slot 4 4 Press the UP DOWN buttons on the remote control to select Digital Audio Manager and then press the ENTER button Your selection is highlighted with yellow borders 5 5 Use the UP DOWN buttons to...

Страница 18: ... control to select DIGITAL PHOTO MANAGER and then press the ENTER button Your selection is highlighted with yellow borders 5 5 JPEG files in the Memory Stick Photo CD will be displayed on the screen in the order of their recording View Photo Album Memory Stick Photo CD Screen Configuration 1 EXIT Takes you to the Start menu 2 SLIDE SHOW Begins the slide show 3 PAGE Highlight the PAGE menu item and...

Страница 19: ...RIGHT buttons to select Slide Show and press ENTER 2 2 Use the LEFT RIGHT buttons to select Set Order and press ENTER 3 3 Use the UP DOWN LEFT RIGHT buttons on the remote control to select the image you want to move and then press the ENTER button Your selection is highlighted with yellow borders 4 4 Use the UP DOWN LEFT RIGHT buttons on the remote control to select the location you want to move t...

Страница 20: ...hoto menu item is highlighted the LEFT RIGHT button move to the next previous images Menu Description 1 1 From the Photo View screen use the UP DOWN LEFT RIGHT buttons to select EDIT and then press the ENTER button The Edit Photo menu appears 2 2 Use the UP DOWN LEFT RIGHT buttons on the remote control to move to the menu item you want and then press the ENTER button If there is no input for 5 sec...

Страница 21: ...ental Audio Display Player Menu Disc Menu Audio Subtitle English English English Automatic Return Enter NOTE Depending on the disc some Setup Menu selections may not work CHANGING CHANGING SETUP MENU SETUP MENU Using the Player Menu Language Using the Disc Menu Language If you set the player menu disc menu audio and subtitle language in advance they will come up automatically every time you watch ...

Страница 22: ...recorded language is selected Howto make the SETUP MENU disappear or return to menu screen during set up Press RETURN button The Parental Control function works in conjunction with DVDs that have been assigned a rating which helps you control the types of DVDs that your family watches There are up to 8 rating levels on a disc 1 1 With the unit in Stop mode press SETUP button 2 2 Use UP DOWN to sel...

Страница 23: ...s the SETUP button 2 2 Use the UP DOWN buttons to select Display Then Then press the ENTER button 3 3 Use the UP DOWN buttons to select the desired item Then press the LEFT RIGHT buttons TV Aspect Depending on the type of television you have you may want to adjust the screen setting aspect ratio 1 Letter Box Select when you want to see the total 16 9 ratio screen DVD supplies even though you have ...

Страница 24: ... in the remote May need replacing Operate the remote control at a distance of no more than 20 feet Remove batteries and hold down one or more buttons for several minutes to drain the microprocessor inside the remote to reset it Reinstall batteries and try remote again Ensure that the disc is installed with the label side facing up Check the region number of the DVD 5 1 channel sound is reproduced ...

Страница 25: ...armonic Distortion AC 240V 50 Hz 16 W 2 8 Kg W 430mm D 240mm H 79mm 5 C to 35 C 10 to 75 Reading Speed 3 49 m sec Approx Play Time Single Sided Single Layer Disc 135 min Reading Speed 1 2 to 1 4 m sec Maximum Play Time 74 min Reading Speed 1 2 to 1 4 m sec Maximum Play Time 20 min Reading Speed 1 2 to 1 4 m sec Maximum Play Time 74 min Video Audio 1 channel 1 0 Vp p 75 Ω load Y 1 0 Vp p 75 Ω load ...

Отзывы: