background image

English 

- 72

R

ecording

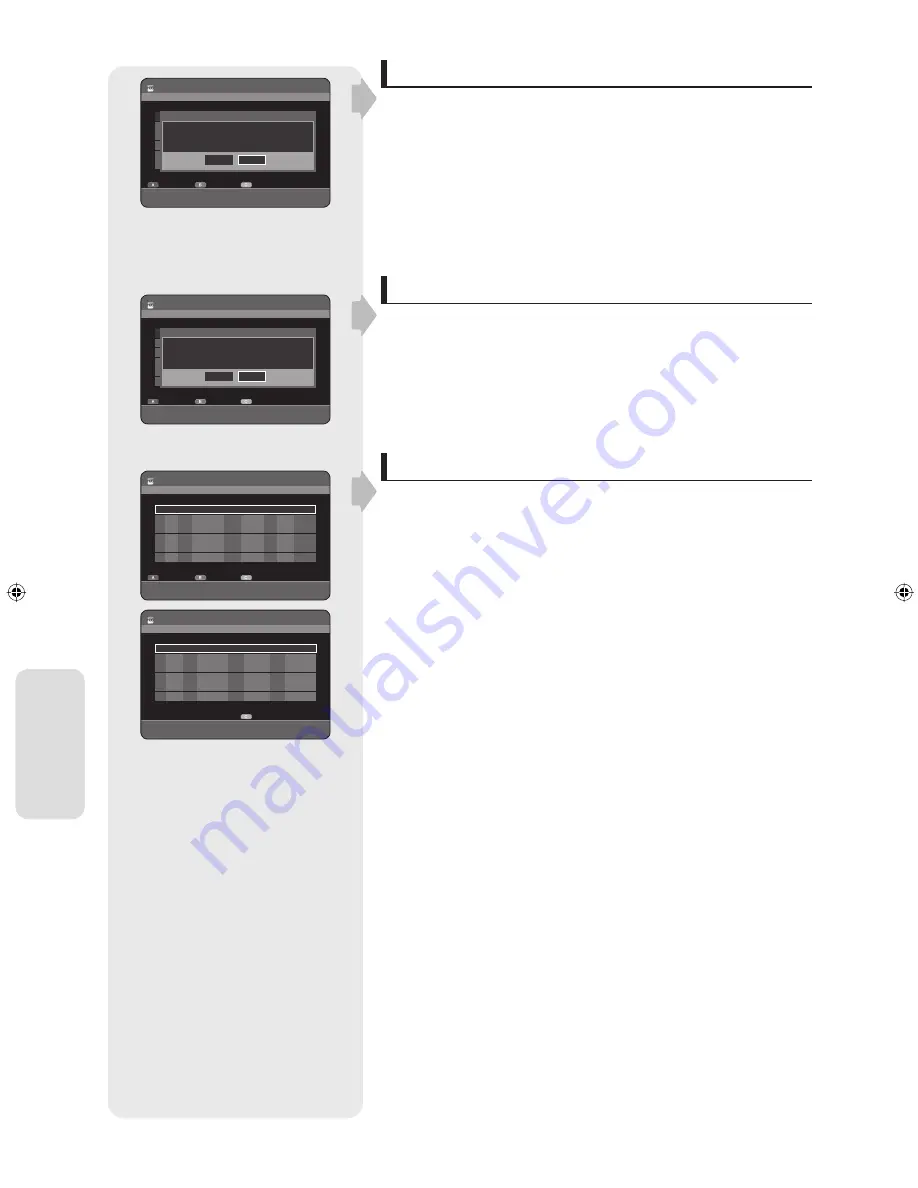
Delete Recorded List

Deletes a Recorded List individually.

3

-1

Press the 

▲▼

 buttons to select the number of the 

Recorded List


you want to delete, and then press the 

RED(A)

 button.

Press the 

◄►

 buttons to select 

Yes

, then press the 

OK

 button.

Clear Recorded List 

Clears all Recorded List at once.

3

-1

Press the 

GREEN(B)

 button.

Press the 

◄►

 buttons to select 

Yes

, then press the 

OK

 button.

Go to Scheduled List

Switches directly from the Recorded List to the Scheduled List.

3

-1

Press the 

YELLOW(C)

 button.

4.

4.

 HDD 

Recorded List

m

MOVE


s

SELECT


r

RETURN


e

EXIT


Delete


Delete All


Scheduled List


No. To Source Date  Start End 

Mode PDC  Status

01 

HDD  PR 01 

JAN 01 

17:30 

18:30 

SP 

On 

OK

02 

HDD  PR 01 

JAN 01 

21:00 

22:00 

SP 

On 

OK

03 

HDD  PR 01 

JAN 01 

23:15 

23:45 

SP 

On 

OK

Do you want to delete?

No. 01


No

Yes

 HDD 

Recorded List

m

MOVE


s

SELECT


r

RETURN


e

EXIT


Delete


Delete All


Scheduled List


No. To Source Date  Start End 

Mode PDC  Status

01 

HDD  PR 01 

JAN 01 

17:30 

18:30 

SP 

On 

OK

02 

HDD  PR 01 

JAN 01 

21:00 

22:00 

SP 

On 

OK

03 

HDD  PR 01 

JAN 01 

23:15 

23:45 

SP 

On 

OK

Do you want to delete a recorded list??

No

Yes

 HDD 

Recorded List

>

MOVE


s

SELECT


r

RETURN


e

EXIT


Delete


Delete All


Scheduled List


No. To Source Date  Start End 

Mode PDC  Status

01 

HDD  PR 01 

JAN 01 

17:30 

18:30 

SP 

On 

OK

02 

HDD  PR 01 

JAN 01 

21:00 

22:00 

SP 

On 

OK

03 

HDD  PR 01 

JAN 01 

23:15 

23:45 

SP 

On 

OK

 HDD 

Scheduled List

Current Time 10:54


s

SELECT


r

RETURN


e

EXIT


Recorded List


No. To Source  Date  Start  End  Mode  PDC

Recordable Time   HDD  105:44 SP

Add a list

01392A_HR750_XEU-ENG-0423.indd   72

01392A_HR750_XEU-ENG-0423.indd   72

2007-04-24     9:33:22

2007-04-24     9:33:22

Содержание DVD-HR750

Страница 1: ...Instruction Manual DVD HR749 DVD HR750 www samsung com uk AK68 01392A English Ελληνικά DVD HR749 DVD HR750 ...

Страница 2: ...f it requires replacing a fuse approved to BS1362 of the same rating must be used Never use the plug with the fuse cover omitted if the cover is detachable If a replacement fuse cover is required it must be of the same colour as the pin face of the plug Replacement covers are available from your dealer If the fitted plug is not suitable for the power points in your house or the cable is not long e...

Страница 3: ... does not operate normally or has been dropped 1 2 3 4 5 6 7 8 9 10 11 12 13 14 Handling Cautions Before connecting other components to this HDD DVD RECORDER be sure to turn them all off Do not move the HDD DVD RECORDER while a disc is being played or the disc may be scratched or broken the HDD DVD RECORDER internal parts may be damaged Do not put a flower vase filled with water or any small metal...

Страница 4: ...o not load warped or cracked discs Disc Storage Be careful not to harm the disc because the data on these discs is highly vulnerable to the environment Do not keep under direct sunlight Keep in a cool ventilated area Store vertically Keep in a clean protection jacket If you move your HDD DVD RECORDER suddenly from a cold place to a warm place condensation may generate on the operating parts and le...

Страница 5: ... is carried out too many times Playback may be impossible in some cases due to the condition of recording This unit can play back DVD R discs recorded and finalised with a Samsung DVD video recorder It may not be able to play some DVD R discs depending on the disc and the condition of the recording DVD RW Disc Playback and Recording Recording and playback can be performed on DVD RW discs in both t...

Страница 6: ...ow Programme protected See page 74 Locking Protecting a Title Disc protected See page 91 Disc Protection DVD RAM RW R discs that are incompatible with the DVD VIDEO format cannot be played with this product For more information on DVD recording compatibility consult your DVD RAM RW R manufacturer Use of poor quality DVD RAM RW R discs may cause following unexpected problems including without limit...

Страница 7: ...ponent it can play only when finalised Some commercial discs and DVD discs purchased outside your region may not be playable with this product When these discs are played either No disc or Please check the regional code of the disc will be displayed If your DVD RAM RW R discs is an illegal copy or is not in DVD video format it may also not be playable Disc compatibility High Speed Recording discs ...

Страница 8: ...Case 2 Connecting to a stereo amplifier with AV output jacks 21 Case 3 Connecting to an AV amplifier with a digital output jack 22 Connecting to AV 3 IN DV input jack 22 Case 1 Connecting a VCR Set Top Box STB DVD player or Camcorder to the AV 3 IN jacks 22 Case 2 Connecting a Camcorder to the DV IN jack 23 System Setup On Screen Menu Navigation 24 Plug Auto Setup 24 Setting the Clock 25 Channel S...

Страница 9: ...Editing Basic Editing Title List 73 Playing the Title 73 Renaming Labeling a Title 73 Locking Protecting a Title 74 Deleting a Title 75 Splitting a Section of a Title Split 76 Deleting a Section of a Title Partial Delete 77 Using the Sort function Title List 78 Navigation Menu 78 Select Contents 79 Advanced Editing Playlist 80 Creating a Playlist 80 Playing Entries in the Playlist 81 Renaming a Pl...

Страница 10: ...up to 8 hours on a 4 7GB DVD RAM RW R disc depending on the recording mode Selectable Recording Mode You can set your HDD DVD RECORDER to one of four different recording speeds each varying in recording quality and length EP 6Hr or 8Hr mode yields the most recording time LP SP modes provide less recording time with higher quality recording XP mode gives you the highest quality recording The dual l...

Страница 11: ... 96 97 1 2 Copyright 2007 Samsung Electronics Co All rights reserved No part or whole of this user s manual may be reproduced or copied without the prior written permission of Samsung Electronics Co How to use the HDD DVD RECORDER Step 1 Select the disc type or HDD Please check available disc type before recording DVD HR749 DVD HR750 If you want to repeatedly record on the same disc or you want to...

Страница 12: ...er s length interval between chapters varies according to the recording mode M Step 5 Editing a recorded disc Editing on discs is easier than conventional video tapes The HDD DVD RECORDER supports many different edit functions possible only with DVDs and HDD With a simple and easy edit menu you can operate various edit functions such as delete copy rename lock etc on a recorded title Creating a pl...

Страница 13: ... If the remote does not operate properly Check the polarity of the batteries Dry Cell Check if the batteries are drained Check if remote sensor is blocked by obstacles Check if there is any fluorescent lighting nearby Dispose of batteries according to local environmental regulations Do not put them in the household trash To determine whether your television is compatible follow the instructions be...

Страница 14: ...NS 71 SINGER 57 SINUDYNE 57 SONY 35 48 TELEAVA 73 TELEFUNKEN 67 73 75 76 THOMSON 72 73 75 THOMSON ASIA 80 81 TOSHIBA 47 48 49 50 51 52 WEGA 57 YOKO 6 ZENITH 63 Result If your television is compatible with the remote control it will switch off It is now programmed to operate with the remote control If several codes are indicated for your television brand try each one in turn until you find one that...

Страница 15: ...V jack such as a camcorder P SCAN button Selects the progressive scan mode DVD button Select DVD mode 1 2 3 4 5 6 7 8 Front Panel HDD button Select HDD mode PROG buttons Select TV preset Channels Same as PROG button on the remote control REC button Starts recording STOP button Stops disc playback PLAY PAUSE button Plays a disc or pauses playback SEARCH SKIP buttons Goes to the next title chapter t...

Страница 16: ...omponent video input AV1 TV OUTPUT SCART connector AV2 EXT INPUT SCART connector In from aerial connector Out to TV connector The Antenna connection does not pass the output signal of the DVD To watch DVD HDD playback your TV you must connect audio video or Scart cables 5 6 7 8 9 10 M Fan The fan always revolves when the power is on Ensure a minimum of 10 cm clear space on all sides of the fan whe...

Страница 17: ...he title list screen or press the COPY button during the playback REC button Use to make a recording on HDD DVD RAM RW R discs MARKER button Use this to bookmark a position while playing a disc HDD button Press this to operate HDD INPUT SEL button Select input signal in external input mode PROG AV1 AV2 AV3 or DV input OPEN CLOSE button To open and close the disc tray TV STANDBY ON button REPEAT A ...

Страница 18: ...oduct sends only signals of TV You must connect SCART cable or Audio Video cables to watch a DVD from your HDD DVD RECORDER TV mode Press the TV DVD button on remote control then TV appear on Front LED display or turn off HDD DVD RECORDER Then you can watch programmes received through TV 1 2 3 4 5 6 M Additional connections You can connect your HDD DVD RECORDER to a satellite or digital tuner 1 2 ...

Страница 19: ...cker free clear image than interlaced video This is only available with TVs that support progressive scan Progressive Scan Output 576P Consumers should note that not all high definition television sets are fully compatible with this product and may cause artifacts to be displayed in the picture in case of 576 progressive scan picture problems It is recommended that the user switch the connection t...

Страница 20: ...between the COMPONENT OUT Y PB PR jacks on HDD DVD RECORDER and COMPONENT IN Y PB PR jacks on your TV You will enjoy high quality and accurate colour reproduction images Connect audio cables white and red between the AUDIO OUT jacks on the HDD DVD RECORDER and AUDIO IN jacks on TV or AV amplifier See pages 21 22 After connecting refer to the pages 33 34 Green Red Blue Green Blue Red Make sure that...

Страница 21: ...AV amplifier with a digital output jack Manufactured under licence from Dolby Laboratories Dolby and the double D symbol are trademarks of Dolby Laboratories DTS and DTS Digital Out are trademarks of DTS Inc Case 1 Connecting to your TV If your TV has audio input jacks use this connection Yellow White Red Red White Yellow Case 2 Connecting to a stereo amplifier with AV output jacks If your stereo ...

Страница 22: ...connect your HDD DVD RECORDER to other external devices and view or record their outputs Case 1 Connecting a VCR Set Top Box STB DVD player or Camcorder to the AV 3 IN jacks Case 2 Connecting a DV Device to the DV IN jack Case 1 Connecting a VCR Set Top Box STB DVD player or Camcorder to the AV 3 IN jacks Connecting a VCR or external device to AV 3 IN jacks of the HDD DVD RECORDER You can record f...

Страница 23: ...onnecting a Camcorder to the DV IN jack If your digital camcorder has a DV output jack connect it to the DV input jack of your HDD DVD RECORDER Camcorder If the input is not selected automatically use INPUT SEL button to select proper input M ...

Страница 24: ...w minutes Your HDD DVD RECORDER will then be ready for use Connect the RF cable as indicated on page 18 Connecting Your HDD DVD RECORDER to the TV Using the RF Cable and scart cable Plug the HDD DVD RECORDER into the mains AUTO in the front panel display flickers Press the OK button to start the auto setup Auto channel scan will be started The number of stations automatically stored by the HDD DVD...

Страница 25: ...e buttons to select Setup then press the OK or button Press the buttons to select Clock Set then press the OK or button Press the buttons to input Month Day Year Hour or Minute Press the number buttons to input clock data directly The day of the week is displayed automatically Press the OK button then the date and time will be saved If you don t press the OK button it will not be saved You must ha...

Страница 26: ...emove You can programme the order of channels With the unit in Stop mode press the MENU button Press the buttons to select Setup then press the OK or button Press the buttons to select Channel Set then press the OK or button Press the buttons to select Manual Setup then press the OK or button Press the buttons to select a PR programme you wish to edit delete or swap then press the COLOUR button Se...

Страница 27: ...tons to select the desired language then press the OK or button If the selected language is not recorded on the disc the original pre recorded language is selected The selected language will only appear if it is supported on the disc Setting up the System Options This function allows you to setup the system setting With the unit in Stop mode press the MENU button Press the buttons to select Setup ...

Страница 28: ...IT button to exit the menu Press the REC button to start recording See page 58 about how to set recording speed The message Do you want to create the chapter menu after this recording is displayed Press the buttons to select OK then press the OK button A new chapter is created according to the selected recording mode A chapter will be about 5 minutes long in XP and SP and about 15 minutes long in ...

Страница 29: ...after recording on at least 70 of the disc The tray will open after the disc has been finalised The above feature is available only when a DVD RW V or DVD R disc is inserted If you insert a new DVD RW disc it will be formatted in V mode after auto initialising If you select off you must initialise see page 57 and finalise the disc manually in the Disc Manager menu see page 94 The length of Recordi...

Страница 30: ...r Digital output setting is equally applied to both Dolby Digital and MPEG 2 audio LPCM sound track is always outputted as PCM It has no relation with Digital Output setting Be sure to select the correct Digital Output or you will hear no sound or a loud noise DTS Off Doesn t output DTS signal Select this when your AV receiver or AV amplifier does not have DTS decoder On Outputs DTS Bitstream via ...

Страница 31: ...ct to the direct DVD recording of a programme Off Both Dual L and Dual R of the multi audio broadcasting are recorded on HDD Titles recorded on HDD under such setup status cannot be copied to DVD R or DVD RW V mode On Either Dual L or Dual R of the multi audio broadcasting is recorded on HDD Titles recorded on HDD under such setup status can be copied to DVD R or DVD RW V mode Dual L and Dual R op...

Страница 32: ...es even though you have a TV with a 4 3 ratio screen Black bars will appear at the top and bottom of the screen 4 3 Pan Scan Select this for conventional size TV when you want to see the central portion of the 16 9 screen Extreme left and right side of movie picture will be cut off 16 9 Wide You can view the full 16 9 picture on your wide screen TV 3D Noise Reduction motion adaptive noise reductio...

Страница 33: ...osite Video out S Video out Progressive scan If your TV supports Progressive Scan press the P SCAN button on the front of the HDD DVD RECORDER To view Progressive scan mode first connect the component cable See page 20 Be sure the Component cables are connected properly Setting up the Progressive scan With the unit in Stop mode press the P SCAN button on the front of the HDD DVD RECORDER The messa...

Страница 34: ...e press No will appear Press the buttons to select Yes and then press the OK button Set your TV to Interlace input using the TV remote control Do not press the P SCAN button if you are using a TV that does not support Progressive mode as nothing will be displayed on the screen If you press the P SCAN button by mistake when your TV does not support Progressive mode the mode will then need to be rel...

Страница 35: ...ect Rating Level then press the OK or button Press the buttons to select the rating level you want then press the OK or button For example if you select up to Level 6 discs that contain Level 7 8 will not play A larger number indicates that the programme is intended for adult use only Changing the Password Press the buttons to select Change Password then press the OK or button Enter the 4 digit pa...

Страница 36: ... Extended DVD R AUDIO VIDEO Single Layer 12cm 4 7GB 1 hr XP Excellent Quality 2 hrs SP Standard Quality 4 hrs LP Long Playback 6 or 8 hrs EP Extended Dual Layer 12cm 8 5GB 1hr 50min XP ExcellentQuality 3hrs 40min SP StandardQuality 7hrs 20min LP LongPlayback 11or14hrs 40min EP Extended CD R RW DVD RAM RW R JPEG MP3 DivX HDD DVD HR749 DVD HR750 AUDIO VIDEO Approx 41 XP Excellent Quality Approx 67 S...

Страница 37: ... R discs may not be able to play on some DVD players depending on the player disc and the condition of the recording Discs with NTSC programmes recorded on them cannot be played and recorded using this product Playing a Disc Press the OPEN CLOSE button Place a disc gently into the tray with the disc s label facing up Press the OPEN CLOSE button to close the disc tray Your HDD DVD RECORDER closes t...

Страница 38: ...ecial functions for title chapter audio track subtitle film preview information on characters etc For DVD VIDEO Disc Z Disc Menu Press the DISC MENU button to enter the disc menu of the disc Move to the setup menu related to playback operation You can select audio language and subtitle etc provided by the disc Title Menu Press the TITLE MENU button to move to the title menu of the disc Press this ...

Страница 39: ...d playback press the PLAY button No sound is heard during Scan Search mode except with CDs CD DA You can hear sound during forward search X 2 in disc The speed marked in this function may be different from the actual playback speed Skipping Chapters Titles or Markers SXCVB During play press the SKIP buttons on the remote control If you press the SKIP button it moves to the beginning of the chapter...

Страница 40: ...operation will resume The speed marked in this function may be different from the actual playback speed Slow motion operates only in the forward direction on DivX discs Step Motion Play SZXCVD Press the SKIP buttons on the remote control in the pause mode Each time the button is pressed a new frame will appear When the SKIP button is pressed the previous frame will be activated When the SKIP butto...

Страница 41: ...k for some discs When an audio CD CD DA or an MP3 JPEG disc is inserted depending on the disc type the information display may not appear The Time Search function does not operate in some discs To make the screen disappear press the RETURN button Selecting the Subtitle Language ZD Selects one of the subtitle language recorded on the disc You can also operate this function by pressing the SUBTITLE ...

Страница 42: ...select the audio language for the disc menu only Changing the Camera Angle Z When a DVD VIDEO contains multiple angles of a particular scene you can select the Angle function Press the INFO button during playback Press the buttons to select Angle Press the buttons to select the desired angle This function is disc dependent and may not work on all DVDs This function does not work when a DVD has not...

Страница 43: ... the remote control Press the INFO button during playback Press the buttons to select Repeat Press the buttons to select A B then press the OK button Press the OK button at the point where you want the repeat play to start A and press it again at the point where you want the repeat play to stop B Repeat playback of the A B section starts If you set point B before five seconds of playback has lapse...

Страница 44: ...ss the OK button The screen will be enlarged to twice the normal size The screen size will be enlarged to four times the normal size HDD DVD VIDEO DVD RAM RW R normal size X2 X4 X2 normal size When the recording is done in EP mode the zoom function is not supported except when the recording has been in V mode 1 2 3 4 M HDD Info t O Q P v Search Subtitle Audio Repeat Zoom None 2 D 2 0 L R Off Off C...

Страница 45: ...ted only playback is available Playing back a marker Press the MARKER button during playback Press the buttons to select a marked scene Press the OK or PLAY button to start playing from the selected scene If you press the SKIP button it moves to the beginning of the marker Pressing the button once again within 3 seconds returns to the beginning of the previous marker If you press the SKIP button i...

Страница 46: ...s memorized Repeat above to bookmark other positions You can bookmark up to 10 scenes When the disc tray is opened and then closed bookmarks will disappear Playing back a bookmark Press the MARKER button during playback Press the buttons to select a bookmarked scene Press the OK or PLAY button to start playing from the selected scene Clearing a bookmark Press the MARKER button during playback Pres...

Страница 47: ...D CD DA Insert an audio CD CD DA into the disc tray The audio CD menu appears and the tracks songs are played automatically Press the buttons to select the track song you want to hear and then press the OK button Audio CD CD DA Screen Elements Current track song Displays the number of the track currently being played Displays available buttons and a playback time corresponding to a portion that is...

Страница 48: ...e REPEAT button repeatedly to select the repeat mode you want Press the YELLOW C button during the Music List playback Press the buttons to select desired play mode then press the OK or button Normal CD CD DA MP3 Tracks on a disc are played in the order in which they were recorded on the disc Repeat Track CD CD DA MP3 Repeat Folder MP3 Repeat All CD CD DA MP3 Random CD CD DA MP3 The random option ...

Страница 49: ...automatically 1 2 3 4 1 2 3 CD Music List Q TRACK01 1 10 PREVIOUS NEXT PAGE eEXIT No Title Length Q TRACK01 4 19 002 TRACK02 3 57 003 TRACK03 3 57 004 TRACK04 4 03 005 TRACK05 4 09 006 TRACK06 5 08 007 TRACK07 3 31 Edit Play Mode I TRACK01 00 02 22 New Playlist Go To Playlist CD Make Playlist mMOVE sADD rRETURN eEXIT No Title 001 TRACK01 002 TRACK02 003 TRACK03 004 TRACK04 005 TRACK05 006 TRACK06 ...

Страница 50: ...K04 4 03 005 TRACK05 4 09 006 TRACK06 5 08 007 TRACK07 3 31 Edit Play Mode I TRACK01 00 02 22 New Playlist Go To Playlist CD Playlist Q TRACK04 U 1 4 eEXIT No Title Length Y PLAYLIST01 R TRACK04 4 03 002 TRACK02 3 57 003 TRACK06 5 08 004 TRACK01 4 19 Edit Playlist New Playlist Music List I TRACK04 k PLAYLIST01 00 02 22 CD Music List Q TRACK01 1 10 PREVIOUS NEXT PAGE eEXIT No Title Length Q TRACK01...

Страница 51: ...tents you want to move then Press the OK or button This function is possible only when the disc contains the selected contents Audio CD CD DA is not available 1 2 M 1 2 M CD Music List Q Song 10 mp3 1 10 PREVIOUS NEXT PAGE a CHECK eEXIT No Title Size Y ROOT Q Song 10 mp3 3 8MB 002 Song 1 mp3 5 8MB 003 Song 2 mp3 5 1MB 004 Song 3 mp3 9 2MB 005 Song 4 mp3 5 2MB 006 Song 5 mp3 10 3MB Edit Sort Play M...

Страница 52: ...A button to select Speed Press the buttons to select the slideshow speed then press the OK or button The slideshow starts and plays at the selected speed You can go to Photo List by pressing YELLOW C button To stop the Slide Show Press the GREEN B STOP or RETURN button Rotate To setup follow steps 1 to 4 5 1 Press the GREEN B button to select Rotate Press the buttons to select the rotate angle the...

Страница 53: ... the OK or button Name In alphabetical order Size In order of photo file size You can sort by Name Size Sorted list will be resorted in copied order upon reentering Photo List Select Contents To setup follow steps 1 to 3 in page 52 Press the BLUE D button to select Contents Press the buttons to select the contents you want to move then Press the OK or button This function is possible only when the...

Страница 54: ...e Pause press the SEARCH button on the remote control 1 2 1 4 1 8 Reverse Slow Motion Play is not available Step Motion Play In pause mode Pause press the SKIP button on the remote control in the still mode Reverse Step Motion Play is not available This unit can play the following video compression formats DivX Video Codec Format DivX 3 11 DivX 4 x DivX 5 x without QPEL and GMC DivX Audio Codec Fo...

Страница 55: ...he GREEN B button to select Sort Press the buttons to select the desired item then press the OK or button Name In alphabetical order Size In order of DivX file size You can sort by Name Size Sorted list will be resorted in copied order upon reentering DivX List Select Contents Press the BLUE D button to select Contents Press the buttons to select the contents you want to move then Press the OK or ...

Страница 56: ...rdable DVD RW VR Mode Samsung finalised Not recordable not finalised Recordable Other Company finalised Not recordable not finalised Recordable V Mode Samsung finalised Not recordable not finalised Recordable Other Company finalised Not recordable not finalised Not recordable DVD R V Mode Samsung finalised Not recordable not finalised Recordable Other Company finalised Not recordable not finalised...

Страница 57: ...R Formatting disc is unnecessary and only V Mode Recording is supported DVD RAM RW VR mode This mode allows multiple editing functions such as deletion of the whole title partial deletion of a title etc Various editing options using a created Playlist DVD RW V mode R Chapters will be created automatically when you finalise recording on DVD RW R discs in V mode The chapter s length interval between...

Страница 58: ...HR749 DVD HR750 Recording Mode Recording Times HDD 160GB DVD RAM RW R XP high quality mode Approx 41 hours Approx 1 hour about 8 5 Mbps SP standard quality mode Approx 67 hours Approx 2 hours about 4 5 Mbps LP long recording mode Approx 133 hours Approx 4 hours about 2 Mbps EP extended mode Approx 199 hours Approx 264 hours Approx 6 hours about 1 6 Mbps Approx 8 hours about 1 2 Mbps FR Flexible Re...

Страница 59: ...ith CPRM VR mode V mode O O O DVD R O DVD RAM Ver 2 0 O O Once Copy Once has been recorded recording cannot be done anymore Content Protection for Recordable Media CPRM CPRM is a mechanism that ties a recording to the media on which it is recorded It is supported by some HDD DVD RECORDERs but not by many DVD players Each blank recordable DVD has a unique 64 bit media ID etched in the BCA When prot...

Страница 60: ...REC MODE button and then press the buttons to select the recording speed quality SP LP EP XP Press the REC button Information concerning the channel is displayed on the screen then recording begins Icon is displayed on the front panel Recording from external equipment you are watching Press the INPUT SEL button to select the input source according to the connection you made The front panel display...

Страница 61: ... RAM RW R discs the message Updating the information of disc Please wait for a moment is displayed You can not change the recording mode while recording Recording will stop automatically if there is no free space left for recording Up to 99 titles can be recorded onto a DVD RAM RW R disc Up to 999 titles can be registered on the HDD HDD recording is available for up to 24 hours and when recording ...

Страница 62: ...V If the input is set to DV a playback record menu that enables camcorder control appears on the top of the screen Select the Play icon on the upper part of the screen to playback the camcorder and find the starting position to copy To start recording use the buttons to select Record icon in the top side of the screen then press the OK button You can press the REC button of the remote control to s...

Страница 63: ... the programme to record If you want to record through a connected external component press the INPUT SEL button to select an appropriate external input AV1 AV2 AV3 DV or PR01 Press the REC button to start recording Press the REC button repeatedly to adjust the desired recording time 0 30 1 00 8 00 Off The timer counter decreases by the minute from 8 00 to 0 00 then the HDD DVD RECORDER stops reco...

Страница 64: ...ox 10 seconds or more after recording starts Press the SKIP buttons to select the recording title list Press the OK or PLAY button It plays back the title that you are currently recording from the beginning N Using the MENU button With the unit in recording mode press the MENU button Press the buttons to select Title then press the OK button Title List screen is displayed Press the SKIP buttons to...

Страница 65: ... programme press the PLAY PAUSE button The programme on TV is set in pause mode and the Time Shift Bar is displayed Press the PLAY PAUSE button again to resume watching the programme Time Shift Screen Elements Displays the current media Displays the current status Watching Point Current play time Live Point Live Time Time Shift Time Bar Buttons on the Remote Control used for Time Shift function PL...

Страница 66: ...cording Select when you want to set video quality automatically In FR mode the most suitable record mode is adjusted automatically according to remaining time on the disc and length of the timer recording This function is selected only one mode in XP SP LP and EP modes XP high quality Select when video quality is important SP standard quality Select to record in standard quality LP low quality Sel...

Страница 67: ...ing a Title on page 73 After selecting the set up value for each mode press the OK button to select Save will appear on the front panel It means that a timer recording is registered If the timer settings overlap The programmes are recorded in order of priority After recording of the first programme is complete the second programme starts being recorded To exit without saving the current setting Pr...

Страница 68: ...us Scheduled List Video Plus Extended Off Recorded List mMOVE sSELECT rRETURN eEXIT HDD Scheduled List Current Time 10 54 MOVE sSELECT rRETURN eEXIT Add Delete Recorded List No To Source Date Start End Mode PDC Recordable Time HDD 108 14 SP 01 HDD PR 01 JAN 01 17 30 18 30 SP On 02 HDD PR 01 JAN 01 21 00 22 00 SP On 03 HDD PR 01 JAN 01 23 15 23 45 SP On HDD Scheduled List Current Time 10 54 MOVE sS...

Страница 69: ...Start End Mode PDC Recordable Time HDD 108 14 SP 01 HDD PR 01 JAN 01 17 30 18 30 SP On 02 HDD PR 01 JAN 01 21 00 22 00 SP On 03 HDD PR 01 JAN 01 23 15 23 45 SP On Deleting a Scheduled List SXCV Follow these directions to delete an entry from the Scheduled List N Using the TIMER button With the unit in Stop mode Playback mode press the TIMER button Press the OK or button to select Scheduled List Pr...

Страница 70: ...anually by pressing the buttons Press the RED A button if you do not want to use the default title name The rename screen is displayed Follow steps 4 and 5 of Renaming Labeling a Title on page 73 If the programme and times are correct press the OK button Turn the power off by pressing the STANDBY ON button to activate the timer recording setting Refer to pages 69 71 if you want to Check whether th...

Страница 71: ...K or button Press the EXIT button after finishing the operation The Recorded List screen will disappear Information about Recorded List Informs whether the selected Recorded List performed a Timer Recording successfully 3 1 Press the buttons to select the number of the Recorded List then press the OK button 1 2 3 4 5 1 2 3 HDD DVD RECORDER Timer Record HDD Library Timer Record Disc Manager Setup V...

Страница 72: ... PR 01 JAN 01 17 30 18 30 SP On OK 02 HDD PR 01 JAN 01 21 00 22 00 SP On OK 03 HDD PR 01 JAN 01 23 15 23 45 SP On OK Do you want to delete No 01 No Yes HDD Recorded List mMOVE sSELECT rRETURN eEXIT Delete Delete All Scheduled List No To Source Date Start End Mode PDC Status 01 HDD PR 01 JAN 01 17 30 18 30 SP On OK 02 HDD PR 01 JAN 01 21 00 22 00 SP On OK 03 HDD PR 01 JAN 01 23 15 23 45 SP On OK Do...

Страница 73: ...unctions of editing and explains both edit functions for the recording on a disc and edit functions for the entire disc Recording or editing might not be completed if an error such as a sudden power failure occurs Please be aware that a material that has been damaged is unable to be retrieved to its original content HDD Title List JAN 01 2007 17 30 PR1 1 3 a CHECK eEXIT No Title Length 001 JAN 01 ...

Страница 74: ... OK or button Press the buttons to select On then press the OK button The key icon on the information window for the selected entry changes to the locked status 1 0 If you want to cancel the Protection select Off in step 5 and press the OK button The key icon changes to the unlocked status 0 1 If you select Select All in the Edit menu all title will be checked 4 5 1 2 3 4 5 6 M HDD Title List JAN ...

Страница 75: ...ntry select Off in the Title Protection menu See page 74 When the Disc Protection has been set to Protected you cannot delete titles See page 91 Once an entry is deleted from the Title List it cannot be recovered Once DVD RW R is finalised it cannot be deleted With DVD R titles are only deleted from the menu however the Title remains physically on the disc If you select Select All in the Edit menu...

Страница 76: ...CT rRETURN eEXIT Title List No 001 PLAY PAUSE SCAN Split 1 Split 2 00 00 00 00 00 00 00 00 01 Split Select Return HDD Split JAN 01 2007 17 30 PR1 MOVE sSELECT rRETURN eEXIT Title List No 001 PLAY PAUSE SCAN Split 1 Split 2 00 00 00 00 00 20 00 00 20 Split Select Return HDD Split JAN 01 2007 17 30 PR1 MOVE sSELECT rRETURN eEXIT Title List No 001 PLAY PAUSE SCAN Split 1 Split 2 00 00 00 00 30 55 00 ...

Страница 77: ... The length of the section to be deleted must be at least 5 seconds long End point cannot be marked earlier than start point The section cannot be deleted when it includes a still picture Press the EXIT button after the operation has finished The Title List screen will disappear 1 2 3 4 5 6 7 8 M HDD Partial Delete JAN 01 2007 17 30 PR1 MOVE sSELECT rRETURN eEXIT Title List No 001 PLAY PAUSE SCAN ...

Страница 78: ... or button Press the buttons to skip one minute at a time and search the desired scene then press the OK or PLAY button Cursor does not move if the selected recorded title is shorter than 1 minute The Navigation function may not work on a disc that has not been recorded by this device An edited title may not display the exact search time 1 2 M 1 2 3 4 M HDD Time Navigation 3JAN 01 2007 17 30 PR1 1...

Страница 79: ...disc contains the selected contents 1 2 3 4 M 1 2 M HDD Scene Navigation JAN 01 2007 17 30 PR1 Scene No 1 3 sPLAY eEXIT 01 00 00 05 02 00 00 35 03 00 01 05 HDD Title List JAN 01 2007 17 30 PR1 1 3 a CHECK eEXIT No Title Length 001 JAN 01 2007 17 30 PR 01 00 00 002 JAN 02 2007 21 00 PR 01 00 00 003 JAN 03 2007 23 15 PR 00 30 00 Edit Sort Go to Contents 3 4 1 MPEG2 JAN 01 2007 17 30 SP V Mode Compat...

Страница 80: ...playlist You can check and see all the scenes on the Edit playlist screen See page 82 To make a new playlist Repeat steps 1 6 if you want to make a new playlist Press the button to select Return then press the OK button to finish the operation You can create up to 99 playlist entries Depending on the kind of disc the displayed screen may have a slight difference 1 2 3 4 5 6 7 M HDD Make Playlist N...

Страница 81: ... the cursor backwards by one position Space GREEN B button Enters a blank and moves the cursor one forward to the right Clear YELLOW C button Deletes all the character inputs Save BLUE D button Registers the character inputs Press the BLUE D button to select Save The changed title is displayed in the title field of the selected playlist entry 1 2 3 1 2 3 4 5 HDD Playlist JAN 02 2007 13 47 1 3 a CH...

Страница 82: ... window Select the starting or ending point of the section you want to modify using the playback related buttons PLAY SEARCH SKIP 1 2 3 4 5 HDD Edit Playlist JAN 02 2007 13 47 Scene No 1 6 sPLAY eEXIT Modify Move Add Delete 05 0 00 09 06 00 01 06 07 00 00 00 01 00 02 24 02 0 00 34 03 00 00 31 04 0 01 22 HDD Edit Playlist JAN 02 2007 13 47 Scene No 1 6 sPLAY eEXIT Modify Move Add Delete 05 0 00 09 ...

Страница 83: ... ending point of the section you want to modify using the playback related buttons PLAY SEARCH SKIP Press the OK button at the end point of the scene The image and end point time are displayed in the End window To cancel press the buttons to select Return then press the OK button Press the buttons to select Add then press the OK button The section you want to add is inserted prior to the scene sel...

Страница 84: ...he Playlist screen after the delete operation has finished If you select Select All in the Edit menu all title will be checked 5 1 2 3 4 5 M HDD Edit Playlist JAN 02 2007 13 47 Scene No 1 6 sPLAY eEXIT Modify Move Add Delete 05 0 00 09 06 00 01 06 07 00 00 00 01 00 02 24 02 0 00 34 03 00 00 31 04 0 01 22 HDD Edit Playlist JAN 02 2007 13 47 Scene No 1 6 MOVE sSELECT rRETURN eEXIT Modify Move Add De...

Страница 85: ...ed Video Title Supported Copy Protected Title Not supported Copy Once Title Move Deletes the Title in the HDD after copying The Copy is possible only with CPRM Compatible disc Once Copy Once programme has been recorded on the DVD disc this title cannot be copied to HDD anymore But Copy Once programme has been recorded on the HDD this title can be copied to DVD RW VR mode or DVD RAM N Using the TIT...

Страница 86: ... it until a checkmark disappears Press the RED A button to select Start Copy The title to be copied is not displayed on the screen and copying begins while the currently broadcasting programme is displayed on the screen Press the INFO button to change the copy processing bar If you press INFO button again copy processing bar will be appeared To cancel the copying in progress press the RED A button...

Страница 87: ... the copy processing bar If you press INFO button again copy processing bar will be appeared To cancel the copying in progress press the RED A button After a successful copy The title is successfully copied message is displayed You cannot copy anything else on finalised DVD R and DVD RW V mode mode You cannot copy a DVD VIDEO to HDD Contents Copy Specifications Contents DVD HDD Recorded Video Titl...

Страница 88: ... folder you want to copy then press the MARKER button until a checkmark appears If you don t want to copy a certain one of the checked folders simply select that entry and press MARKER button to deselect it until a checkmark disappears 1 2 3 4 5 6 7 8 9 1 2 3 4 5 CD Copy Selected Items 76 8MB 2 Avallable 236715MB a CHECK eEXIT Start Copy Sort Select All Unselect All 9 MP3 8 40 2MB E HDD To Source ...

Страница 89: ...ally renamed to 01 mp3 01 jpg and copied It allows up to 999 copies to have the same name You cannot copy an Audio CD File size on a disc and the copied file in the HDD may be slightly different due to the file system If you check some entries in the current folder and move to open a different folder those entries are automatically unchecked and excluded from the selection list Contents Copy Speci...

Страница 90: ...isters the character inputs Press the BLUE D button to select Save The changed file name is displayed on the selected entry 1 2 3 4 HDD Music List Q Song 1 mp3 PREVIOUS NEXT PAGE a CHECK eEXIT No Title Size Y ROOT 001 Song 1 mp3 3 8 MB 002 Song 2 mp3 3 8 MB 003 Song 3 mp3 5 1 MB 004 Song 4 mp3 9 2 MB 005 Song 5 mp3 5 2 MB 006 Song 6 mp3 10 3 MB Edit Sort Play Mode Contents 9 Song 1 mp3 E ROOT 00 0...

Страница 91: ... the buttons to select Disc Manager then press the OK or button Press the buttons to select Protection then press the OK button Press the buttons to select On then press the OK button 1 2 3 4 5 M 1 2 3 4 DVD RAM VR Disc Manager MOVE sSELECT rRETURN eEXIT Disc Name DVD VR Used Space 00 17 0 52 GB Available Space 01 54 SP 3 85 GB Disc Protection Info Not Protected Current Rec Mode VR Mode Rename Pro...

Страница 92: ...e If there is a title containing a still picture however that function will not operate If you want to delete a protected entry disable Protect for it on the Lock item Press the buttons to select the Title DivX Music or Photo then press the OK button Press the buttons to select Yes then press the OK button All title lists DivX lists music lists or photo lists are deleted 1 2 3 4 1 2 3 4 5 Title HD...

Страница 93: ... will be prompted with the confirmation message All data will be deleted Do you want to continue Press the buttons to select Yes then press the OK button The disc is formatted DVD VR and DVD V are defined according to their recording format DVD VR DVD V DISC DVD RAM RW DVD RW DVD R 1 2 3 4 DVD RW VR Disc Manager MOVE sSELECT rRETURN eEXIT Disc Name DVD VR Used Space 00 17 0 52 GB Available Space 0...

Страница 94: ... screen may be different Finalising time may be different depending on the amount of data recorded on the disc Data on the disc will be damaged if the recorder is powered off during finalisation process You can finalise the disc automatically using EZ Record See page 29 1 2 3 4 5 M DVD RW VR Disc Manager mMOVE sSELECT rRETURN eEXIT Disc Name DVD VR Used Space 00 17 0 52 GB Available Space 01 54 SP...

Страница 95: ...alise Mark DVD Video RW DVD RW V Operation Same as DVD Video Additional recording protection and deletion are possible A DVD RW can be finalised or unfinalised in VR mode Finalise Unfinalise Mark DVD RW VR F DVD RW VR Operation Additional recording deletion editing and protection are impossible Additional recording deletion editing and protection are possible 1 2 3 4 5 M DVD RW VR F Disc Manager M...

Страница 96: ...nnot use this operation or function due to one of the following reasons 1 Your DVD disc restricts it 2 Your DVD disc does not support this feature for example angles 3 The feature is not available at the moment 4 You ve requested a title chapter or scan time that is out of range Play mode settings are different from the settings configured in the Settings menu Checkpoint 1 The disc does not suppor...

Страница 97: ...work properly Checkpoint 1 Re check the recording time and the end time settings again Checkpoint 2 Recording will be cancelled if the power is interrupted due to a power failure or another similar reason while recording Remote Control Unit The remote control doesn t work Checkpoint 1 Point the remote control at the remote control sensor on your HDD DVD RECORDER Allow for proper distance Remove ob...

Страница 98: ...ial digital audio output Video Composite Video Video output jack x 1 S Video output x 1 Y 1 0Vp p C 0 286Vp p at 75Ω load Component output x 1 Y 1 0Vp p Pb 0 70Vp p Pr 0 70Vp p at 75Ω load Scart Jack AV1 Scart TV Video Composite RGB Audio analogue Recording Picture Compression format MPEG II Audio Compression format Dolby Digital 2ch 256Kbps MPEG II Recording Quality XP about 8 5 Mbps SP about 4 5...

Страница 99: ... products caused by such repair work will not be covered by this warranty 4 This product is not considered to be defective in materials nor workmanship by reason that it requires adaptation in order to conform to national or local technical or safety standards in force in any Country other than the one for which the product was originally designed and manufactured This warranty will not cover and ...

Страница 100: ...Contact SAMSUNG WORLD WIDE If you have any questions or comments relating to Samsung products please contact the SAMSUNG customer care centre Region Country Customer Care Centre Web Site ...

Страница 101: ...ealth from uncontrolled waste disposal please separate this from other types of wastes and recycle it responsibly to promote the sustainable reuse of material resources Household users should contact either the retailer where they purchased this product or their local government office for details of where and how they can take this item for environmentally safe recycling Business users should con...

Отзывы: