background image

ENG-13

Connections

C h a p t e r   2

C

O N N E C T I O N S

Choosing a Connection

The following shows examples of connections commonly used to connect the DVD player with a TV
and other components.

Before Connecting the DVD Player

- Always turn off the DVD player, TV, and other components before you connect or disconnect any

cables.

- Refer to the user’s manual of the additional components (such as a TV) you are connecting for

more information on those particular components.

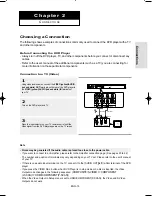
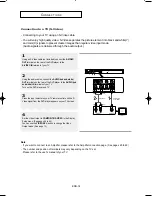
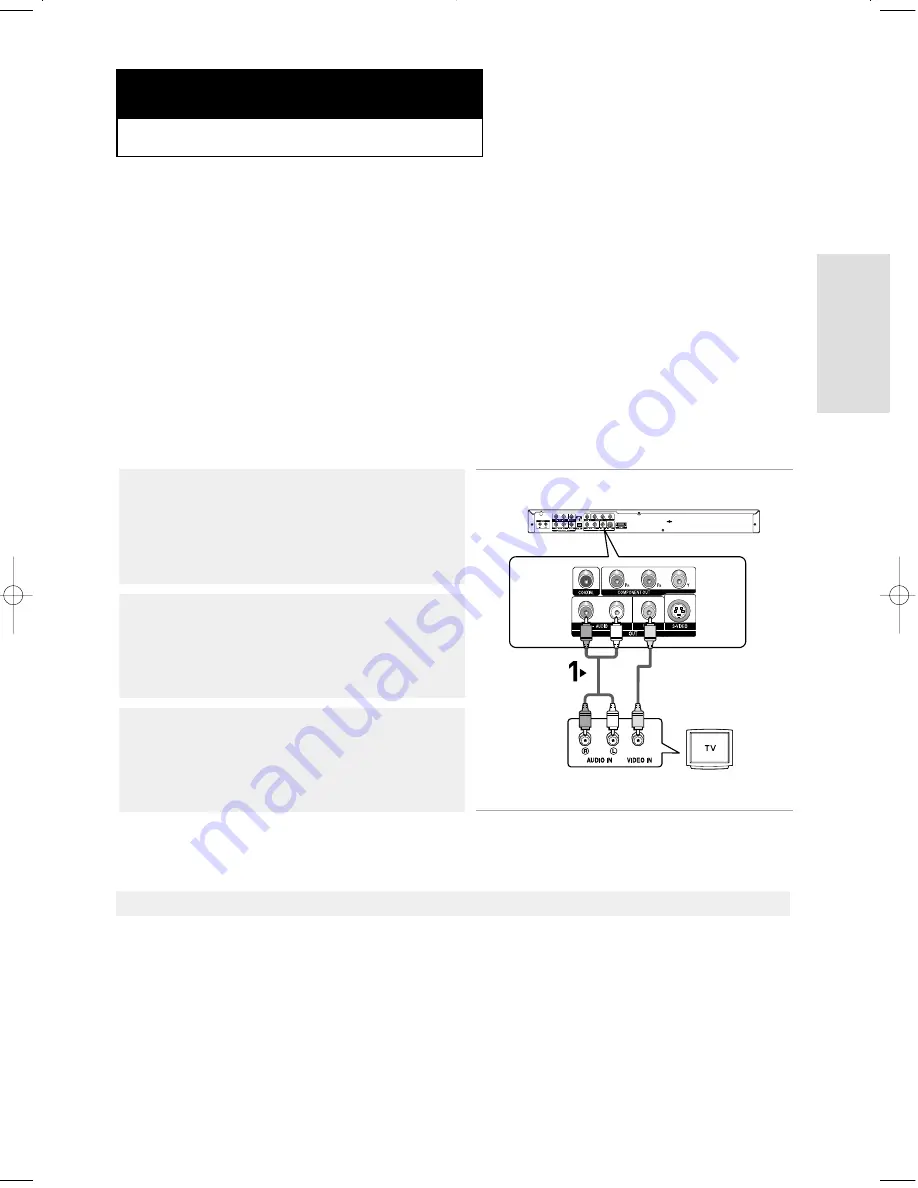
Connection to a TV (Video)

1

Using video/audio cables, connect the VIDEO (yellow)/AUDIO
(red and white) OUT 
terminals on the rear of the DVD player to
the VIDEO (yellow)/AUDIO (red and white) IN terminals of
your TV.

2

Turn on the DVD player and TV.

3

Press the input selector on your TV remote control until the
Video signal from the DVD player appears on the TV screen.

Note

- Noise may be generated if the audio cable is placed too close to the power cable. 

- If you want to connect to an Amplifier, please refer to the Amplifier connection page. (See pages 20 to 22)

- The number and position of terminals may vary depending on your TV set. Please refer to the user's manual

of your TV.

- If there is one audio input terminal on the TV, connect it to the [AUDIO OUT][left] (white) terminal of the DVD

player.

- If you press the VIDEO SEL. button when DVD Player is in stop mode or no disc is inserted, the Video

Output mode changes in the following sequence: (

COMPOSITE/S-VIDEO 

COMPONENT

(I-SCAN) 

HDMI/COMPONENT(P-SCAN)

)

- When the Video Output in Setup menu is set to HDMI/COMPONENT(P-SCAN), the Video and S-Video

Outputs do not work.

RED

WHITE

YELLOW

RED

WHITE

YELLOW

Audio Cable

Video Cable

00627B-HD950-XAA-1  5/6/05  3:21 PM  Page 13

Содержание DVD-HD950

Страница 1: ...DVD Player DVD HD950...

Страница 2: ...the provided plug does not fit into your outlet consult an electrician for replacement of the obsolete outlet 10 Protect the power cord from being walked on or pinched particularly at plugs convenienc...

Страница 3: ...electromagnetic interference with electric appliances such as radios and televisions use shielded cables and connectors for connections FCC NOTE for U S A This equipment has been tested and found to c...

Страница 4: ...uct unit to encode and or decode audio files conforming to the ISO IEC 11172 3 or ISO IEC 13818 3 No rights are granted under this license for product features or functions that do not conform to the...

Страница 5: ...n t operate properly Check the polarity of the batteries Dry Cell Check if the batteries are drained Check if remote control sensor is blocked by obstacles Check if there is any fluorescent lighting n...

Страница 6: ...the Aspect Ratio EZ View 33 Selecting the Audio Language 35 Selecting the Subtitle Language 36 Changing the Camera Angle 37 Using the Instant Replay Skip Function 37 Using the Bookmark Function 38 Us...

Страница 7: ...hest possible audio fidelity capable on DVD HDMI High Definition Multimedia Interface HDMI reduces picture noise by allowing a pure digital video audio signal path from the player to your TV Note Disc...

Страница 8: ...ause damage to the DVD player 5 31 2 Single sided 240 min Double sided 480 min Single sided 80 min Double sided 160 min Audio Video DVD contains excellent sound and video due to Dolby Digital and MPEG...

Страница 9: ...disc here 3 OPEN CLOSE Press to open and close the disc tray 4 DISPLAY Operation indicators are displayed here 5 EZ VIEW The aspect ratio of a picture can easily be adjusted to your TV s screen size...

Страница 10: ...ber 10 DVD Audio Index number 11 Disc type indicators SVCD Super VCD VCD CD 12 MPEG Audio output 13 CVD Chinese VCD Disc indicator 14 MP3 Audio output 15 Linear PCM audio output 16 Lights when the dev...

Страница 11: ...HDMI compatible TV HDMI will be output automatically a maximum of 10 seconds later If you want to use a Video S Video or Component Output unplug HDMI cable 8 COMPONENT VIDEO OUT JACKS Use these jacks...

Страница 12: ...or status displays from the screen 20 INSTANT SKIP Button This function skips playback ahead 10 seconds 21 INSTANT REPLAY Button This function is used to replay the previous 10 seconds of a movie from...

Страница 13: ...input selector on your TV remote control until the Video signal from the DVD player appears on the TV screen Note Noise may be generated if the audio cable is placed too close to the power cable If y...

Страница 14: ...er to the user s manual of your TV 1 Using an S Video cable not included connect the S VIDEO OUT terminal on the rear of the DVD player to the S VIDEO IN terminal of your TV 2 Using the audio cables c...

Страница 15: ...epending on the manufacturer The number and location of the terminals may vary depending on the TV set Please refer to the user s manual of your TV 1 Using component video cables not included connect...

Страница 16: ...follow the TV User s Manual regarding Progressive Scan settings in the TV s menu system Depending on your TV the connection method may differ from the illustration above 2 Using the audio cables conne...

Страница 17: ...the DVD player to the HDMI IN terminal of your TV 2 Press the input selector on your TV remote control until the HDMI signal from the DVD player appears on your TV screen HDMI VIDEO Specifications Wh...

Страница 18: ...msung use HDMI Analog TVs require an analog video audio signal However when playing a DVD the data transmitted to a TV is digital Therefore either a digital to analog converter in the DVD player or an...

Страница 19: ...ction works only with Samsung Anynet supported models Using Anynet you can easily control this DVD Player with your Samsung TV For detailed operation steps and connections refer to the Samsung TV Anyn...

Страница 20: ...the AUDIO red and white OUT terminals on the rear of the DVD player to the AUDIO red and white IN terminals of the Amplifier 2 Using the video signal cable s connect the VIDEO S VIDEO COMPONENT or HD...

Страница 21: ...System Dolby digital or DTS Amplifier 1 If using an optical cable not included connect the DIGITAL AUDIO OUT OPTICAL terminal on the rear of the DVD player to the DIGITAL AUDIO IN OPTICAL terminal of...

Страница 22: ...onnect the 5 1CH ANALOG AUDIO OUT terminals on the rear of the DVD player to the 5 1CH ANALOG AUDIO IN terminals of the 5 1CH Analog Amplifier 2 Using the video signal cable s connect the VIDEO S VIDE...

Страница 23: ...you select a menu language you can change it by pressing the button on the front panel of the unit for more than 5 seconds with no disc in the unit Then the SELECT MENU LANGUAGE window appears again...

Страница 24: ...in the forward direction 5 Removing Disc Press the OPEN CLOSE button 8 Slow Motion Play Except CD Press the SEARCH button to choose the play speed between 1 8 1 4 and 1 2 of normal during PAUSE or ST...

Страница 25: ...ing during search mode Except CD DVD VCD CD SACD DVD AUDIO 2X 4X 64X 128X 4X 8X 2X 4X 8X Skipping Tracks When playing a DVD if you press the SKIP button it moves to the next chapter If you press the S...

Страница 26: ...n on the remote control You can also select Info in the function menu by pressing the MENU button 2 Press the buttons to select the desired item DVD VCD CD When VCD2 0 is in Menu Off mode only this fu...

Страница 27: ...rting time as a reference The time search function does not operate on some discs Refers to the film s soundtrack language In the example the soundtrack is played in English 5 1CH A DVD disc can have...

Страница 28: ...isc Menu using the DISC MENU button on the remote control In VCD 2 0 the DISC MENU button is used to select Menu On or Menu Off mode Using the Title Menu DVD 1 During the playback of a DVD disc press...

Страница 29: ...s 30 to 31 EZ View See pages 33 to 34 Front Display Lights when the front display is selected ON You can also directly select these functions except Front Display using their respective buttons on the...

Страница 30: ...on 1 Press the REPEAT A B button at the point where you want repeat play to start A B is automatically highlighted 2 Press the REPEAT A B button again at the point where you want repeat play to stop B...

Страница 31: ...DISC MENU buton To set A B REPEAT set A first then set B after the following slow play time has elapsed 1 8x wait 40 seconds then press B 1 4x wait 20 seconds then press B 1 2x wait 10 seconds then p...

Страница 32: ...o the program Press the ENTER button The selection numbers appear in the Program Order box To return to the previous menu screen press the RETURN button To cancel the selected program order press the...

Страница 33: ...picture will look vertically stretched Depending on a type of disc the black bars may not disappear completely ZOOM FIT The top bottom left and right of the screen are cut off and the central portion...

Страница 34: ...l screen appears The picture will look vertically stretched ZOOM FIT The top bottom left and right of the screen are cut off and the central portion of the screen is enlarged For 4 3 aspect ratio disc...

Страница 35: ...languages are represented by abbreviations 2 To remove the AUDIO icon press the CLEAR or RETURN button ENG DOLBYDIGITAL 5 1CH AUDIO DVD When playing a VCD or CD you can select among Stereo Right or L...

Страница 36: ...re represented by abbreviations 2 To remove the SUBTITLE icon press the CLEAR or RETURN button Note Depending on DVDs you can change desired subtitle in the Disc Menu Press the DISC MENU button This f...

Страница 37: ...To remove the ANGLE icon press the CLEAR or RETURN button Note If the disc has only one angle this feature won t work Currently very few discs have this feature 4 6 ANGLE Using the Instant Replay Skip...

Страница 38: ...he buttons to select Bookmark then press the or ENTER button 2 When you reach the scene you want to mark Press the button to move to the next Bookmark and press the ENTER button Up to three scenes may...

Страница 39: ...mote control 3 Press the PLAY PAUSE button to skip to the marked scene 2 Press the buttons to select a marked scene Clearing a Bookmark 1 During play press the BOOKMARK button on the remote control 3...

Страница 40: ...Press the or buttons to select the part of the screen you want to zoom in on Press the ENTER button During DVD play press ENTER to zoom in 2X 4X 2X Normal in order During VCD play press ENTER to zoom...

Страница 41: ...FO button on the remote control You can select Info in the function menu by pressing the MENU button 4 Press the buttons to make the desired setup and then press the ENTER button You may use the numbe...

Страница 42: ...ou can see this icon In this case you cannot use PAGE PRE NEXT buttons Allows playback of music from a desired time by using the number buttons Slide V zone Page Index Function 1 Use PAGE PRE NEXT but...

Страница 43: ...ts the title that is playing Group repeats the group that is playing DVD AUDIO Off 01 01 AUDIO Format Display 1 During DVD AUDIO playback press the AUDIO button to see AUDIO Format information LPCM Li...

Страница 44: ...music title If you want to use the Repeat Function press the REPEAT button to change the mode such as Off Track Disc Off Normal Playback Track Repeats the current music title Disc Repeats the music ti...

Страница 45: ...s off 2 During play press the INFO button on the remote control You can select Info in the function menu by pressing the MENU button 4 Press the buttons to make the desired setup and then press the EN...

Страница 46: ...annel and 2 channel audio format 2CH L R MULTI F L F R R L R R C T S W CD To access the desired Track when there is more than one in the disc CD Allows playback from a desired time You must enter the...

Страница 47: ...AT button Off Normal Playback Track Repeats the current track Folder Repeats the current folder Random Files in the disc will be played in random order MP3 file icon WMA file icon JPEG file icon Folde...

Страница 48: ...n to change the playback mode There are four modes Off Track Folder and Random Off Normal Playback Track Repeats the current song file Folder Repeats the song files which have the same extension in th...

Страница 49: ...ality Conversely files with decompression rates below 128 Kbps will not be played properly Use a decompression transfer rate of at least 64Kbps when recording WMA files Sound quality with WMA files ba...

Страница 50: ...re rotates 90 degrees clockwise Zoom Press the or buttons to select the part of the screen you want to zoom in on Press the ENTER button Each time the ENTER button is pressed the picture is enlarged u...

Страница 51: ...ile size the amount of time between each picture may be different from the set interval time Album Screen Zoom and Info functions are not available when displaying images in HD JPEG mode OSD On Screen...

Страница 52: ...isc the disc can be played only up to the blank segment A maximum of 3000 images can be stored on a single CD Kodak Picture CDs are recommended When playing a Kodak Picture CD only the JPEG files in t...

Страница 53: ...nt children from viewing unsuitable movies such as those with violence adult subject matter etc EZ Setup Using the EZ Setup you can setup PLAYER MENU LANGUAGE TV Aspect and PCM Down Sampling in a sing...

Страница 54: ...Yes then press the ENTER button 5 Press the buttons to select the desired player menu language then press the ENTER button EZ SETUP Setup Language Setup Audio Setup Display Setup Parental Setup EZ Set...

Страница 55: ...nished setting the speaker press the buttons to select END then press the ENTER button You can also use the RETURN button to exit 8 1 If an AV Receiver is not connected to the TV press the buttons to...

Страница 56: ...he or ENTER button 4 Press the buttons to select Player Menu then press the or ENTER button 5 Press the buttons to select the desired language then press the or ENTER button The language is selected a...

Страница 57: ...is selected The language is selected and the screen returns to Language Setup menu To exit the setup menu press the MENU button 1 With the unit in Stop mode press the MENU button 2 Press the buttons...

Страница 58: ...nguage is selected The language is selected and the screen returns to Language Setup menu To exit the setup menu press the MENU button 1 With the unit in Stop mode press the MENU button 2 Press the bu...

Страница 59: ...ase the disc will use its original language setting The language is selected and the screen returns to setup menu To exit the setup menu press the MENU button 1 With the unit in Stop mode press the ME...

Страница 60: ...s to select the desired item then press the or ENTER button 1 With the unit in Stop mode press the MENU button 2 Press the buttons to select Setup then press the or ENTER button To exit the setup menu...

Страница 61: ...et Digital Audio to PCM If your TV is not compatible with LPCM sampling rates over 48kHz you should set PCM Down sampling to On SACD audio is only available through the analog outputs It is not possib...

Страница 62: ...Setup then press the or ENTER button To exit the setup menu press the MENU button Setup Language Setup Audio Setup Display Setup Parental Setup EZ Setup Setup Language Setup Audio Setup Display Setup...

Страница 63: ...Surround SL SR None If you do not connect a center speaker select this Large Rear Side Outputs the bass frequencies of the rear speaker Small Rear Side When the sound distorts or the surround sound ef...

Страница 64: ...hen press the or ENTER button 1 With the unit in Stop mode press the MENU button 2 Press the buttons to select Setup then press the or ENTER button To exit the setup menu press the MENU button TV Aspe...

Страница 65: ...ature when the screen shakes in the Auto mode Frame Select this feature when you want to see small letters more clearly in the Auto mode Screen Messages Use to turn on screen messages On or Off Video...

Страница 66: ...gh Definition image source Available when resolution is 720p 768p 1080i in HDMI enabled SD Standard Definition image source DVI Output You can use this function to set HDMI to DVI output format When H...

Страница 67: ...es if you want to use a password The Enter Password screen appears 5 Enter your password The Re enter Password screen appears to confirm the password Enter your password again The player is locked 1 W...

Страница 68: ...Press the buttons to select the Rating Level you want then press the or ENTER button e g Setting up in Level 6 1 With the unit in Stop mode press the MENU button 2 Press the buttons to select Setup th...

Страница 69: ...n 1 With the unit in Stop mode press the MENU button 2 Press the buttons to select Setup then press the or ENTER button CHANGE PASSWORD Enter New Password CHANGE PASSWORD Re enter Password Use Passwor...

Страница 70: ...BRAND CODE ANAM 10 11 12 13 14 15 16 17 18 AIWA 82 BANG OLUFSEN 57 BLAUPUNKT 71 BRANDT 73 BRIONVEGA 57 CGE 52 CONTINENTALEDISON 75 DAEWOO 19 20 23 24 25 26 27 28 29 30 31 32 33 34 EMERSON 64 FERGUSON...

Страница 71: ...ETUP Menu is the Audio Output set to Bitstream The features or action cannot be completed at this time because 1 The DVD s software restricts it 2 The DVD s software doesn t support the feature e g an...

Страница 72: ...20p 768p 1080i DVD player If snow noise appears on the screen it means that TV does not support HDCP High bandwidth Digital Content Protection Check your TV system setup correctly The screen Jitter ph...

Страница 73: ...ngle Sided Single Layer Disc 135 min Reading Speed 4 8 5 6 m sec Maximum Play Time 74 min Reading Speed 4 8 5 6 m sec Maximum Play Time 20 min Reading Speed 4 8 5 6 m sec Maximum Play Time 74 min Vide...

Страница 74: ...ce the purchaser must contact SAMSUNG for problem determination and service procedures SAMSUNG DOES NOT WARRANT UNINTERRUPTED OR ERROR FREE OPERATION OF THE PRODUCT All replaced parts and products bec...

Страница 75: ...00 ELECTRONICS HEADQUARTERS 105 Challenger Road Ridgefield Park NJ 07660 0511 TEL 1 800 SAMSUNG SERVICE DIVISION 400 Valley Road Suite 201 Mount Arlington NJ 07856 1 800 SAMSUNG 1 800 726 7864 www sam...

Отзывы: