background image

4

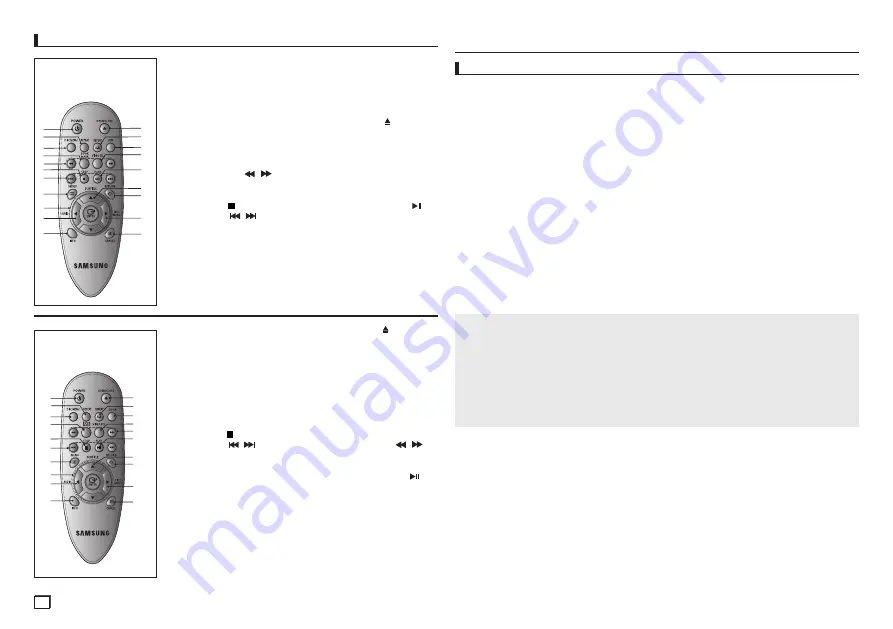
1. DVD POWER Button

    Turns the power on or off.

2. REPEAT Button

    Allows you to repeat play 

a title, 

    chapter, track, or disc.

3. DISC MENU Button

    Brings up the Disc menu.

4. BOOKMARK

    Quickly find bookmark sec-

tions of a DVD.

5. SEARCH Buttons (

/

)

    Allow you to search forward/

back ward through a disc.

6. STOP Button ( )


7. SKIP Buttons (

/

)

    Use to skip the title, chapter 

or track

8. MENU Button

    Brings up the DVD player’s 

menu.

9. ENTER /

π/†

,

√/®

 Buttons

    This button functions as a 

toggle switch.

10. AUDIO Button (

)

     Use this button to access var-

ious audio functions on a disc.

11. INFO Button


Displays the current disc 
mode.

12. OPEN/CLOSE ( ) Button


To open and close the disc 
tray.

13. REPEAT A-B Button


Allows you to repeat A-B disc.

14. USB Button
15. VIDEO SEL. Button


Selects video output formats. 

16. PLAY/PAUSE Button (

)


Begin/Pause disc play.

17. SUBTITLE Button (

π

)

18. RETURN Button


Returns to a previous menu.

19. TITLE MENU Button (

®


Brings up the Title menu.

20. CANCEL Button


Use to remove menus or sta-
tus displays from the screen.

Tour of the Remote Control

12
13

16

17
18

19

20

14

15

1
2

3
4
5
6
7

8

9

10

11

DVD-C450
DVD-C360

1. DVD POWER Button

   Turns the power on or off.

2. REPEAT Button

  Allows you to repeat play a 

title, chapter, track, or disc.

3. DISC MENU Button

  Brings up the Disc menu.

4. BOOKMARK 

  Quickly find bookmark sections 

of a DVD.

5. STOP Button ( )
6. SKIP Buttons

 (

/

)

  Use to skip the title, chapter or 

track 

7. MENU Button

  Brings up the DVD player’s 

menu.

8. ENTER/

π/†

,

√/®

 Buttons

  This button functions as a 

toggle switch.

9. AUDIO Button (

)

  Use this button to access vari-

ous audio functions on a disc.

10. INFO Button

    Displays the current disc 
     mode.

11. OPEN/CLOSE ( ) Button

    To open and close the disc 
     tray.

12. REPEAT A-B Button

    Allows you to repeat A-B  
     disc.

13. ZOOM Button

    Enlarges the DVD Picture.

14. VIDEO SEL. Button

    Selects video output for
     mats. 

15. SEARCH Buttons (

/

)

    Allow you to search forward/
     back ward through a disc. 

16. PLAY/PAUSE Button (

)

    Begin/Pause disc play.

17. SUBTITLE Button (

π

)

18. RETURN Button

    Returns to a previous menu.

19. TITLE MENU Button (

®

    Brings up the Title menu.

20. CANCEL Button

    Use to remove menus 
     or status displays from the  
     screen.


1
2

3
4

5

6

7

8
9

10

11

12
13
14
15

18

17

16

19

20

DVD-C350

Note
-  Noise may be generated if the audio cable is too close to the power cable.

-  If you want to connect to an Amplifier, please refer to the Amplifier connection page.
-  The number and position of terminals can vary depending on your TV set.  


Please refer to the user's manual of the TV.

-  If there is one audio input terminal on the TV, connect it to the [AUDIO OUT][left] (white) terminal 

of the DVD player.

-  If you press the VIDEO SEL. button when DVD Player is in stop mode or no disc is inserted, the 

Video Output mode changes in the following sequence: (SCART-CVBS 

➝ 

I-SCAN 

➝ 

P-SCAN 

➝ 

SCART-RGB).

C. Connection to an Audio System (2 Channel Amplifier, Dolby 
Digital,MPEG2 or DTS Amplifier)

-  Using the audio cables, connect the 

AUDIO (red and white) OUT

 terminals on the rear of the 

DVD player to the 

AUDIO (red and white) IN

 terminals of the Amplifier.

-  If Using the video signal cable(s), connect the 

VIDEO

 terminals on the rear of the DVD player 

to the 

VIDEO

  terminal of your TV, If using a coaxial cable, connect the 

DIGITAL AUDIO OUT 

(COAXIAL)

 terminal on the rear of the DVD player to the 

DIGITAL AUDIO IN (COAXIAL)

 terminal 

of the Amplifier.

-  Turn on the DVD player, TV, and Amplifier.
-  Press the input select button of the Amplifier to select 

external input

  in order to hear sound 

from the DVD player.

   Refer to your Amplifier's user manual to set the Amplifier's audio input.

Connections

Choosing a Connection

The following shows examples of connections commonly used to connect the DVD player with a TV 
and other components.

Before Connecting the DVD Player

-  Always turn off the DVD player, TV, and other components before you connect or disconnect any 

cables.

-  Refer to the user’s manual of the additional components you are connecting for more informa-

tion on those particular components.

A. Connecting to a TV (SCART) 

-  Using Scart cable, connect to 

SCART

 terminal on the rear of the DVD player to the 

SCART IN


terminals of TV.

-  Turn on the DVD player and TV.
-  Press the input selector on your TV remote control until the Video signal from the DVD player 

appears on the TV screen.

B. Connecting to a TV (VIDEO CVBS)

-  Using video/audio cables, connect the 

VIDEO


(yellow)/AUDIO (red and white) OUT

 terminals 

on the rear of the DVD player to the 

VIDEO (yellow)/AUDIO (red and white) IN

  terminals of TV.

- Turn on the DVD player and TV.
- Press the input selector on your TV remote control until the Video signal from the DVD player 

appears on the TV screen.

Содержание DVD-C350/XTR

Страница 1: ...Manual AK68 01928A imagine the possibilities Thank you for purchasing this Samsung product To receive more complete service please register your product at www samsung com global register DVD C450 XTR DVD C360 XTR DVD C350 XTR ...

Страница 2: ... other than this prod uct unit and the license does not extend to any unlicensed product unit or process conforming to ISO OUR 11172 3 or ISO OUR 13818 3 used or sold in combination with this product unit The license only covers the use of this product unit to encode and or decode audio files conforming to the ISO OUR 11172 3 or ISO OUR 13818 3 No rights are granted under this license for product ...

Страница 3: ...duct incorporates copyright pro tection technology that is protected by methods claims of certain U S patents and other intellectual property rights owned by Rovi Corporation and other rights owners Use of this copyright protection technology must be auzthorized by Rovi Corporation and is intended for home and other limited viewing uses only unless otherwise authorized by Rovi Corporation Reverse ...

Страница 4: ...ated if the audio cable is too close to the power cable If you want to connect to an Amplifier please refer to the Amplifier connection page The number and position of terminals can vary depending on your TV set Please refer to the user s manual of the TV If there is one audio input terminal on the TV connect it to the AUDIO OUT left white terminal of the DVD player If you press the VIDEO SEL butt...

Страница 5: ...play press the SKIP or button When playing a DVD if you press the SKIP button it moves to the next chapter If you press the SKIP button it moves to the beginning of the chapter One more press makes it move to the beginning of the previous chapter When playing a VCD or a CD if you press the SKIP button it moves to the next track If you press the SKIP button it moves to the beginning of the track On...

Страница 6: ...tton 3 Press the buttons to select EZ View then press the ENTER button Each time you press the button the screen size changes For graphics of the screen sizes and the sequence in which the sizes change see the next column If you are using a 16 9 TV If you are using a 4 3 TV Note This function may behave differently depending on the type of disc For 16 9 aspect ratio discs NORMAL Wide Screen Fit Zo...

Страница 7: ...D the Disc Menu may not work Recalling a Marked Scene 1 3 The first 1 3 steps are the same as those for Using the Bookmark Function 4 Press the buttons to select a marked scene 5 Press the PLAY PAUSE button to skip to the marked scene Clearing a Bookmark 1 3 The first 1 3 steps are the same as those for Using the Bookmark Function 4 Press the buttons to select the bookmark number you want to delet...

Страница 8: ...ality You should note that certain technologies and methods for MP3 file recording on CD Rs prevent optimal playback of these files on your DVD player degraded sound quality and in some cases inability of the player to read the files This unit can play a maximum of 500 files and 500 folders per disc MPEG4 Playback MPEG4 Play Function MPEG4 is a compressed video format designed to deliver DVD quali...

Страница 9: ...protocol or require additional program installation when connected to a PC are not supported A device using NTFS file system is not supported Only FAT 16 32 File Allocation Table 16 32 file system is supported Note To return to CDDA screen press the RETURN button again When the CD ripping is in process the player will automatically begin playing Only Audio CD CD DA discs can be ripped Because the ...

Страница 10: ... remote control Use the buttons to select Setup then press the or ENTER button 2 Press the π buttons to access the different features Press the or ENTER button to access the sub features 3 To make the setup screen disappear after setting up press the MENU button again Note Depending on the disc some Setup Menu selections may not work Setting Up the Language Features If you set the player menu disc...

Страница 11: ... the buttons to select Parental Page then press the or ENTER button 3 Press the π buttons to select Parental Password then press the or ENTER button 4 Press the π buttons to select Rating Level you want then press the ENTER button e g Setting up in KID SAFE 5 Enter your password If this is the first time enter 0000 Then enter a new password The new password must be a number other than 0000 to acti...

Страница 12: ...shooting please check the following General Power Requirements AC 110 240 V 50 60 Hz Weight DVD C350 C360 1 2 Kg DVD C450 1 5 Kg Power Comsumption 6W Dimensions DVD C350 C360 360mm W X 207mm D X 42mm H DVD C450 430mm W X 207mm D X 42mm H Operating Temperature Range 5 C to 35 C Operating Humidity Range 10 to 75 Video Output Scart Jack R Red 0 7 Vp p 75 Ω load G Green 0 7 Vp p 75 Ω load B Blue 0 7 V...

Страница 13: ...memo ...

Страница 14: ...memo ...

Страница 15: ...memo ...

Страница 16: ...8000 7267 www samsung com lv Estonia 800 7267 www samsung com ee Asia Pacific Australia 1300 362 603 www samsung com au New Zealand 0800 SAMSUNG 0800 726 786 www samsung com nz China 400 810 5858 010 6475 1880 www samsung com cn Hong Kong 3698 4698 www samsung com hk www samsung com hk_en India 3030 8282 1800 110011 1800 3000 8282 www samsung com in Indonesia 0800 112 8888 www samsung com id Japan...

Страница 17: ...apabileceklerinizi hayal edin Bu Samsung ürününü tercih ettiğiniz için teşekkür ederiz Hizmetlerimizin tamamından faydalanmak için lütfen ürününüzü aşağıdaki adresten kayıt ettiriniz www samsung com global register DVD C450 XTR DVD C360 XTR DVD C350 XTR ...

Страница 18: ...alandırma deliklerini kapatmayınız Disk tepsisini elle itmeyiniz Cihazları birbiri üzerine yışmayınız Oynatıcıyı taşımadan önce hiçbir parçanın açık çalışır durumda Başka cihazları bu oynatıcıya bağlamadan önce açık çalışır durumda olmadıklarından emin olunuz Kullanımdan sonra diski çıkartıp oynatıcıyı kapatınız oynatıcıyı uzun süreli kullanmayacaksanız buna özellikle dikkat ediniz Elektrik fişi c...

Страница 19: ...sk tipi veya kayıt koşullarına başlı olarak ünite bazı CD R CD RW ve DVD R diskleri ça amayabilir KOPYA KORUMA Çoşu DVD disk kopya korumalıdır Bu nedenle DVD oynatıcınızı bir VCR a değil doğrudan televizyonunuza başlamalısınız VCR a başlarsanız kopya korumalı DVD disklerden alınan görüntü bozuk olacaktır Bu ürün kopya koruma teknolojisi içermektedir Söz konusu teknoloji bazı ABD patentleri ve Rovi...

Страница 20: ...k ya da kapa mak için 12 A B TEKRAR Tuşu A B diski tekrar oynatmaniza izin verir 13 Zoom Tuşu 14 VIDEO SEL Tuşu Video çıkış formatını seçer 15 ARAMA Tuşları Diskte ileri ya da geri arama yapmanıza izin verir 16 OYNATMA DURAKLATMA Tuşu Disk oynatmayı Başlatır ya da Duraklatır 17 ALTYAZI Tuşu π 18 GERİ DÖNME Tuşu Bir önceki menüye geri döner 19 TITLE MENU Tuşu 20 CANCEL Tuşu Ekrandan menüleri yada d...

Страница 21: ...layın Oynatıcıyı fişe taktıktan sonra ilk defa DVD güç düşmesine bastışınızda dil seçimi için π tuğlarına basarak ardından tuşuna ENTER düğmesine basın Bu ekran yalnızca oynatıcıyı ilk defa fişe taktışınız zaman ortaya çıkacaktır Başlatma ekranında dil seçimi yapılmazsa DVD oynatıcıyı açıp kapattışınız her zaman için ayarlar değişebilir Sonuçta istediğiniz dili seçtişinizden emin olunuz Menü dilin...

Страница 22: ...niz noktada REPEAT A B tuşuna basın B 3 Normal oynatıma geri dönmek için ekran Tekrar Repeat mesajını görüntüleyene kadar REPEAT A B düğmesine basın Kapalı Off ileri funksiyonlar 16 9 formatındaki diskler için SCREEN Wide Screen Fit Zoom Fit 4 3 formatındaki diskler için Normal Wide Screen Fit Zoom Fit VERTICAL FIT 4 3 TV Kullanıyorsanız 16 9 formatındaki diskler için 4 3 Letter Box 4 3 Pan Scan S...

Страница 23: ... düşmeleyen yarar kutulama select uzak kontrol arzulamadı açı Işaretleme Fonksiyonunun Kullanımı Iğaretlenmiğ Bir Sahnenin Çağrılması 1 3 Ilk 1 3 adım deki Iğaretlenmiğ Bir Sahnenin Çağrılması 4 Iğaretlenmiğ bir sahneyi seçmek için tuşuna basın 5 tuşuna PLAY PAUSE basarak işaretlenmiş sahneye geçiğ yapın Bir Iğaretin Silinmesi 1 3 Ilk 1 3 adım deki Iğaretlenmiğ Bir Sahnenin Çağrılması 4 tuğlarına ...

Страница 24: ...ının garantisi veya ses kalitesinin güvencesi olarak düğünülemez Bilinmelidir ki CD R üzerine MP3 dosyası kaydetmek için kullanılan bazı teknoloji ve yöntemler bu dosyaların DVD oynatıcınızda en iyi şekilde çalınmasını engeller bazı durumlarda azalmığ ses kalitesi ve bazen de oynatıcının dosyaları okuyamaması gibi Bu ünite disk bağına en çok 500 dosya ve 500 klasör çal abilir MPEG4 Oynatım MPEG4 O...

Страница 25: ...anırsanız USB cihazı tanınmayabilir CBI Control Bulk Interrupt desteklenmemektedir PTP protokolü kullanan veya bilgisayara bağlandığında ek program kurulumu gerektiren Dijital Kameralar desteklenmemektedir NTFS dosya sistemi kullanan cihazlar desteklenmemektedir Yalnızca FAT 16 32 Dosya Ayırma Tablosu 16 32 dosya sistemi desteklenmektedir Bazı MP3 çalarlar bu ürüne bağlandığında kendi dosya sistem...

Страница 26: ...TER düğmesine basın 3 π tuğlarına basarak istediğiniz dili seçin ardından tuşuna ya da ENTER düğmesine basın ayar menüsünü değiştirmek 1 Ünite Stop modunda iken uzaktan kumandanızdaki MENU tuşuna basın tuğlarına basarak Setup ı seçin ardından tuşuna ya da ENTER düğmesine basın 2 π tuğlarına basarak farklı özelliklere erişebilirsiniz tuşuna ya da ENTER düğmesine basarak alt özelliklere erişebilirsi...

Страница 27: ...ENTER düğmesine basın 4 π tuğlarına basarak istediğiniz sınıflandırma seviyesi ni seçin ve ardından tuşuna ya da ENTER düğmesine basın örneğin Kids Safe konumuna ayarlayın 5 Parolanızı girin İlk sefer yapıyorsanız 0000 rakamlarını girin Ardından yeni bir şifre girin Ebeveyn kontrol fonksiyonunu etkinleştirmek üzere yeni şifre 0000 rakamlarından farklı bir rakam olmalıdır Yeni parolanızı tekrar gir...

Страница 28: ... 1 2 Kg DVD C450 1 5 Kg Güç Tüketimi 6W Ebat DVD C350 C360 360mm W X 207mm D X 42mm H DVD C450 430mm W X 207mm D X 42mm H Çalığma Sıcaklığı 5 C to 35 C Çalığma Nem Oranı 10 to 75 Video Çıkığı Scart Jak R kirmizi 0 7 Vp p 75 Ω yük G Yeşil 0 7 Vp p 75 Ω yük B Mavi 0 7 Vp p 75 Ω yük Kompozit Video 1 0 Vp p 75 Ω yük Parlaklik sinyali 1 0 Vp p 75 Ω yük Renk sinyali 0 3 Vp p 75 Ω yük Komponent Video Y 1...

Страница 29: ...Memo ...

Страница 30: ...Memo ...

Страница 31: ...Memo ...

Страница 32: ...amsung com hk www samsung com hk_en India 3030 8282 1800 110011 1800 3000 8282 www samsung com in Indonesia 0800 112 8888 www samsung com id Japan 0120 327 527 www samsung com jp Malaysia 1800 88 9999 www samsung com my Philippines 1 800 10 SAMSUNG 726 7864 1 800 3 SAMSUNG 726 7864 1 800 8 SAMSUNG 726 7864 02 5805777 www samsung com ph Singapore 1800 SAMSUNG 726 7864 www samsung com sg Thailand 18...

Отзывы: