background image

English-5

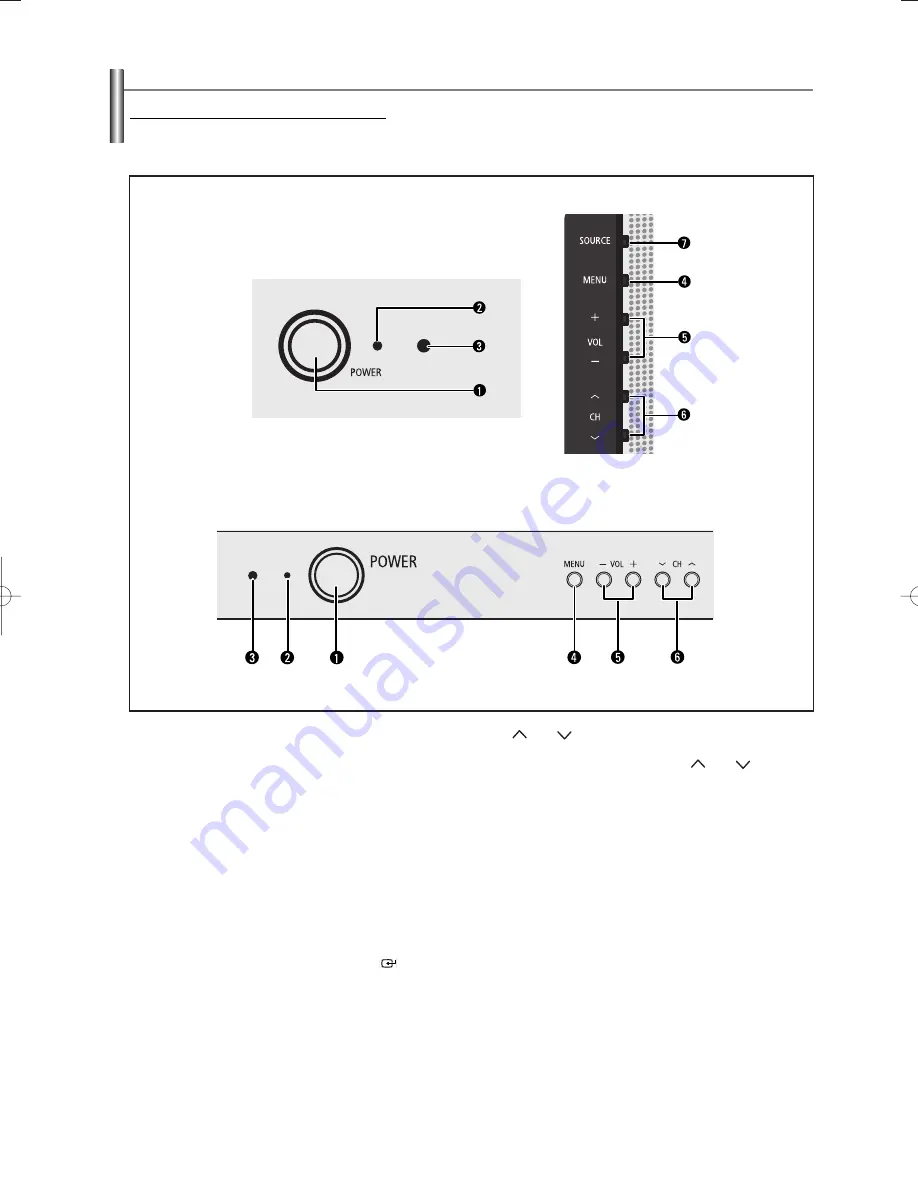
Viewing the Control Panel 

Buttons on the Lower-Right Part of the Panel

The buttons on the lower-right panel control your TV’s basic features, including the on-screen menu.
To use the more advanced features, you must use the remote control.

POWER

Press to turn the TV on and off. 

Power Indicator

Blinks and turns off when the power is on and lights 
up in stand-by mode.

REMOTE CONTROL SENSOR

Aim the remote control towards this spot on the TV.

MENU

Press to see an on-screen menu of your TV’s 
features.

+ VOL –

Press to increase or decrease the volume.
In the on-screen menu, use the 

+ VOL –

buttons as

you use the 

œ

œ

and 

buttons or 

ENTER

(

button

on the remote control.

CH

Press to change channels.  
In the on-screen menu, use the 

CH

button as 

you would use the 

and 

button on the remote 

control.

SOURCE

Toggles between all the available input sources
(TV, AV1, AV2, S-Video, Component). 

CL29Z30

CL29Z40

AA68-03806A-00Eng_√÷¡æ  3/27/06  1:37 PM  Page 5

Содержание CL-29Z30PQ

Страница 1: ...Register your product at www samsung com global register Owner s Instructions CL 29Z30 CL 29Z40 COLOR TELEVISION ...

Страница 2: ...cs and images on screen such as the dark side bars on non expanded standard format television video and programming should be limited to no more than 15 of the total television viewing per week Additionally viewing other stationary images and text such as stock market reports video game displays station logos web sites or computer graphics and patterns should be limited as described above for all ...

Страница 3: ...PICTURE CONTROL Using Automatic Picture Settings 18 Customizing the Picture 18 Adjusting the Color Tone 19 Changing the Screen Size 19 Digital Noise Reduction 20 DNIe Jr Digital Natural Image engine Junior depending on the model 20 Tilt depending on the model 20 Viewing Picture in Picture depending on the model 21 SOUND CONTROL Using Automatic Sound Settings 22 Customizing the Sound 23 Choosing a ...

Страница 4: ... depending on the model Remote Control AA59 00384A AA59 00385A AAA Batteries Owner s Instructions Safety Guide Manual Warranty Cards Registration Card Not available in all locations Accessories Please make sure the following items are included with your TV If any items are missing contact your dealer S VIDEO Cable Video Cable Audio Cable Antenna Cable Component Cable The following parts are sold s...

Страница 5: ...nd lights up in stand by mode 3 REMOTE CONTROL SENSOR Aim the remote control towards this spot on the TV 4 MENU Press to see an on screen menu of your TV s features 5 VOL Press to increase or decrease the volume In the on screen menu use the VOL buttons as you use the œ œ and buttons or ENTER button on the remote control 6 CH Press to change channels In the on screen menu use the CH button as you ...

Страница 6: ...ideo input jacks of a recording VCR 3 COMPONENT IN 480i Connect to the Component audio and video outputs of a DVD or DTV set top box 480i video signal input is available 4 ANT IN Connect to an antenna air or cable TV system 1 S VIDEO Video inputs for external devices with an S Video output 2 AV IN 2 Video and audio inputs for external devices Viewing the Connection Panel Side Panel Jacks Use the l...

Страница 7: ...MTS Press to choose stereo mono or Separate Audio Program SAP broadcast R SURF Press to automatically return to a preferred channel after a user preset time delay TURBO Press to select Turbo sound SOURCE Press to display all of the available video sources INFO Press to display information on the TV screen PRE CH Tunes to the previous channel CH Press to change channels EXIT Press to exit the menu ...

Страница 8: ...e screws on a 300 75 Ω adapter not supplied Use a screwdriver to tighten the screws 2 Plug the adaptor into the ANT IN terminal on the back of the TV If your antenna has a set of leads that look like this see Antennas with 300 Ω Flat Twin Leads below If your antenna has one lead that looks like this see Antennas with 75 Ω Round Leads If you have two antennas see Separate VHF and UHF Antennas Anten...

Страница 9: ...ble 3 Connect an Antenna Cable between an OUTPUT terminal on the splitter and the IN terminal on the cable box Splitter Cable Box Incoming cable 4 Connect an Antenna Cable between the ANT OUT terminal on the cable box and the B IN terminal on the RF A B switch Splitter Cable Box RF A B Switch Incoming cable 5 Connect another cable between the other OUT terminal on the splitter and the A IN termina...

Страница 10: ...ion When connecting an external device match the color of the connection terminal to the cable Also you can connect to AV IN 2 on the side panel of TV VCR Rear Panel TV Rear Panel Antenna Cable Not supplied Video Cable Not supplied Audio Cable Not supplied 2 3 4 5 Connecting an S VHS VCR Your Samsung TV can be connected to an S Video signal from an S VHS VCR This connection delivers a better pictu...

Страница 11: ...onnecting an external device match the color of the connection terminal to the cable Connecting a Camcorder The side panel jacks on your TV make it easy to connect a camcorder to your TV They allow you to view the camcorder tapes without using a VCR 1 Connect a Video Cable or S Video Cable between the AV IN 2 VIDEO or S VIDEO jack on the TV and the VIDEO or S VIDEO jack on the camcorder 2 Connect ...

Страница 12: ...o connect a DVD player Set Top Box to your TV 1 Connect a Component Cable between the COMPONENT IN 480i Y PB PR jacks on the TV and the COMPONENT Y PB PR jacks on the DVD Player Set Top Box 2 Connect Audio Cables between the AV IN 2 L AUDIO R jacks on the TV and the AUDIO OUT jacks on the DVD Player Set Top Box DVD Player Set Top Box TV Rear Panel Component Cable Not supplied Audio Cable Not suppl...

Страница 13: ...MENU button The message Auto Program is displayed Contact your local cable company to identify the type of cable system that exists in your particular area 5 Press the ENTER button to select Start The TV will begin memorizing all of the available channels Press the ENTER button to stop Refer to Memorizing the Channels on page 16 6 After all available channels are stored the Time is displayed Press...

Страница 14: ... 122 press then 2 then 2 Using the Button Changing Channels 1 Press the CH or CH button to change channels When you press the CH or CH button the TV changes channels in sequence You will see all the channels that the TV has memorized The TV must have memorized at least three channels You will not see channels that were either erased or not memorized See page 16 to memorize channels Using the Chann...

Страница 15: ...in picture and sound settings The display identifies the current channel and the status of certain audio video settings Press the INFO button once more or wait approximately 10 seconds and it disappears automatically Air 3 Signal Mono Picture Dynamic Sound Custom MTS Stereo 12 00 am The on screen menus disappear from the screen after a few seconds Viewing the Menus 1 With the power on press the ME...

Страница 16: ...nnel digits There are three steps for memorizing channels selecting a broadcast source memorizing the channels automatic and adding and deleting channels manual Selecting the Video Signal source Before your television can begin memorizing the available channels you must specify the type of signal source that is connected to the TV i e an antenna or a cable system 1 Press the MENU button to display...

Страница 17: ...ce connected to the input jacks to make your input source selection easier 1 Press the MENU button to display the menu Press the ENTER button to select Input Press the or button to select Edit Name then press the ENTER button 2 Press the or button to select AV1 AV2 S Video or Component input jack then press the ENTER button 3 Press the or button to select VCR DVD Cable STB Sat STB AV Recv DVD Recv...

Страница 18: ...e when watching movies Choose Custom if you want to adjust the settings according to personal preference Press the P MODE button on the remote control to select one of the standard picture settings Move Enter Return Picture Mode Dynamic Custom Color Tone Normal Size Normal More TV Move Enter Return Custom Contrast 100 Brightness 45 Sharpness 65 color 43 Tint G 50 R 50 TV Move Enter Return Picture ...

Страница 19: ...e the picture size Move Enter Return Picture Mode Dynamic Custom Color Tone Normal Size Normal More TV Move Enter Return Picture Mode Dynamic Custom Color Tone Waram1 Size Normal More TV Cool2 Cool1 Normal Warm1 Warm2 Move Enter Return Picture Mode Dynamic Custom Color Tone Normal Size Normal More TV Normal Zoom TV Mode Normal Zoom Adjusting the Color Tone You can change the color of the entire sc...

Страница 20: ...ending on the TV s location When this occurs follow the steps below 1 Press the MENU button to display the menu Press the or button to select Picture then press the ENTER button 2 Press the or button to select Tilt then press the ENTER button Press the œ œ or button to adjust screen tilt Press the EXIT button to exit Move œ œ Adjust Return TV Picture More Digital NR Off DNIe Jr On Tilt 0 PIP Move ...

Страница 21: ...ing TV or other video input Activating Picture in Picture 1 Press the MENU button to display the menu Press the or button to select Picture then press the ENTER button Press the or button to select PIP then press the ENTER button Move Enter Return TV Picture More Digital NR Off DNIe Jr On Tilt 0 PIP Move Enter Return TV PIP PIP Off Off On Selecting a Signal Source External A V for PIP 3 Press the ...

Страница 22: ...Choose Speech when watching a show that is mostly dialog i e news Choose Custom to recall your personalized settings see Customizing the Sound Move Enter Return Sound Mode Custom Custom MTS Stereo Auto Volume Off More TV Move Enter Return Sound Mode Custom Custom MTS Stereo Auto Volume Off More TV Standard Music Movie Speech Custom Press the PIP CH button on the remote control Changing the PIP Cha...

Страница 23: ...Move œ œ Adjust Return Move Enter Return Sound Mode Custom Custom MTS Stereo Auto Volume Off More TV Move Enter Return Sound Mode Custom Custom MTS Stereo Auto Volume Off More TV Mono Stereo SAP Choosing a Multi Channel Sound MTS track Multi Track Sound 1 Press the MENU button to display the menu Press the or button to select Sound then press the ENTER button 2 Press the or button to select MTS th...

Страница 24: ...wo identical left and right channels Once the Pseudo Stereo is set to Off or On the setting applies to the sound effects such as Standard Music Movie and Speech 1 Press the MENU button to display the menu Press the or button to select Sound then press the ENTER button 2 Press the or button to select Pseudo Stereo then press the ENTER button Continued Move Enter Return TV Sound More Turbo Sound Off...

Страница 25: ...h cable broadcasting it may take some time for a channel name to be displayed due to the time it takes to receive data If you add or delete the TV channel the corresponding label information will also be added or deleted Adding and Erasing Channels Channel Control 1 Press the MENU button to display the menu Press the or button to select Channel then press the ENTER button 2 Press the or button to ...

Страница 26: ...el Auto Program Add Delete Deleted Air CATV Air Name LNA Off TV Off On Surf 0 30 Using the R Surf Feature This feature allows you to set the TV to return to a particular channel after a certain amount of time For example you may be watching a channel when commercials start You can set the R Surf to 5 minutes then switch channels After 5 minutes the TV will return to the original channel To use the...

Страница 27: ...etup then press the ENTER button Press the ENTER button to select Time 2 Press the or button to select On Timer then press the ENTER button 3 Press the œ œ or button to move to the hour or minute Set the clock by pressing the or button Press the œ œ or button to move to Off To activate the On Timer set to On by pressing the or button When finished press the MENU button to return Auto Power Off Whe...

Страница 28: ...t the clock by pressing the or button Press the œ or button to move to Off To activate the Off Timer set to On by pressing the or button Press the EXIT button to exit Time Clock 12 00am On Timer 12 00am On Off Timer 12 00am Off Sleep Timer Off On Timer Volume 10 TV œ œ Move Adjust Return Time Clock 12 00am On Timer 12 00am On Off Timer 12 00am Off Sleep Timer Off On Timer Volume 10 TV Move œ œ Adj...

Страница 29: ... ENTER button Press the or button to select 1 or 2 then press the ENTER button Different channels and fields display different information Field 2 carries additional information that supplements the information in Field 1 For example Channel 1 may have subtitles in English while Channel 2 has subtitles in Spanish The availability of captions depends on the program being broadcast Press the EXIT bu...

Страница 30: ...press the ENTER button Press the EXIT button to exit Move Enter Return Setup More Blue Screen On Melody On Demonstration Child Lock TV Move Enter Return Setup Time Plug Play Caption Language English More TV Off On Selecting a Menu Language 1 Press the MENU button to display the menu Press the or button to select Setup then press the ENTER button Press the or button to select Language 2 Press the œ...

Страница 31: ...urn TV Move Enter Return Setup Time Plug Play Caption Language English More TV Setup More Blue Screen On Melody On Demonstration Child Lock Setting the On Off Melody 1 Press the MENU button to display the menu Press the or button to select Setup then press the ENTER button 2 Press the or button to select Melody then press the ENTER button Press the or button to select Off or On then press the ENTE...

Страница 32: ...s on the TV panel the Not Available is displayed in the Child Lock menu You can access by using the remote control only 5 Press the or button to select Unlocked or Locked Press the EXIT button to exit This feature allows you to prevent unauthorized users such as children from watching unsuitable programmes by muting out video and audio Child Lock cannot be released using front or side panel button...

Страница 33: ...ake sure the MUTE button is off First check the volume of units connected to your TV digital broadcasting receiver DVD cable broadcasting receiver VCR etc Then adjust the TV volume accordingly Check all wire connections Unplug the TV for 30 seconds then try operating it again Make sure the wall outlet is working Replace the remote control batteries Clean the upper edge of the remote control transm...

Страница 34: ...enter 0800 333 3733 0800 124 421 800 726 7864 SAMSUNG 0 800 507 7267 1 800 10 7267 800 6225 1 800 299 0013 1 800 234 7267 01 800 SAMSUNG 7267864 800 7267 1 800 682 3180 1 800 751 2676 1 800 7267 864 1 800 100 5303 Web Site www samsung com ar www samsung com br www samsung com cl www samsung com latin www samsung com latin www samsung com latin www samsung com latin www samsung com latin www samsun...

Отзывы: