background image

- 16 -

7-2 Main Parts List

No.

Code No.

Description

Specifi cation

Q’ty

Remark

B001

3405-001034

SWITCH-MICRO

125/250VAC,16A,200GF,SPST-N

2

PRI,DOOR

B002

3405-001032

SWITCH-MICRO

125/250VAC,16A,200GF,SPDT

1

MONITOR S/W

B006

DE72-00137B

LATCH-BODY

PG113R,NYLON,WHT,-,-,-,-,-

1

B010

DE66-00093B

LEVER-SWITCH(A)

PG113R,NYLON,NTR,HANDLE,

1

B011

DE66-00094B

LEVER-SWITCH(B)

PG113R,NYLON,NTR,HANDLE,

1

B018

DE96-00120Q

ASSY BODY LATCH

PG117R(TBMO/SIDE),NYLON

1

H008

6031-001424

WASHER-PLAIN

PTFE,-,ID22.2,OD28,T1.7,WHT

1

H018

DE31-90051A

BLADE-FAN

P.P,T,D130,-,-,-,-

1

M001

DE70-00185N

PANEL-OUTER

C115,SECC,T0.6,W405.7,L1090.

1

M002

DE63-90035H

CUSHION-RUBBER

-,DFA20,T2,W190,L200,-,-

1

M003

DE61-00438A

BRACKET-UPPER

C115,SECC,T0.5,-,-,-,1.1-C

1

M005

DE61-70060A

SPRING-PLATE

-,SK-5,T0.5,-,-,-,-,-,-,-,-

1

M008

DE63-20017A

GASKET-HEATER

-,BRASS,T1.5,OD30.5,ID22.5

1

M010

DE61-50021A

BRACKET-FLANGE

-,SECC1,T0.8,32,32,-,-

1

M011

DE61-50347A

BRACKET-EARTH

-,BSS2-A,T1.0,W35,L43,MBGF

1

M012

DE61-50027B

BRACKET-HEATER

-,SECC,T1.0,W51,L55,CE945

1

M013

DE61-50570C

BRACKET-AIR GUIDE

CK95,SECC,T0.8,-,-,-,D

1

M015

DE39-00022B

ASSY POWER CORD

4819D,CK135,230V50Hz,-,-

1

M017

DE96-00011A

ASSY NOISE FILTER

SN-3WUA,250V15A,3W 15A

1

M019

3601-001197

FUSE-CARTRIDGE

250V,15A,SLOW-BLOW,CERAMI

1

M023

DE31-10155R

MOTOR FAN

-,230V50HZ,-,SMF-745EA1,2320RP

1

M029

DE47-20009A

THERMOSTAT

PW2N-520PB,160/60,250V/7.5A,H

1

M034

DE67-00187A

COUPLER

CE1100,PPS(ESS840),-,-,-,-

1

M035

OM75P(31)MTSN

ASSY-MAGNETRON

OM75P(31)MTSN

1

M036

4713-001046

LAMP-INCANDESCENT

240V,104mA,25W,ORG,-,-

1

M037

DE63-00248A

COVER-AIR

5TH/1.0 CONVECTION,NYLON #66(T

1

M038

DE26-00080C

TRANS H.V

SHV-EURO2 AC-5,230V,50Hz,2330V

1

M039

2501-001015

C-OIL

1.0uF,2100V,BK,35X54X80,20mm

1

M040

DE61-50106A

BRACKET-HVC

-,SECC,T0.8,W31,L125.8,-,-

1

M041

0402-001554

DIODE-RECTIFIER

HV03-12T01,12000V,0.4A,D

1

M042

DE91-70061A

CHARLIE..FUSE

THV060T-0800-H,5KV/0.80A,W

1

M046

DE60-60025A

PIN-FOOT

PP-JI350,BLK,-,-,-,-,-,-

2

M047

DE61-40065A

FOOT

-,PP,T2x22x17mm,BLK,-,-,-

2

M048

DE80-00024E

BASE-PLATE

C110/C115,SCP1,T0.6,-,-,-,NC-

1

M049

DE31-10170A

MOTOR SYNCHRONOUS

M2LJ24Z702,ST-16F,220/

1

M051

DE71-00015A

COVER-CEILING

CE2933,-,T0.3,W114.2,L121.

1

M053

DE61-00439A

GUIDE-AIR

C115,SECC,T0.5,-,-,-,1.1 CONV

1

M054

DE32-10013A

SENSOR THERMISTOR

PT-312-K2,-,-,-,-,-,-

1

M058

DE65-20014A

CABLE CLAMP

-,-,-,NY-66,-,DA-6N

1

P/CORD

M095

DE47-00001A

HEATER

SHG-2933E,-,-,1300W(1250W),-,230V

1

M113

DE61-30006A

SUPPORT-HEATER

-,ALUMINA,5G,2ND-W/P,-,-,

1

M187

DE61-00603A

STOPPER

CE1110,AIumina

1

P186

DE63-00148A

COVER-BACK

C115,SECC,T0.5,-,-,-,-,-,1.1

1

T001

DE74-20015G

TRAY-COOKING

3RD-1.0,T6,1115G,HKS,-,-,-,

1

T009

DE97-00136B

ASSY-WIRE RACK

CK95,LOW-RACK,-,-,-,-

1

T010

DE97-00216E

ASSY-WIRE RACK

C100,HIGH-RACK/LOW-RACKAS

1

T017

DE92-90189T

ASSY-GUIDE ROLLER

JES1044,PPS 14.7DI,-,-

1

W002

DE96-00291A

ASSY-WIRE HARNESS A

CE1100/XEF,CONVECTIO

1

W003

DE96-00296A

ASSY-WIRE HARNESS B

CE1100/XEF,CONVECTIO

1

W006

DE39-40409A

WIRE HARNESS-E

230V50HZ,M9G45,CTW,-,-,-

1

X004

DE99-00242R

ASSY-CLEAN WATER BOWL

1.1 AQUA CONV,SPS

1

Содержание CE1110R

Страница 1: ...MICROWAVE OVEN CONTENTS 1 Precaution 2 Specifications 3 Operating Instructions 4 Disassembly and Reassembly 5 Alignment and Adjustments 6 Troubleshooting 7 Exploded Views and Parts List 8 PCB Diagrams 9 Schematic Diagrams CE1110R SER ...

Страница 2: ...al is a property of Samsung Electronics Co Ltd Any unauthorized use of Manual can be punished under applicable International and or domestic law Samsung Electronics Co Ltd June 2004 Printed in Korea Code No DE68 03579A ...

Страница 3: ...ction within the microwave generating compartments check the magnetron wave guide or transmission line and cavity for proper alignment integrity and connections d Any defective or misadjusted components in the interlock monitor door seal and microwave generation and transmission systems shall be repaired replaced or adjusted by procedures described in this manual before the oven is released to the...

Страница 4: ...ches while repairing an MWO 11 To avoid any possible radiation hazard replace parts in accordance with the wiring diagram Also use only the exact replacements for the following parts Primary and secondary interlock switches interlock monitor switch 12 If the fuse is blown by the Interlock Monitor Switch Replace all of the following at the same time Primary door sensing switch and power relay as we...

Страница 5: ...nds after disconnection Short the negative terminal of the high voltage capacitor to to the oven chassis Use a screwdriver 3 High voltage is maintained within specified limits by close tolerance safety related components and adjustments If the high voltage exceeds the specified limits check each of the special components H V Diode Short H V Capacitor Fig 1 1 Discharging High Voltage Capacitor Touch ...

Страница 6: ...TRON COOLING METHOD OUTSIDE DIMENSIONS mm SHIPPING WEIGHT NET WEIGHT 99 MINUTES 230V 50Hz AC MICROWAVE 1 400W GRILL 1 300W CONVECTION 1 700W FROM 100 TO 900W 6 LEVEL POWER IEC 705 TEST PROCEDURE 2 450MHz OM75PH 31 COOLING FAN MOTOR 522 W x 312 H x 539 D 23 5 kg 21 0 kg 2 1 Table of Specifications ...

Страница 7: ...ng Instructions 3 1 Control Panel 3 2 Features External Views 522mm 369mm 312mm 216mm 539mm Door Ventilation Holes Light Safety Interlock Holes Guide Roller Coupler Grill Rack Glass Plate Door Latches Control Panel ...

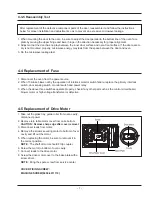
Страница 8: ... remount the magnetron gasket in the correct position and make sure the gasket is in good condition 1 Discharge the high voltage capacitor 2 Disconnect all the leads 3 Remove the mounting bolts 4 Reconnect the leads correctly and firmly PRECAUTION Servicemen should remove their watches whenever working close to or replacing the magnetron PRECAUTION There exists HIGH VOLTAGE ELECTRICITY with high cu...

Страница 9: ... Door C because it is fragile Then remove the door assembly 4 3 3 Removal of Door E Following the procedure as shown in the figure insert and bend a thin metal plate between Door E and Door A until you hear the tick sound 1 Insertion depth of the thin metal plate should be 0 5mm or less 4 3 4 Removal of Key Door Spring Remove pin hinge from Door E Detach spring from Door E and key door Screw Screw ...

Страница 10: ...t of motor should fit tip coupler 6 Screw the motor to bottom of oven cavity 7 Connect leads to the drive motor 8 Screw the drive motor cover to the base plate with a screw driver NOTE Bring the spare screw from service center COVER FIXING SCREW MACHINE SCREW 6006 0011110 1 When mounting the door to the oven be sure to adjust the door parallel to the bottom line of the oven face plate by moving the...

Страница 11: ...trol circuit 2 Disconnect the connectors from the control circuit board 3 Remove screws securing the control box assembly 4 Remove the screw securing the ground tail of the keyboard 4 6 2 Removal of Ass y P C B Assembly 1 Remove screws securing the control circuit board 2 Lift up the control circuit board from the Ass y control box Control Box Screw ASSY PCB SCREWS ...

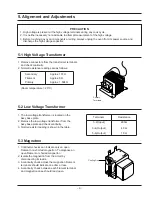
Страница 12: ... 1 Continuity checks can indicate only an open filament or a shorted magnetron To diagnose an open filament or shorted magnetron 2 Isolate the magnetron from the circuit by disconnecting its leads 3 A continuity check across the magnetron filament terminals should indicate one ohm or less 4 A continuity check between each filament terminal and magnetron case should read open Primary Terminals Cooling ...

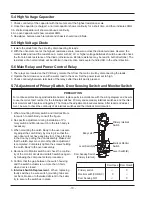
Страница 13: ...mounting the Latch Body to the oven assem bly adjust the Latch Body by moving it so that the oven door will not have any play in it Check for play in the door by pulling the door assembly Make sure that the latch keys move smoothly after adjustment is completed Completely tighten the screws holding the Latch Body to the oven assembly 4 Reconnect to Monitor switch and check the continu ity of the m...

Страница 14: ...ed stir the water again with the thermometer and measure the temperature T2 5 Subtract T1 from T2 This will give you the water temperature rise T 6 The output power is obtained by the following formula Output Power 4 187 x 1000 x T 0 88 x Mc x T2 T1 49 Heating Time sec 4 187 Coefficient for Water 1000 Water cc T Temperature Rise T1 T2 Mc Cylindrical borosilicate glass weight To Room Temperature 46 ...

Страница 15: ...a corner of the door keep the probe perpendicular to the areas making sure that the probe end at the base of the cone does not get closer than 5cm to any metal If it gets closer than 5cm er roneous readings may result 5 Measured leakage must be less than 4mW cm2 after repair or adjustment Maximum allowable leakage is 5mW cm2 4mW cm2 is used to allow for measurement and meter accuracy 1 Do not exce...

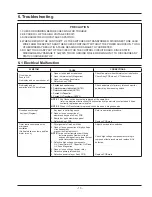
Страница 16: ...ormer NOTE2 Check adjustment of primary interlock monitor power relay door sensing switch NOTE 1 All of these switches must be replaced at the same time refer to adjustment instructions Check continuity of power relay contacts and if it has continuity replace power relay also NOTE 2 When H V Transformer is replaced check diode and magnetron also Oven does not accept key input Program 1 Key input i...

Страница 17: ...main Loud buzzing noise can be heard 1 Loose fan and fan motor 2 Loose screws on H V Transformer 3 Shorted H V Diode Tighten screws of fan motor Tighten screws of H V Transformer Replace H V Diode Turntable motor does not rotate 1 Open or loose wiring of turntable motor 2 Defective turntable motor Replace turntable motor Oven stops operation during cooking 1 Open or loose wiring of primary interlo...

Страница 18: ...M003 W003 W006 M035 M037 M005 M041 M043 MM105 MM103 MM104 M046 M047 M040 M039 M038 M049 T010 T009 M051 M054 M053 M048 M113 M095 H008 M008 M010 M011 M013 M015 W002 M036 M029 P018 M012 M017 M019 B006 B001 B002 B010 B018 B011 M023 M058 X004 H018 B001 T001 T017 M034 M187 ...

Страница 19: ... COUPLER CE1100 PPS ESS840 1 M035 OM75P 31 MTSN ASSY MAGNETRON OM75P 31 MTSN 1 M036 4713 001046 LAMP INCANDESCENT 240V 104mA 25W ORG 1 M037 DE63 00248A COVER AIR 5TH 1 0 CONVECTION NYLON 66 T 1 M038 DE26 00080C TRANS H V SHV EURO2 AC 5 230V 50Hz 2330V 1 M039 2501 001015 C OIL 1 0uF 2100V BK 35X54X80 20mm 1 M040 DE61 50106A BRACKET HVC SECC T0 8 W31 L125 8 1 M041 0402 001554 DIODE RECTIFIER HV03 12...

Страница 20: ...I0 6 D5 5 L19 1 D009 DE61 00246A HINGE DOOR U MW8103SS SCP1 T2 0 1 D010 DE61 00247A HINGE DOOR L MW8103SS SCP1 T2 0 1 D011 DE64 00690A KEY DOOR TBMO EURO NYLON 66 BLK SI 1 D019 DE64 01067B HANDLE DOOR 1 1 AQUA CONV PC LEXAN 141 1 D024 DE64 00984A SCREEN DOOR B C100 C115 TEMP GLASS T3 2 1 D026 DE63 00235A COVER HANDLE 1 1 AQUA CONV PC LEXAN 14 1 D049 ASSY DOOR CE1110 XEU WHT SEUK 1 S N A S N A SERV...

Страница 21: ...04 DE34 00185B SWITCH MEMBRANE CE1110R BWT GRAPHIC 1 C005 DE64 00792A CONTROL PANEL MEMBRANE CE1110 XEN PC LE 1 C009 DE64 00794A WINDOW DISPLAY MEMBRANE C110 SAN CR5381 1 C071 DE63 00088A COVER LED C100 PUT_FORM 1 C082 ASSY CONTROL BOX CE1110R BWT WHT RUSSI 1 S N A S N A SERVICE NOT AVAILABLE C004 C005 C003 C009 C071 C082 C082 ...

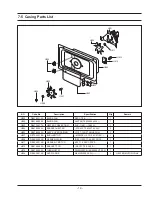
Страница 22: ...6 C 2 H005 DE97 00393A ASSY COVER CASING C110 1 1CU FT AQUA CON 1 H007 DE72 30016B BUSH MOTOR MSWR3 L15 7 D5 6 CE115K 1 H008 DE60 40026B WASHER PLAIN ID5 5 OD12 T1 0 SBC1 ZNC3 1 H011 DE60 40014B WASHER C MOTOR M16 T1 0 SECC ZNC3 1 H012 DE61 50490A BRACKET TCO SECC1 T0 6 34 58 1 H013 DE47 20009A THERMOSTAT PW2N 520PB 160 60 250V 7 5A H 1 H024 DE60 30016B NUT FLANGE M4 MSWR10 FEFN 3 HEATER MOTOR CON...

Страница 23: ...06 001174 SCREW TAPPING WE TH M4 L12 ZPC YEL 1 A COVER 6006 001174 SCREW TAPPING WE TH M4 L12 ZPC YEL 5 B PLATE 6006 001174 SCREW TAPPING WE TH M4 L12 ZPC YEL 2 BD LATCH 6006 001174 SCREW TAPPING WE TH M4 L12 ZPC YEL 2 BKT UPPER 6006 001174 SCREW TAPPING WE TH M4 L12 ZPC YEL 4 C BACK 6006 001174 SCREW TAPPING WE TH M4 L12 ZPC YEL 1 C MOTOR 6006 001174 SCREW TAPPING WE TH M4 L12 ZPC YEL 2 C BOX 600...

Страница 24: ...6 IC VOL DETECTOR ELM7533CBA S SOT 23 3P 2 9X1 5MM 1 IC03 1404 000230 THERMISTOR PTC 27ohm 20 265V 1 5A 360mA BK 2 PTC1 PTC2 2007 000033 R CHIP 0ohm 5 1 4W TP 3216 11 J01 J11 2007 000277 R CHIP 100Kohm 1 1 8W TP 2012 1 R10 2007 000300 R CHIP 10Kohm 5 1 8W TP 2012 2 R05 R06 2007 000468 R CHIP 1Kohm 5 1 8W TP 2012 7 R01 R03 R07 R11 R12 R14 R15 2007 000546 R CHIP 20Kohm 5 1 8W TP 2012 1 R13 2007 0006...

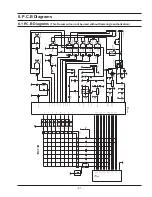
Страница 25: ...V_RED 1nF TR08 24V C15 10K R05 KRC246 1nF C12 BUZ1 CBE2220BA R25 1K 1K R15 C19 1nF MM4148 D19 D18 MM4148 D17 MM4148 MM4148 D16 6 7 8 9 MM4148 D14 10 11 12 13 14 15 16 2 3 4 5 1000uF C02 CN03 12516HS 16 1 24V 1nF C16 C20 0 02nF C03 100uF BD01 DF06S 41 P73 42 P74 43 44 P75 P76 1 3 P77 RESET 14 TEST 13 VAref 18 VDD 40 VSS 17 X IN 15 X OUT 16 P16 26 P17 37 P20 38 P21 P22 4 27 P50 P51 28 P60 31 32 P61 ...

Страница 26: ...grams This Document can not be used without Samsung s authorization MAGNETRON FA F RED RED RED RED SYMBOL COLOR BRN BROWN BLK BLACK RED RED BLU BLUE WHT BLK HIGH VOLTAGE TRANSFORMER HIGH VOLTAGE CAPACITOR HIGH VOLTAGE DIODE TO CHASSIS H V FUSE ...

Отзывы: