background image

EN

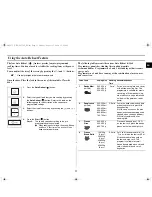
Cooking/Reheating

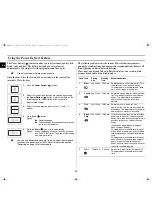
The following procedure explains how to cook or reheat food.

ALWAYS check your cooking settings before leaving the oven 
unattended.

Open the door. Place the food in the centre of the turntable. Close the 
door. Never switch the microwave oven on when it is empty.

Quick Start:

If you wish to heat a dish for a short period of time at maximum 
power (900 W), you can also simply press the 

Start 

(

button 

once for each 30 seconds of cooking time. The oven starts 
immediately.

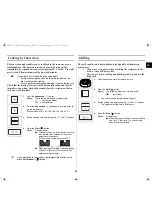
Power Levels and Time Variations

The power level function enables you to adapt the amount of energy 
dissipated and thus the time required to cook or reheat your food, 
according to its type and quantity. You can choose between six power 
levels.

The cooking times given in recipes and in this booklet correspond to the 
specific power level indicated.

1.

Press the 

Microwave 

(

) button.

Result:

The following indications are displayed:

 (microwave 

mode)

2.

Select the appropriate power level by pressing the 

Microwave 

(

) button again until the corresponding 

output power is displayed. Refer to the power level table 
below for further details.

3.

Set the cooking time by pressing the (

) and (

) buttons.

Result:

The cooking time is displayed.

4.

Press the 

Start 

(

) button.

Result:

The oven light comes on and the turntable starts 
rotating. Cooking starts and when it has 
finished:

The oven will beep and flash “0” four times. 
The oven will then beep one time per minute.

If you would like to know the current Power 
Level of the oven cavity, press 

Microwave 

(

)


button once. If you would like to change the 
power level during cooking, press the 

Microwave 

(

)

 button twice or more times to 

select the desired power level.

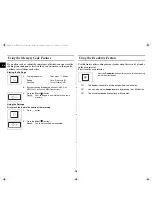
Power Level

Percentage

Output

HIGH
MEDIUM HIGH 
MEDIUM 
MEDIUM LOW 
DEFROST
LOW

100 %

67 %
50 %
33 %
20 %
11 %

900 W
600 W
450 W
300 W
180 W
100 W

If you select a...

Then the cooking time must be...

Higher power level
Lower power level

Decreased
Increased

jlXW^}†loTWZ^X[m†luU”GGwˆŽŒG_GGt–•‹ˆ SGhœŽœš›GX^SGYWW`GGXXaZZGht

Содержание CE107V

Страница 1: ...sing the Cafeteria Feature 13 Multistage Cooking 14 Fast Preheating the Oven 14 Cooking by Convection 15 Grilling 15 Choosing the Accessories 16 Combining Microwaves and the Grill 16 Combining Microwa...

Страница 2: ...n 2 Select the food category by pressing the Power Defrost button until the desired food category is selected 3 Select the weight by pressing the and buttons as required 4 Press Start button Result De...

Страница 3: ...e 2 Roller ring to be placed in the center of the oven Purpose The roller ring supports the turntable 3 turntable to be placed on the roller ring with the center fitting on to the coupler Purpose The...

Страница 4: ...emove wire twist ties from paper or plastic bags Reason Electric arcing or sparking may occur and may damage the oven When heating food in plastic or paper containers keep an eye on the oven due to th...

Страница 5: ...for anyone other than a comperent person to carry out any service or repair operation which involves the removal of a cover which gives protection against exposure to microwave energy WARNING Liquids...

Страница 6: ...o an appropriate wall socket The turntable must be in position in the oven If a power level other than the maximum 100 900 W is used the water takes longer to boil Open the oven door by pulling the ha...

Страница 7: ...he oven arcing Have you used a dish with metal trimmings Have you left a fork or other metal utensil inside the oven Is aluminium foil too close to the inside walls The oven causes interference with r...

Страница 8: ...e following indications are displayed microwave mode 2 Select the appropriate power level by pressing the Microwave button again until the corresponding output power is displayed Refer to the power le...

Страница 9: ...or Increase the remaining cooking time To stop the cooking Then Temporarily Open the door Result Cooking stops To resume cooking close the door again and press the Start button Completely Press the St...

Страница 10: ...550 g 600 650 g 700 750 g 2 3 min Weigh the vegetables after washing cleaning and cutting into similar size Put them into a glass bowl with lid Add 30 ml 2 tablespoons water when cooking for 200 250...

Страница 11: ...e oven will beep and flash 0 four times The oven will then beep one time per minute Code Food Serving Size Standing Time Recommendations 1 Ready Meal chilled 300 350 g 400 450 g 500 550 g 3 min Put on...

Страница 12: ...ished the oven will beep and flash 0 four times The oven will then beep one time per minute Code Food Serving Size Standing Time Recommendations 1 Meat 200 2000 g 20 90 min Shield the edges with alumi...

Страница 13: ...h 0 four times The oven will then beep one time per minute Code Food Serving Size Standing Time Recommendations 1 Drinks Coffee milk tea water room temperature 150 ml 1 cup 300 ml 2 cups 450 ml 3 cups...

Страница 14: ...button 1 Press the Power Defrost button 2 Select the type of food that you are cooking by pressing the Power Defrost button 3 Set the weight by pressing the and buttons the appropriate number of time...

Страница 15: ...d grilling results if you use the high rack 1 Press the Convection button Result The following indications are displayed convection mode 220 C temperature 2 Press the Convection button once or more ti...

Страница 16: ...ou would use in your normal oven Microwave safe containers are not usually suitable for convection cooking don t use plastic containers dishes paper cups towels etc If you wish to select a combined co...

Страница 17: ...n Result The following indications are displayed microwave convection combi mode 600 W output power Switches to the following temperature mode in 2 seconds 220 C temperature 2 Select the temperature b...

Страница 18: ...interior The deodorization time has been specified as 5 minutes You can also adjust Deodorize time by pressing the 30s button The maximum deodorization time is 60 minutes 1 To programme the Then pres...

Страница 19: ...rill and Microwave Convection buttons at the same time about three second Result The oven is locked The follow indication is display L 2 To unlock the oven press the Grill and Microwave Convection but...

Страница 20: ...ene cups containers Paper bags or newspaper Recycled paper or metal trims Can be used to warm food Overheating may cause the polystyrene to melt May catch fire May cause arcing Glassware Oven to table...

Страница 21: ...example see the chapter with tips techniques and hints Covering during cooking To cover the food during cooking is very important as the evaporated water rises as steam and contributes to cooking proc...

Страница 22: ...cold water Brown Rice parboiled 250 g 375 g 900 W 20 21 22 23 5 Add 500 ml cold water Add 750 ml cold water Mixed Rice rice wild rice 250 g 900 W 16 17 5 Add 500 ml cold water Mixed Corn rice grain 2...

Страница 23: ...imes When reheating food for the first time it is helpful to make a note of the time taken for future reference Always make sure that the reheated food is piping hot throughout Allow food to stand for...

Страница 24: ...00 W 1 1 2 2 3 3 3 4 1 2 Pour into cups and reheat uncovered 1 cup in the centre 2 cups opposite of each other 3 cups in a circle Keep in microwave oven during standing time and stir well Soup chilled...

Страница 25: ...efrosting food For defrosting of frozen food with a temperature of about 18 to 20 C use the following table as a guide All frozen food should be defrosted using defrosting power level 180 W Food Porti...

Страница 26: ...ooking Please refer to the grill table for further details IMPORTANT REMARK Whenever the combination mode microwave grill is used the food should be placed on the high rack unless another instruction...

Страница 27: ...l and well known method of cooking food in an oven with hot air circulated by a fan on the back wall Cookware for cooking with microwaves convection Should be able to let the microwaves pass through S...

Страница 28: ...oast Chicken 1000 1100 g 450 W 220 C 17 22 13 17 Brush chicken with oil and spices Put chicken first breast side down second side breast side up on the low rack Stand for 5 minutes BREAD Fresh Bread R...

Страница 29: ...imes well during cooking BROWNING ALMOND SLICES Spread 30 g sliced almonds evenly on a medium sized ceramic plate Stir several times during browning for 3 to 4 minutes using 600 W Let it stand for 2 3...

Страница 30: ...d damp may adversely affect the working parts in the oven Technical Specifications SAMSUNG strives to improve its products at all times Both the design specifications and these user instructions are t...

Страница 31: ...cake 900 W 5 6 min Place a GGG23cm pyrex dish on turntable 12 3 3 Meat loaf 600 W 23 27 min Place the pyrex dish on glass turntable Combination cooking with the microwave 12 3 4 Potato gratin 450 W 20...

Страница 32: ...jlXW loTWZ X m luU GGw GZYGGt SGh GX SGYWW GGXXaZZGht...

Отзывы: