background image

35

English

05

Other

 Information

Issues

Solutions and Explanations

The remote control does not work.

•  Replace the remote control batteries with the poles (+/–) in the right direction.
•  Clean the sensor’s transmission window on the remote.
•  Try pointing the remote directly at the TV from 5~6 feet away.

The TV is making a humming noise.

•  Plasma TVs typically make a soft humming sound. This is normal. It’s caused by the electrical charges 

that are used to create the images on the screen.

•  If the humming sound is loud, you may have set the brightness on the TV too high. Try setting the 

brightness lower.

•  You can also have loud humming if the back of your Plasma TV is too close to a wall or other hard 

surface. Also try rerouting your connection cables.

•  Improper installation of wall mount can create excessive noise.

Image Retention (Burn In) Issue.

•  To minimize the possibility of screen burn, this unit is equipped with screen burn reduction technology. 

Pixel Shift technology enables you to set picture movement up/down (Vertical Line) and side to side 
(Horizontal Dot).

The cable/set top box remote control 
doesn’t turn the TV on or off, or adjust the 
volume.

•  Program the Cable/Set remote control to operate the TV. Refer to the Cable/Set user manual for the 

SAMSUNG TV code.

A “Mode Not Supported” message 
appears.

•  Check the supported resolution of the TV, and adjust the external device’s output resolution 

accordingly. Refer to the resolution settings on page 11 of this manual.

Caption

 on TV menu is greyed out.

• 

Caption

 can not be selected in the TV menu when connected via HDMI or Component (p. 21).

• 

Caption

 must be activated on the external device (p. 21).

There is a plastic smell from the TV.

•  This smell is normal and will dissipate over time.

The TV 

Signal Strength

 is unavailable in 

the Self Diagnostic Test menu.

•  This function is only available with digital channels from an Antenna / RF/Coax connection (p. 22).

The TV is tilted to the side.

•  Remove the base stand from the TV and reassemble it.

The channel menu is greyed out 
(unavailable).

•  The 

Channel

 menu is only available when the TV source is selected.

Your settings are lost after 30 minutes or 
every time the TV is turned off.

•  If the TV is in the 

Store Demo

 mode, it will reset audio and picture settings every 30 minutes. Change 

the settings from 

Store Demo

 mode to 

Home Use

 mode in the 

Plug & Play

 procedure. Press the 

SOURCE 

button to select 

TV

 mode, and go to 

MENU


Setup


Plug & Play


ENTER

E

 (p. 8).

You have intermittent loss of audio or 
video.

•  Check the cable connections and reconnect them.
•  Loss of audio or video can be caused by using overly rigid or thick cables. Make sure the cables are 

flexible enough for long term use. If mounting the TV to a wall, we recommend using cables with 90 
degree connectors.

You see small particles when you look 
closely at the edge of the frame of the TV.

•  This is part of the product’s design and is not a defect.

POP (TV’s internal banner ad) appears on 
the screen.

•  Select 

Home Use

 under 

Plug & Play

 mode. For details, refer to 

Plug & Play

 Feature (p. 8).


Some of above pictures and functions are available at specific models only.

[PC450-USA]BN68-02577A-04Eng.indb   35

2010-06-23   오후 1:12:07

Содержание BN68-02577A-04

Страница 1: ...NG WORLDWIDE If you have any questions or comments relating to Samsung products please contact the SAMSUNG customer care center Country Customer Care Center Web Site Address CANADA 1 800 SAMSUNG 726 7864 www samsung com ca Samsung Electronics Canada Inc Customer Service 55 Standish Court Mississauga Ontario L5R 4B2 Canada U S A 1 800 SAMSUNG 726 7864 www samsung com us Samsung Electronics America ...

Страница 2: ...ce Center Transportation to and from the Service Center is the responsibility of the purchaser Conditions covered are limited only to manufacturing defects in material or workmanship and only those encountered in normal use of the product Excluded but not limited to are any originally specified provisions for in home or on site services minimum or maximum repair times exchanges or replacements acc...

Страница 3: ... Adjusting Sound Settings 18 Sound Settings 18 y y Setup Menu 18 Setting the Time 18 Using the Sleep Timer 19 Setting the On Off Timer 19 Locking Programs 19 Economical Solutions 21 Other Features 21 y y Support Menu 22 Advanced Features y y Media Play 23 Connecting a USB Device 23 y y Anynet 26 Setting Up Anynet 27 Switching between Anynet Devices 28 Recording 28 Listening through a Receiver 28 T...

Страница 4: ... items colors and shapes may vary depending on the models y y Remote Control BN59 00997A Batteries AAA x 2 y y Owner s Instructions y y Warranty Card Safety Guide Quick Setup Guide y y Cleaning Cloth BN63 01798B y y Power Cord Blanking Bracket BN63 06456A Ferrite Core for Power Cord 1EA y 3301 002049 Ferrite Core for Power Cord The ferrite cores are used to shield the cables from interference When...

Страница 5: ...n fasten two screws M4 X L16 at position 2 NOTE x x Make sure to distinguish between the front and back of the Stand and Guide Stand when assembling them x x Make sure that at least two persons lift and move the PDP TV x x Stand the product up and fasten the screws If you fasten the screws with the PDP TV placed down it may lean to one side Do not insert your fingers into the stand base slot of th...

Страница 6: ... z Changes the channels In the OSD use the z buttons as you would use the and buttons on the remote control Power Indicator Blinks and turns off when the power is on and lights up in standby mode P Power Turns the TV on or off Remote control sensor Aim the remote control towards this spot on the TV Standby mode Do not leave your TV in standby mode for long periods of time when you are away on a ho...

Страница 7: ...reen menu items and changes the values seen on the menu Exits the menu S MODE Press to select the sound mode p 17 SLEEP Automatically shuts off the TV at a preset time p 19 MTS Press to choose stereo mono or Separate Audio Program SAP broadcast p 18 P MODE Press to select the picture mode p 15 P SIZE Selects the picture size p 16 CC Controls the caption decoder p 21 Press to directly access channe...

Страница 8: ...on the TV When you see the volume OSD press and hold MENU for 5 sec 3 Selecting an antenna Press the or button then press the ENTERE button Select Air Cable or Auto 4 Selecting a channel Press the or button then press the ENTERE button Select the channel source to memorize When setting the antenna source to Cable a step appears allowing you to assign numerical values channel frequencies to the cha...

Страница 9: ... the external device about the HDMI version and if out of date request an upgrade x x Be sure to purchase a certified HDMI cable Otherwise the picture may not display or a connection error may occur Using a Component up to 720p 1080i or Audio Video 480i only Cable Available devices DVD Blu ray player cable box STB satellite receiver VCR When connecting to AV IN the color of the AV IN Y VIDEO jack ...

Страница 10: ...cable box STB Set Top Box satellite receiver and is connected to the TV via HDMI only 2 CH audio will be heard from the amplifier or DVD home theater If you want to hear 5 1 CH audio connect the digital audio out jack from your DVD Blu ray player cable box STB satellite receiver directly to an amplifier or home theater AUDIO OUT Connects to the audio input jacks on your amplifier DVD home theater ...

Страница 11: ... 1024 x 768 1024 x 768 1024 x 768 1280 x 720 1360 x 768 31 469 37 500 37 861 37 879 46 875 48 077 48 363 56 476 60 023 45 000 47 712 59 940 75 000 72 809 60 317 75 000 72 188 60 004 70 069 75 029 60 000 60 015 25 175 31 500 31 500 40 000 49 500 50 000 65 000 75 000 78 750 74 250 85 500 VESA GTF 1280 x 720 52 500 70 000 89 040 NOTE x x For HDMI DVI cable connection you must use the HDMI IN 1 DVI ja...

Страница 12: ...Basic Features How to Navigate Menus Before using the TV follow the steps below to learn how to navigate the menu and select and adjust different functions S MODE SLEEP MEDIA P P MODE P SIZE 1 2 3 4 A B C D 1 MENU button Displays the main on screen menu 2 ENTERE Direction button Move the cursor and select an item Confirm the setting 3 RETURN button Returns to the previous menu 4 EXIT button Exits ...

Страница 13: ...l Status Display Icons Icons Operations c A channel selected A channel set as a Favorite A reserved Program Using Favorite Channels O O MENUm Channel Channel List ENTERE Add to Favorite Delete from Favorite t Set channels you watch frequently as Favorites 1 Select a channel and press the TOOLS button 2 Add or delete a the channel using the Add to Favorite or Delete from Favorite menu respectively ...

Страница 14: ...dd menu only appears for deleted channels x x Delete a channel from the Added Channels or Favorite menu in the same manner Timer Viewing You can set a desired channel to be displayed automatically at the reserved time Set the current time first to use this function 1 Press the buttons to select the desired channel in Channel List 2 Press the TOOLS button then select Timer Viewing 3 Scroll up or do...

Страница 15: ...n only make changes to Cell Light Contrast and Brightness x x Settings can be adjusted and stored for each external device connected to the TV Changing the Picture Options Advanced Settings O O MENUm Picture Advanced Settings ENTERE Advanced Settings are available in Standard Movie mode Compared to previous models new Samsung TVs have a more precise picture In PC mode you can only make changes to ...

Страница 16: ...or button to select Position 2 Press the ENTERE button 3 Press the or button to move the picture 4 Press the ENTERE button 5 Press the or button to select Reset 6 Press the ENTERE button x x HD High Definition 16 9 1080i 1080p 1920x1080 720p 1280x720 x x Settings can be adjusted and stored for each external device you have connected to an input on the TV Input Source Picture Size ATV AV Component ...

Страница 17: ... the settings automatically Not available when connecting with an HDMI DVI cable Screen Coarse Fine Removes or reduces picture noise If the noise is not removed by Fine tuning alone then adjust the frequency as best as possible Coarse and Fine tune again After the noise has been reduced readjust the picture so that it is aligned to the center of screen Position Adjust the PC s screen positioning i...

Страница 18: ...ions the volume can vary as you switch between channels This feature lets you automatically adjust the volume of the desired channel by lowering the sound output when the modulation signal is high or by raising the sound output when the modulation signal is low Speaker Select External Speaker TV Speaker A sound echo may occur due to a difference in decoding speed between the main speaker and the a...

Страница 19: ...y one photo file in the USB the Slide Show will not play x x If a folder name is too long the folder cannot be selected x x Each USB you use is assigned its own folder When using more than one of the same type of USB make sure the folders assigned to each USB have different names Repeat Select Once Everyday Mon Fri Mon Sat Sat Sun or Manual to set at you convenience If you select Manual you can se...

Страница 20: ... ans Programming may not be suitable for children under the age of 13 16 ans Programming is not suitable for children under the age of 16 18 ans Programming restricted to adults The V Chip will automatically block any category that deals with more sensitive material For example if you block the 8 ans category then 13 ans 16 ans and 18 ans will automatically be blocked also Downloadable U S Rating ...

Страница 21: ...t available Caption On Screen Text Messages Caption Off On You can switch the caption function on or off If captions are not available they will not be displayed on the screen CC The Caption feature doesn t work in Component HDMI or PC modes Caption Mode You can select the desired caption mode The availability of captions depends on the program being broadcast Default CC1 CC4 Text1 Text4 analog ch...

Страница 22: ... performing the sound test make sure Speaker Select is set to TV Speaker in the Sound menu The melody will be heard during the test even if Speaker Select is set to External Speaker or the sound is muted by pressing the MUTE button Yes If you can hear sound only from one speaker or not at all during the sound test select Yes There may be a problem with the TV Contact Samsung s Call Center for assi...

Страница 23: ...es of MSC are Thumb drives and Flash Card Readers Both USB and HUB are not supported x Before connecting your device to the TV please back up your files to prevent them from damage or loss of data SAMSUNG is not responsible for any data file damage or data loss x Please connect directly to the USB port of your TV If you are using a separate cable connection there may be a USB Compatibility problem...

Страница 24: ...deleted from the PC is still found when Media Play is run use the Empty the Recycle Bin function on the PC to permanently delete the file Photo Viewing a Photo or Slide Show 1 Press the INFO button to display the option View Start Slide Show Delete Delete All Deselect All 2 Press the or button to select Start Slide Show then press the ENTERE button During the slide show files are displayed in orde...

Страница 25: ...a sound problem y y Music function information icons Repeat Music is On Repeat Music is Off When pressing the Play Pause button on the remote control while music is playing When pressing the Stop button on the remote control the music stops Photo Photo Music Setup SUM 307 2MB 973 7MB Music Photo Music Setup SUM 307 2MB 973 7MB DSC_0558 JPG 580 440 78 0KB 03 14 SUM Photo 307 2MB 973 7MB File jpg Fi...

Страница 26: ...ting While a slide show is in progress use the Background Music Setting to select a music file to listen to Select an MP3 file as the background music Repeat Music Select to determine whether to repeat playing the music when all MP3 files in the current folder have been played Screen Saver Select to set the waiting time before the screen saver appears The screensaver will appear when no button is ...

Страница 27: ...et device list device_name MENU Shows the connected device menus E g If a DVD recorder is connected the disc menu of the DVD recorder will appear device_name INFO Shows the play menu of the connected device E g If a DVD recorder is connected the play menu of the DVD recorder will appear Recording recorder Starts recording immediately using the recorder This is only available for devices that suppo...

Страница 28: ... whatever you are currently watching If you are watching video from another device the video from the device is recorded Before recording check whether the antenna jack is properly connected to the recording device To properly connect an antenna to a recording device refer to the recording device s users manual Listening through a Receiver You can listen to sound through a receiver i e Home Theate...

Страница 29: ...button on the TV remote control and select a non Anynet device Press z PRE CH and FAV CH to change the TV mode Note that the channel button operates only when a tuner embedded Anynet device is not connected The message Connecting to Anynet device appears on the screen You cannot use the remote control when you are configuring Anynet or switching to a view mode Use the remote control when the Anyne...

Страница 30: ...l mount kits are shown in the table below x x When purchasing our wall mount kit a detailed installation manual and all parts necessary for assembly are provided x x Do not use screws that do not comply with the VESA standard screw specifications x x Do not use screws that are longer than the standard dimension or do not comply with the VESA standard screw specifications Screws that are too long m...

Страница 31: ...nd other objects e g walls to ensure proper ventilation Failing to do so may result in fire or a problem with the product due to an increase in the internal temperature of the product When using a stand or wall mount use parts provided by Samsung Electronics only x x If you use parts provided by another manufacturer it may result in a problem with the product or an injury due to the product fallin...

Страница 32: ...ure to use only the appropriate supplied screw If you use a different screw you can damage your TV 2 Firmly fasten the screw you provided size M4xL20 or similar to the wall or cabinet where the TV is to be installed If you fasten the screw to the wall we recommend you drive the screw into a stud If that is not possible use a molly to anchor the screw 3 Tie the TV Holder cord to the screw fastened ...

Страница 33: ... Try resetting the picture to view the default picture settings go to MENU Picture Picture Reset p 17 There is a dotted line on the edge of the screen If the picture size is set to Screen Fit change it to 16 9 p 16 Change cable satellite box resolution The picture is black and white If you are using an AV composite input connect the video cable yellow to the Green jack of component input 1 on the ...

Страница 34: ...en select Auto and make sure the correct Cable TV signal type is set in the menu There are 3 options STD HRC and IRC p 13 Verify the Antenna is positioned correctly No Caption on digital channels Check Caption Setup menu Try changing Caption Mode Service1 to CC1 p 21 Some channels may not have caption data The picture is distorted macro block error small block dots pixelization Compression of vide...

Страница 35: ... on TV menu is greyed out Caption can not be selected in the TV menu when connected via HDMI or Component p 21 Caption must be activated on the external device p 21 There is a plastic smell from the TV This smell is normal and will dissipate over time The TV Signal Strength is unavailable in the Self Diagnostic Test menu This function is only available with digital channels from an Antenna RF Coax...

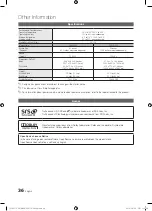
Страница 36: ... 3 x 786 3 mm Weight Without Stand With Stand 38 6 Ibs 17 5 kg 43 0 Ibs 19 5 kg 50 7 Ibs 23 kg 55 1 Ibs 25 kg Display Resolution 1024 X 768 1360 X 768 Design and specifications are subject to change without prior notice This device is a Class B digital apparatus For information about power supply and more about power consumption refer to the label attached to the product License TruSurround HD SRS...

Страница 37: ...del name 1 2 3 4 5 6 PN42C450 15 2 3 4 3 2 29 2 15 7 15 7 PN50C450 19 4 3 7 2 5 35 7 15 7 15 7 NOTE All drawings are not necessarily to scale Some dimensions are subject to change without prior notice Refer to the dimensions prior to performing installation of your TV Not responsible for typographical or printed errors 2010 Samsung Electronics America Inc 1 2 3 4 5 6 7 8 1 2 3 4 5 6 PC450 USA BN68...

Страница 38: ...CH button 7 13 Film Mode 16 Fine Tune 15 Flesh Tone 15 Frequency 11 H HDMI 9 26 Home Theater 10 26 I Installation Space 31 L Language 21 License 36 M Media Play 23 Melody 22 Mono 18 Music 25 N Navigate 12 O Optimal resolution 11 P Photo 24 Picture Size 16 Plug Play 8 Power Indicator 6 R Receiver 28 Recording 28 Remote Control 7 Repeat Music 25 S Select All 14 Self Diagnosis 22 Sharpness 15 Sleep T...

Отзывы: