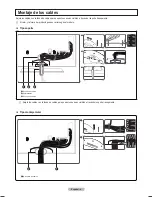
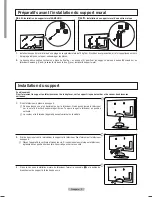
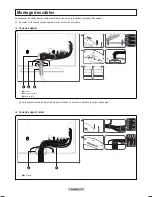
background image

Français - 7

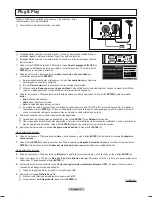
Pour choisir la source

Appuyez sur la touche SOURCE de la télécommande. Vous pouvez sélectionner le mode TV ou une source d’entrée branchée au téléviseur. 

Choisissez la source d’entrée désirée à l’aide de cette touche.

TV, AV, Component, PC, HDMI1/DVI, HDMI, HDMI, HDMI4, USB.

Pour plus de détails, reportez-vous au guide électronique.

N
N

Configuration du format de l’écran

Si vous désirez modifier le format de l’image à l’écran, Appuyez sur la touche MENU. Vous pouvez choisir le format de l’image en 

sélectionnant Image→ Options d’image → Format. Appuyer sur la touche ▲ ou ▼ pour sélectionner le format d’écran désiré. (16:9 / Zoom1 

/ Zoom2 / Format large / 4:3 / Just Scan)

Vous pouvez également appuyer plusieurs fois sur la touche 

P.SIZE

 de la télécommande pour changer le format de l’image.

O

Si vous souhaitez réinitialiser ce paramètre...

1.

  Appuyez sur la touche MENU. Appuyez sur la touche ▲ ou ▼ pour choisir 

Configuration

, puis sur 

ENTER

E

.

.

   Appuyez sur 

ENTER

E

 de nouveau pour sélectionner Prêt à l’emploi.

La fonction

 Prêt à l’emploi

 n’est accessible qu’en mode 

TV

.

N

INTE

RNET

***

]lq}lùnst}

T

*Z€tw~

Wt~p*~z€}np

_a

[N*

E*8*8*8*8

La

E*8*8*8*8

Nzx{zypy

E*8*8*8*8

SOXT<:OaT

E*8*8*8*8

SOXT=

E*8*8*8*8

Picture Options

Nuance coul. 

: Normal

Format 

: 16:9 

Réduct. bruit num. 

: Auto

Nv nr HDMI 

: Normal

Démo 1080 Full HD Motion 

: Off

Mode Film 

: Off

Mode bleu seu. 

: Off

Dépl. 

E

 Intro. 

R

 Retour

INTE

RNET

Plug & Play

Select Language of the OSD.

Menu Language


:


Move


E

 Enter

English

Español

Français

BN68-02273A.indb   7

2009-04-07   오후 2:52:59

Содержание BN68-02135A

Страница 1: ...er Bottom Screw PN58B850Y1F PN58B860Y2F only Screws 5ea PN50B850Y1F PN50B860Y2F Only Ferrite Core 3301 001201 PN58B850Y1F PN58B860Y2F only Ferrite Core 7ea 3301 001305 The Supplied Accessories Installing Batteries in the Remote Control 1 800 SAMSUNG 7267864 Samsung Electronics America Inc 105 Challenger Road Ridgefield Park NJ 07660 0511 Samsung Electronics Canada Inc Customer Service 55 Standish ...

Страница 2: ...g TV Case B Screw down the hole 1 when installing wall mount on the wall Case A Installing the SAMSUNG Wall Mount Case B Installing another company s Wall Mount 3 When installing your TV on a wall close the cover 1 on the stand base connection using one screws Preparing before installing Wall Mount Installing the Stand Warning Firmly secure the stand to the TV before moving it as the stand may fal...

Страница 3: ...product color and shape may vary depending on the model Stand Type Enclose the cables in the Holder Wire Cable so that the cables are not visible through the transparent stand Wall Mount Type N N Assembling the Cables 1 2 1 3 2 1 3 2 1 2 1 2 1 3 2 1 3 2 1 Holder Wire 2 Holder Wire stand 3 Holder Wire cable 12 Holder Wire ...

Страница 4: ...nter items in the menu 6 Press the or button to decrease or increase the value of a particular item The adjustment OSD may differ depending on the selected menu 7 Press the ENTERE button to complete the configuration 8 Press the EXIT button to exit INTERNET INTERNET INTERNET Brightness 45 Enter Return Adjust Move MENU Button Display the main on screen menu ENTERE Button Move the cursor and select ...

Страница 5: ... company to identify the type of cable system that exists in your particular area 4 The TV will begin memorizing all of the available channels To stop the search before it has finished press the ENTERE button with Stop selected After all the available channels are stored the TV starts to remove scrambled channels The Auto program menu then reappears Press the ENTERE button when channel memorizatio...

Страница 6: ...or button to select the screen format you want 16 9 Zoom1 Zoom2 Wide Fit 4 3 Just Scan Alternately you can press the P SIZE button on the remote control repeatedly to change the picture size O If you want to reset this feature 1 Press the MENU button to display the menu Press the or button to select Setup then press the ENTERE button 2 Press the ENTERE button again to select Plug Play The Plug Pla...

Страница 7: ...und Check the volume Check whether the MUTEM button has been pressed on the remote control Check the Speaker Select settings Troubleshooting A B Switch Viewing channels A Normal B Scrambled Connecting an Antenna When you set the A B switch to B you will need to tune your TV to the cable box s output channel which is usually channel 3 or 4 ANT IN ANT IN ANT IN UHF VHF Splitter wall RF A B Switch Ca...

Страница 8: ... R R W VIDEO OUT COMPONENT OUT AUDIO OUT AUDIO OUT DVI OUT HDMI OUT AUDIO OUT VIDEO OUT T DVI OUT AUDIO OUT VIDEO OUT COMPONENT OUT HDMI OUT AUDIO OUT HDMI DVI PC COMPONENT VIDEO Best Normal Component connection Using a Component Cable DVD Blu Ray player Cable Box Satellite receiver Using a DVI Cable DVD Blu Ray player HD Cable Box HD Satellite receiver STB HD connection Using an HDMI Cable DVD Bl...

Страница 9: ...O OUT OPTICAL AUDIO IN Using a D Sub Cable PC OUT Using a D Sub Cable HDMI OUT DVI OUT AUDIO OUT AUDIO OUT OPTICAL AUDIO IN Using a D Sub Cable PC OUT Using a D Sub Cable HDMI OUT DVI OUT AUDIO OUT AUDIO OUT OPTICAL AUDIO IN Using a D Sub Cable PC OUT Using a D Sub Cable HDMI OUT AUDIO OUT OPTICAL Digital AUDIO Analog Best Normal Using an Optical Cable Digital Audio connection Digital Audio System...

Страница 10: ...B850Y1F PN50B860Y2F Cubierta inferior Tornillos sólo PN58B850Y1F PN58B860Y2F Tornillos 5 Sólo PN50B850Y1F PN50B860Y2F Núcleo de ferrita 7unid 3301 001305 Núcleo de ferrita 3301 001201 sólo PN58B850Y1F PN58B860Y2F Accesorios incluidos Instalación de las pilas en el mando a distancia 1 800 SAMSUNG 7267864 Samsung Electronics America Inc 105 Challenger Road Ridgefi eld Park NJ 07660 0511 Samsung Elec...

Страница 11: ...presa Caso B Se ha de fijar en el orificio 1 cuando instale el montaje mural en la pared Caso A Instalación del montaje mural SAMSUNG Caso B Instalación del montaje mural de otra empresa 3 Cuando instale el televisor en una pared fije la tapa 1 al soporte con dos tornillos Preparación para instalar el montaje mural Instalación del soporte Advertencia Sujete firmemente el soporte al televisor antes...

Страница 12: ...la forma del producto pueden variar según el modelo Tipo soporte Sujete los cables con la funda de cables para que éstos no sean visibles a través del soporte transparente Tipo montaje mural N N Montaje de los cables 1 2 1 3 2 1 3 2 1 2 1 2 1 3 2 1 3 2 1 Soporte de cables 2 Sujetacables 3 Soporte de cables 12 Soporte de cables ...

Страница 13: ...el botón ENTERE para acceder a los elementos del menú 6 Pulse los botones o para reducir o aumentar el valor de una opción concreta La visualización en pantalla de ajuste puede variar según el menú seleccionado 7 Pulse el botón ENTERE para completar la configuración 8 Pulse el botón EXIT para salir INTERNET INTERNET INTERNET Brillo 45 Ingresar Regresar Ajustar Mover Botón MENU Muestra el menú de p...

Страница 14: ...en contacto con su proveedor de cable para averiguar el tipo de sistema de cable existente en su zona 4 El televisor comenzar a memorizar todos los canales disponibles Para detener la bsqueda antes de que finalice pulse el botn ENTERE con Detener seleccionado Una vez guardados todos los canales disponibles el televisor inicia la eliminacin de los canales codificados Vuelve a mostrarse el men de pr...

Страница 15: ...seleccionar el formato de pantalla que desee 16 9 Zoom1 Zoom2 Ajuste ancho 4 3 Just Scan Sólo explorar O bien puede pulsar repetidamente el botón P SIZE del mando a distancia para cambiar el tamaño de la imagen O Si desea reiniciar esta función 1 Pulse el botón MENU para ver el menú Pulse los botones o para seleccionar Configuración y a continuación pulse el botón ENTERE 2 Pulse de nuevo el botón ...

Страница 16: ...EM se ha pulsado en el mando a distancia Compruebe la configuración de la selección del altavoz Identificación de problemas Conmutador A B Visualización de canales A Normal B Codificados Conexión de una antena Cuando ajuste el conmutador A B en la posición B necesitará sintonizar el TV con el canal de salida del receptor de cable que normalmente es el canal 3 o 4 ANT IN ANT IN ANT IN UHF VHF Separ...

Страница 17: ...UT AUDIO OUT AUDIO OUT DVI OUT HDMI OUT AUDIO OUT VIDEO OUT T DVI OUT AUDIO OUT VIDEO OUT COMPONENT OUT HDMI OUT AUDIO OUT HDMI DVI PC COMPONENT VIDEO Óptima Normal Conexión de Component Mediante un cable de componentes Reproductor DVD Blu ray receptor por cable satélite Uso de un cable HDMI Reproductor DVD Blu ray o receptor por cable HD satélite HD decodificador Conexión HD Mediante un cable DVI...

Страница 18: ...TICAL AUDIO IN Using a D Sub Cable PC OUT Using a D Sub Cable HDMI OUT DVI OUT AUDIO OUT AUDIO OUT OPTICAL AUDIO IN Using a D Sub Cable PC OUT Using a D Sub Cable HDMI OUT DVI OUT AUDIO OUT AUDIO OUT OPTICAL AUDIO IN Using a D Sub Cable PC OUT Using a D Sub Cable HDMI OUT AUDIO OUT OPTICAL Digital AUDIO Analógico Óptima Normal Mediante un cable óptico Conexión de Audio Digital Sistema de audio dig...

Страница 19: ...se Vis PN58B850Y1F PN58B860Y2F seulement Vis 5ea PN50B850Y1F PN50B860Y2F seulement Tore magnétique 3301 001201 PN58B850Y1F PN58B860Y2F seulement Tore magnétique 7ea 3301 001305 Accessoires fournis Insertion des piles dans la télécommande INTERNET 1 800 SAMSUNG 7267864 Samsung Electronics America Inc 105 Challenger Road Ridgefi eld Park NJ 07660 0511 Samsung Electronics Canada Inc Service à la clie...

Страница 20: ...a au support Deux personnes ou plus devraient porter le téléviseur Ne déposez jamais le téléviseur sur le sol afin d éviter d endommager l écran Toujours ranger le téléviseur en position verticale La couleur et la forme de l appareil peuvent varier selon le modèle N N 1 Installez le support mural à l aide d une plage de couple maximale de 15 kgf cm Procédez avec précaution si la force appliquée es...

Страница 21: ...et la forme du produit peuvent varier en fonction du modèle Type de support Faites passer les câbles dans le câble porte fil afin qu on ne les voie pas dans le support transparent Type de support mural N N Montage des câbles 1 2 1 3 2 1 3 2 1 2 1 2 1 3 2 1 3 2 1 Porte fil 2 Support et porte fil 3 Câble porte fil 12 Porte fil ...

Страница 22: ... du sous menu 6 Appuyez sur la touche ou pour augmenter ou réduire la valeur d un élément particulier Le réglage du menu OSD varie en fonction du menu sélectionné 7 Appuyez sur ENTERE pour terminer la configuration 8 Appuyez sur la touche EXIT pour quitter le menu INTERNET INTERNET INTERNET Luminosité 45 Intro Retour Réglage Dépl Mode Standard Lumière cellule 4 Contraste 95 Luminosité 45 Netteté 5...

Страница 23: ...ionnez la source de signal pour une diffusion analogique et numérique Communiquez avec votre câblodistributeur local pour déteminer le type de système de câble de votre région 4 Le téléviseur commence la mémorisation des canaux accessibles Pour arrêter la recherche avant la fin appuyez sur la touche ENTERE lorsque la fonction Arrêt est sélectionnée Une fois tous les canaux mémorisés le téléviseur ...

Страница 24: ...che ou pour sélectionner le format d écran désiré 16 9 Zoom1 Zoom2 Format large 4 3 Just Scan Vous pouvez également appuyer plusieurs fois sur la touche P SIZE de la télécommande pour changer le format de l image O Si vous souhaitez réinitialiser ce paramètre 1 Appuyez sur la touche MENU Appuyez sur la touche ou pour choisir Configuration puis sur ENTERE 2 Appuyez sur ENTERE de nouveau pour sélect...

Страница 25: ...on d alimentation est bien branché à une prise électrique Assurez vous d avoir appuyé sur le bouton du téléviseur Vérifiez les réglages de contraste et de luminosité de l image Vérifiez le volume L image est normale mais aucun son n est émis Vérifiez le volume Vérifiez si la touche M Sourdine a été activée sur la télécommande Vérifiez les réglages Speaker Select Sélect le haut parleur Dépannage Ré...

Страница 26: ...UDIO OUT DVI OUT AUDIO OUT VIDEO OUT COMPONENT OUT HDMI OUT AUDIO OUT HDMI DVI PC COMPOSANTE VIDÉO Optimal Normal Branchement d une composante À l aide d un câble de composante Lecteur DVD Blu Ray câblosélecteur ou récepteur satellite À l aide d un câble DVI Lecteur DVD Blu Ray câblosélecteur HD ou récepteur satellite HD Branchement HD À l aide d un câble audio vidéo Codes de magnétoscope Branchem...

Страница 27: ...O OUT AUDIO OUT OPTICAL AUDIO IN Using a D Sub Cable PC OUT Using a D Sub Cable HDMI OUT AUDIO OUT R W R W OPTICAL AUDIO IN Using a D Sub Cable PC OUT Using a D Sub Cable HDMI OUT DVI OUT AUDIO OUT AUDIO OUT OPTICA AUDIO IN Using a D S Using a D S HDMI O AUDIO OUT AUDIO OUT OPTIQUE numérique AUDIO analogique Optimal Normal À l aide d un câble optique Branchementaudionumérique Système audionumériqu...

Страница 28: ...ontacter le Service Consommateurs Samsung Country Customer Care Center Web Site Address U S A 1 800 SAMSUNG 726 7864 www samsung com us Samsung Electronics America Inc 105 Challenger Road Ridgefield Park NJ 07660 0511 CANADA 1 800 SAMSUNG 726 7864 www samsung com ca Samsung Electronics Canada Inc Customer Service 55 Standish Court Mississauga Ontario L5R 4B2 Canada Samsung Electronique Canada Inc ...

Отзывы: