background image

Español - 10

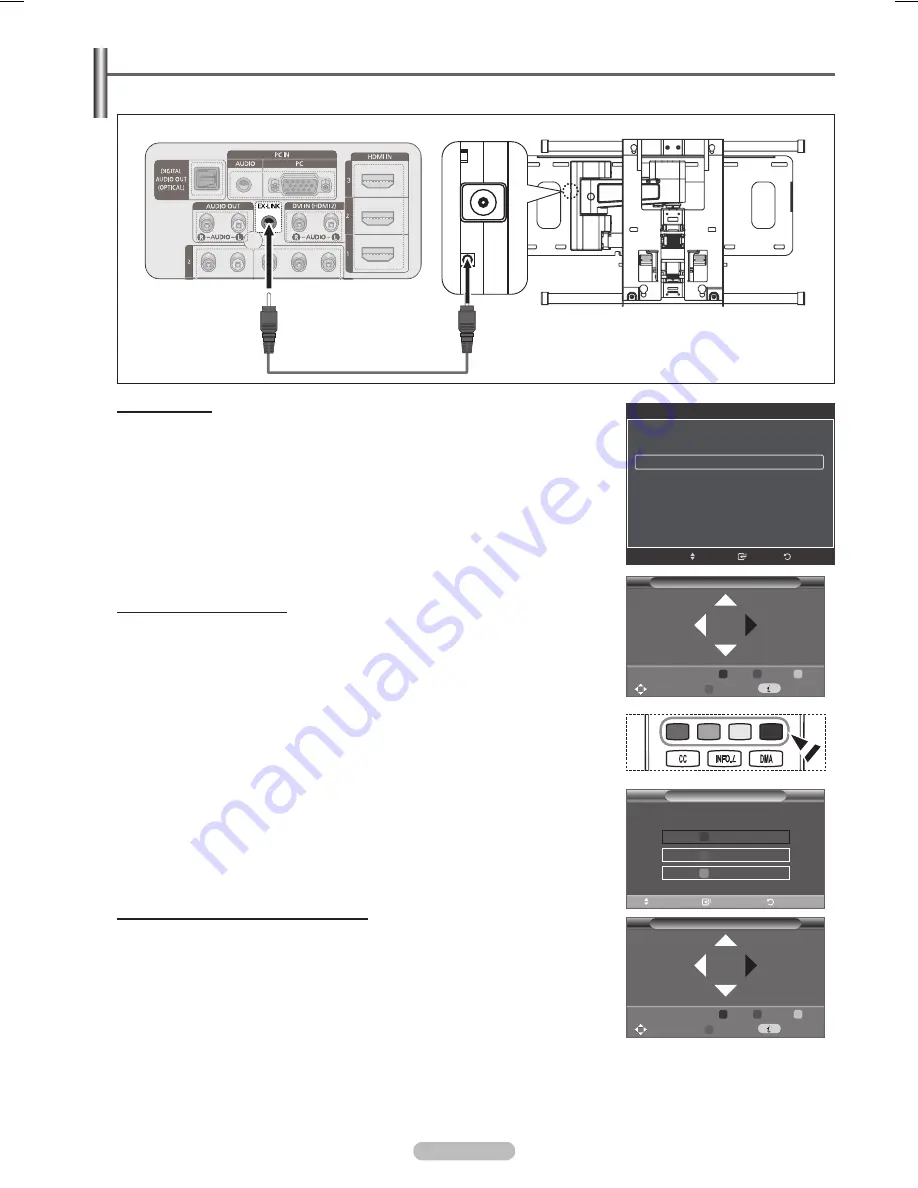
Acceso al menú

Pulse los botones ▲, ▼, ◄ o ► del mando a distancia.

  Se muestra la pantalla Ajuste de montaje en pared.

  Si no se muestra la pantalla Ajuste de montaje en pared cuando se hace clic en 

un botón de dirección mientras se está viendo la televisión, use el menú para 

mostrar la pantalla.

•  Pulse el botón 

MENU

 para ver el menú. Pulse los botones ▲ o ▼ para seleccionar 

Configuración

 y, a continuación, pulse el botón 

ENTER

.

•   Pulse los botones ▲ o ▼ para seleccionar 

Configuración externa

 y, a 

continuación, pulse el botón 

ENTER

.

•  Pulse los botones ▲ o ▼ para seleccionar 

Ajuste de montaje en pared

 y, a 

continuación, pulse el botón 

ENTER

.

Memorización de la posición
 

Ajuste la posición deseada mediante los botones ▲, ▼, ◄ o ►.

  Si pulsa un botón de flecha sin que haya aparecido un OSD en la pantalla del 

televisor, aparece la pantalla de ajuste.

  Pulse el botón 

INFO

 para reiniciar. Pulse los botones ◄ o ► para seleccionar 

 y, a continuación, pulse el botón 

ENTER

. La posición se inicializa con la 

configuración predeterminada.


Pulse el botón azul.

Pulse los botones ▲ o ▼ para seleccionar un modo de guardar entre 

Posición 1

Posición

 o 

Posición

 a fin de guardar la posición actual. 

  Si no desea guardar la posición actual, pulse el botón 

RETURN

.

  Cuando se selecciona un modo de guardar, no se pueden usar los botones de 

colores.


Pulse el botón 

ENTER

 para guardar.

  Cuando se selecciona 

 Posición 1

, se muestra el mensaje 

Posición actual 

guardada como Posición 1

.

Pulse el botón 

ENTER

.

  La posición guardada se muestra en la parte izquierda de la OSD.

Desplazamiento a la posición memorizada

Complete el paso 1 de 

Acceso al menú

.


Pulse un botón de color (rojo, verde, amarillo) para mover el montaje mural a la 

posición guardada.

  Se puede mover el montaje mural a una de las tres posiciones preconfiguradas 

con los botones rojo (posición 1), verde (posición 2) o amarillo (posición 3).

  Si después de usar una posición preconfigurada se ajusta ésta, la visualización de 

la posición desaparece.

  Para la instalación, consulte el manual de instalación proporcionado con el equipo de 

montaje mural.

  Para la instalación del producto, así como la instalación y movimiento del montaje en la pared, consulte a una empresa 

especializada en instalaciones.

  La instalación manual se debe usar al colocar el equipo de montaje en una pared. Para colocarlo en otros materiales de 

construcción, póngase en contacto con el distribuidor más cercano.

  El montaje mural no está operativo cuando  

o WISELINK están funcionando

.

Ajuste de montaje mural automático (se vende por separado) (PN50A50T1F)

Una vez instalado el montaje mural automático, la posición del televisor se puede ajustar fácilmente.

Panel posterior del TV

Montaje mural automático

Cable EX-LINK (no suministrado)

Guardar

Seleccione un modo para guardar.

  Posición 1
  Posición 2
  Posición 3

Mover

Regresar

Ingresar

Configuración externa

Regresar

Ingresar

Mover

Melodía 

: Medio

Efecto de luz 

: Modo vis. act.

Ajuste de montaje en pared 

Ajustar

Posición

1

2

3

 Centro

Guardar

Ajuste de montaje en pared

Ajustar

Posición

1

2

3

 Centro

Guardar

Ajuste de montaje en pared

Posición 1

BN68-01653A-Spa.indb   130

8/14/2008   1:11:05 PM

Содержание 760 Series

Страница 1: ...e Si vous avez des suggestions ou des questions concernant les produits Samsung veuillez contacter le Service Consommateurs Samsung Country Customer Care Center Web Site Address CANADA 1 800 SAMSUNG 7...

Страница 2: ...rtain intellectual property rights of certain third parties In particular this product is licensed under the following US patents 5 991 715 5 740 317 4 972 484 5 214 678 5 323 396 5 539 829 5 606 618...

Страница 3: ...temperature or humidity This is normal and not a defect of the unit Cell Defects The PDP uses a panel consisting of 1 230 000 SD level to 3 150 000 HD level pixels which require sophisticated technol...

Страница 4: ...ning Analog Channels 47 Checking the Digital Signal Strength 48 PC Display Using Your TV as a Computer PC Display 49 Display Modes 49 Setting up the TV with your PC 50 Time Setting Setting the Time 52...

Страница 5: ...arranty Card Safety Guide Manual Not available in all locations Cleaning Cloth BN63 01798B Cover Bottom Screws 2ea PN50A760T1F PN58A760T1F only Refer to page 131 Ferrite Core for Power Cord 3301 00130...

Страница 6: ...to see an on screen menu of your TV s features 3 VOL Press to increase or decrease the volume In the on screen menu use the VOL buttons as you would use the and buttons on the remote control 4 CH Pres...

Страница 7: ...LAN cable to this port to connect to the Network SAMSUNG s InfoLink Service See page 96 9 COMPONENT IN 1 2 AV IN 1 Connects Component video audio The COMPONENT IN 1 jack is also used as the AV IN 1 j...

Страница 8: ...BUTTONS Use these buttons in the Channel list and WISELINK etc CC Controls the caption decoder E MODE Press to select the preset display and sound modes for sports cinema and games Use these buttons i...

Страница 9: ...edure requires an optional combiner adaptor available at most electronics shops 1 Connect both antenna leads to the combiner 2 Plug the combiner into the ANT IN terminal on the bottom of the back pane...

Страница 10: ...IN terminal on your cable box This terminal might be labeled ANT IN VHF IN or simply IN 2 Connect this cable to a two way splitter 3 Connect an Antenna cable between an OUTPUT terminal on the splitte...

Страница 11: ...atellite receiver Set Top Box What is HDMI HDMI or high definition multimedia interface is an interface that enables the transmission of digital audio and video signals using a single cable The differ...

Страница 12: ...e receiver Set Top Box to your TV 1 Connect a Component Cable between the COMPONENT IN 1 or 2 Y PB PR jacks on the TV and the COMPONENT Y PB PR jacks on the DVD Blu Ray Player or Cable Box Satellite r...

Страница 13: ...re as compared to a standard VCR 1 To begin follow steps 1 3 in the previous section to connect the antenna or cable to your VCR and your TV Connect an S Video Cable between the S VIDEO OUT jack on th...

Страница 14: ...nnected to the DIGITAL AUDIO OUT OPTICAL jack Decrease the volume of the TV and adjust the volume level with the system s volume control What is OPTICAL An optical cable converts an electric signal in...

Страница 15: ...Connect a 3 5 mm Stereo plug to 2RCA cable between the DVI IN HDMI2 R AUDIO L jack on the TV and the Audio Out jack of the sound card on your computer Each PC has a different back panel configuration...

Страница 16: ...then press the ENTER button We recommend setting the TV to Home Use mode for the best picture in your home environment Store Demo mode is only intended for use in retail environments If the unit is ac...

Страница 17: ...TER button Press the or button to select Off or On then the ENTER button The message Select the time zone in which you live is displayed 10 Press the or button to highlight the time zone for your loca...

Страница 18: ...7 The TV will change channels when you press the second number For quick channel change press the number buttons then press the ENTER button You can press number buttons on Remote control for direct c...

Страница 19: ...cture Sound Channel Setup Input Application 2 Press the or button to select one of the icons Then press the ENTER button to access the icon s sub menu To move to a lower menu turn the wheel clockwise...

Страница 20: ...ote control is on turns the button backlight on for a moment If you touch or move the remote control and the motion is detected by the sensor of the remote control the button backlight will be turned...

Страница 21: ...d the TV starts to remove scrambled channels see page 47 The Auto program menu then reappears If you want to stop Auto Programming press the ENTER button The Stop Auto Program message will be displaye...

Страница 22: ...u can name the device connected to the input jacks to make your input source selection easier 1 Press the MENU button to display the menu Press the or button to select Input then press the ENTER butto...

Страница 23: ...a particular item Press the ENTER button Press the EXIT button to exit When you make changes to Cell Light Contrast Brightness Sharpness Color or Tint G R the OSD will be adjusted accordingly When in...

Страница 24: ...w Sets the black color depth to low Medium Sets the black color depth to medium High Sets the black color depth to high Activating Dynamic Contrast You can adjust the screen contrast so that the optim...

Страница 25: ...e value of a particular item Press the ENTER button In Color you can adjust the RGB values for the selected color To reset the adjusted RGB value select Reset Red Adjusts the red saturation level of t...

Страница 26: ...NTER button R Offset Adjusts the red color darkness G Offset Adjusts the green color darkness B Offset Adjusts the blue color darkness R Gain Adjusts the red color brightness G Gain Adjusts the green...

Страница 27: ...button In PC mode you can only make changes to the Color Tone Size and Screen Burn Protection from among the items in Picture Options Adjusting the Color Tone 1 Follow the Activating Picture Options...

Страница 28: ...to move the picture up and down Reset Press the or button to select Reset then press the ENTER button You can initialize the setting Easy Setting 1 Press the TOOLS button on the remote control 2 Pres...

Страница 29: ...Follow the Activating Picture Options instructions numbers 1 and 2 Refer to page 27 2 Press the or button to select Digital NR then press the ENTER button 3 Press the or button to select Off Low Mediu...

Страница 30: ...Refer to page 27 2 Press the or button to select HDMI Black Level then press the ENTER button 3 Press the or button to select Normal or Low then press the ENTER button Normal The screen gets brighter...

Страница 31: ...Home Theaters etc Using this function you can adjust the Color and Tint to preferred values appropri ate to the signal level of each video device using the Red Green Blue Cyan Ma genta Yellow Color B...

Страница 32: ...e Gray When you watch TV with the screen ratio of 4 3 the screen is prevented from any damage by adjusting the white balance on both extreme left and right sides To prevent the screen burn from happen...

Страница 33: ...ou can minutely move pixels on the PDP in the horizontal or vertical direction to prevent after images on the screen 4 Press the or button to select the item you wish to change then press the ENTER bu...

Страница 34: ...ting the Picture Settings to the Factory Defaults 1 To select the desired picture mode follow the Changing the Picture Standard instructions numbers 1 and 2 see page 23 2 Press the or button to select...

Страница 35: ...select a particular item 4 Press the or button to select the required option 5 Press the EXIT or TOOLS button to exit Changing the Position of the PIP Window 4 Press the or button to select Position t...

Страница 36: ...Press the MENU button Press the or button to select Sound then press the ENTER button 2 Press the or button to select Equalizer then press the ENTER button 3 Press the ENTER button to select Mode Pres...

Страница 37: ...nal television speakers It is fully compatible with all multi channel formats 1 Press the MENU button to display the menu Press the or button to select Sound then press the ENTER button 2 Press the or...

Страница 38: ...e Audio Program which is usually a foreign language translation Multi Track Sound is available only in Analog TV mode Depending on the particular program being broadcast you can listen to Mono Stereo...

Страница 39: ...CH LIST EXIT VOL RETURN TOOLS INFO W LINK CH LIST EXIT and MUTE buttons do not operate when the Select Speaker is set to External Speaker Setting the Speaker You can set to have sound output from the...

Страница 40: ...esetting the Sound Settings to the Factory Defaults You can restore the Sound settings to the factory defaults Connecting Headphones Sold separately You can connect a set of headphones to your set if...

Страница 41: ...lists Using the Color buttons on the Remote with the Channel List Red Antenna Switches to DTV air or DTV cable Green Zoom Enlarges or shrinks a channel number Yellow Select Selects multiple channel li...

Страница 42: ...A channel must be deleted before it can be added back to the Added Channels list To Add Restore a channel back to the Added Channel List follow steps 1 3 above press the or button to select a channel...

Страница 43: ...button The channel is deleted from Favorites and the mark disappears Press the EXIT button to exit You can also Add or Delete a channel from Favorites in the Added Channels menu in the same manner All...

Страница 44: ...page 45 Only memorized channels can be reserved channels You can set the channel month day year hour and minute directly by pressing the number buttons on the remote control Press the CH LIST button...

Страница 45: ...Press the or button to select OK then press the ENTER button The viewing reservation has been canceled Press the EXIT button to exit Programmed Menu Change Info Select to change a viewing reservation...

Страница 46: ...ring Channels in Memory Auto Program Channels can labeled so that their call letters appear whenever the channel is selected 1 Press the MENU button Press the or button to select Channel then press th...

Страница 47: ...button to display the menu Press the or button to select Channel then press the ENTER button 2 Press the or button to select Fine Tune then press the ENTER button 3 Press the or button to adjust the f...

Страница 48: ...ion of available digital channels 1 Press the MENU button to display the menu Press the or button to select Channel then press the ENTER button 2 Press the or button to select Signal Strength then pre...

Страница 49: ...ystem equals the standard signal mode the screen is adjusted automatically If the signal from the system doesn t equal the standard signal mode adjust the mode by referring to your videocard user guid...

Страница 50: ...en make the vertical frequency adjustments and fine tune again After the noise has been reduced re adjust the picture so that it is aligned in the center of the screen Preset Press the SOURCE button t...

Страница 51: ...alizing the Screen Position You can replace all image settings with the factory default values Preset Press the SOURCE button to select PC mode 1 Press the MENU button to display the menu Press the or...

Страница 52: ...to move to Month Day Year Hour Minute or am pm Set the date and time you want by pressing the or button then press the ENTER button Press the EXIT button to exit The current time will appear every tim...

Страница 53: ...TER button Press the or button to select On or Off then press the ENTER button Press the EXIT button to exit Depending on the broadcast station and signal the auto time may not be set correctly If thi...

Страница 54: ...B Make sure that an USB device is connected to your TV Antenna Select Air or Cable Channel Select the desired channel Music Select the folder containing MP3 files on the USB device Photo Select the fo...

Страница 55: ...or button to select Off then press the ENTER button Press the EXIT button to exit Easy Setting 1 Press the TOOLS button on the remote control 2 Press the or button to select Sleep Timer 3 Press the or...

Страница 56: ...Press the or button to select the appropriate language English Espa ol or Fran ais then press the ENTER button Press the EXIT button to exit Plug Play Language English Time Network Selection Cable Cab...

Страница 57: ...pear Enter your 4 digit PIN number The default PIN number of a new TV set is 0 0 0 0 3 The V Chip screen will appear Press the or button to select Change PIN then press the ENTER button The Change PIN...

Страница 58: ...o methods The TV guidelines or the MPAA rating 1 Press the MENU button to display the menu Press the or button to select Setup then press the ENTER button 2 Press the or button to select V Chip then p...

Страница 59: ...ress to lock all TV ratings The TV Y TV Y7 TV G TV PG TV 14 and TV MA have additional options See the next step to change any of the following sub ratings ALL Lock all TV ratings L Adult language FV F...

Страница 60: ...lock or unblock the category Press the EXIT button to exit G General audience no restriction PG Parental guidance suggested PG 13 Parents strongly cautioned R Restricted Children under 17 should be ac...

Страница 61: ...ng intended for children under age 8 C8 Programming generally considered acceptable for children 8 years and over to watch on their own G General programming suitable for all audiences PG Parental gui...

Страница 62: ...All Press to lock all TV ratings G General 8 ans Not recommended for young children 13 ans Programming may not be suitable for children under the age of 13 16 ans Programming is not suitable for chil...

Страница 63: ...tton to activate the restriction selected The symbol is indicated Press the EXIT button to exit Allow All Press to unlock all TV ratings Block All Press to lock all TV ratings Parental restriction lev...

Страница 64: ...or CH button Under certain conditions depending on the rating of the local TV programs the V Chip might lock out all the channels In this case use the V Chip function for an emergency escape If you fo...

Страница 65: ...ze This option consists of Default Small Standard and Large The default is Default Font Style This option consists of Default Style0 Style7 You can change the font you want The default is Default Fore...

Страница 66: ...The Special Non Synchronous Use Captions This channel carries data that is intended to augment information carried in the program CC3 Secondary Synchronous Caption Service Alternate program related c...

Страница 67: ...Sleep Timer function Setting the Light Effect You can turn the blue LED on the front of TV on off 1 Press the MENU button to display the menu Press the or button to select Setup then press the ENTER b...

Страница 68: ...ovides the optimal picture and sound quality for sports Cinema Provides the optimal picture and sound quality for movie watching You can experience a richer picture and enhanced sound Game Provides th...

Страница 69: ...0 seconds is displayed 5 If the firmware on the USB is properly recognized the message Upgrade version xxxx to version xxxx The system would be reset after upgrade is displayed Press the or button to...

Страница 70: ...re than 5 seconds The Self Diagnostic Test menu appears 2 Press the or button to select Sound Test then press the ENTER button The message Does the problem still exist with this test pattern is displa...

Страница 71: ...and JPEG files while a PTP device supports JPEG files only The sequential jpeg format is supported Photo and audio files must be named in English French or Spanish If not the files can not be played C...

Страница 72: ...ol Using the Photo List This menu shows Photo files saved on an USB memory device Photo List 1 Press the W LINK button on the remote control to display the WISELINK Pro menu 2 Press the or button to s...

Страница 73: ...the number of photos that are selected by pressing the Yellow button 6 Help Items Red Device button Selects a connected device Green Favorites Setting button Changes the favorites setting for the sel...

Страница 74: ...e or button to select from the sublist of files grouped by Month To move to the previous next group press the RETURN TOOLS INFO W LINK CH LIST EXIT REW or RETURN TOOLS INFO W LINK CH LIST EXIT FF butt...

Страница 75: ...elect from the sublist of photos grouped by compositon To move to the previous next composition group press the RETURN TOOLS INFO W LINK CH LIST EXIT REW or RETURN TOOLS INFO W LINK CH LIST EXIT FF bu...

Страница 76: ...s the Green button repeatedly until the desired setting appears Favorites settings change completed Favorite options Users can select the number of stars up to 3 according to their preference The star...

Страница 77: ...ting the Photo files 1 Press the or button to select the desired photo in the Photo list 2 Press the TOOLS button 3 Press the or button to select Delete then press the ENTER button The Delete this fil...

Страница 78: ...the remote control to start the Slide Show Slide show function information icon Displayed at the top left of the screen Icon Current OSD Function Photo Slide Show Photo Slide Show is in progress Phot...

Страница 79: ...is not saved The Rotating function information icon is displayed at the top right of the screen Icon Current OSD Function Rotating 0 This rotates a photo to its original position Rotating 90 This rota...

Страница 80: ...to select Slide Show Speed Press the or button to select the desired option Normal Fast Slow You can select the Slide Show speed only during a slide show You can also change the speed of the Slide Sho...

Страница 81: ...od the music files ton the USB device and groups them accordingly Picture Setting Change the screen settings Refer to page 23 Sound Setting Change the audio settings Refer to page 36 Information The p...

Страница 82: ...tandard for sorting music files Title Artist Mood Genre Folder Preference 3 View Groups Shows the sorting groups The sorting group including the currently selected music file is highlighted 4 Current...

Страница 83: ...n change the Favorite information Music files for which information cannot be displayed are set to Unclassified If there is no title information for a music file the filename is displayed If no inform...

Страница 84: ...ress the or button to select a music file 2 Press the TOOLS button 3 Press the or button to select Change Group Info Press the ENTER button The mark appears on the top of the left of the selected musi...

Страница 85: ...K CH LIST EXIT REW or RETURN TOOLS INFO W LINK CH LIST EXIT FF button 3 Press the TOOLS button 4 Press the or button to select Play Current Group 5 Press ENTER to play the selected group of music file...

Страница 86: ...annot restore the deleted music files Viewing the Information The music file information including the order of the file in the current directory the name the size the date modified and the path is di...

Страница 87: ...f a music file may be displayed as 00 00 00 if its playing time information is not found at the start of the file 4 To exit WISELINK Pro mode press the W LINK button on the remote control Playing the...

Страница 88: ...e When all music files in the folder or the selected file are played once Repeat Mode is Off RETURN TOOLS INFO W LINK CH LIST EXIT RETURN TOOLS INFO W LINK CH LIST EXIT Music Play Pause When pressing...

Страница 89: ...ution Audio codec avi Xvid 800X600 PCM ADPCM H 264 MP 1920X1080 AC3 MPEG4 SP 800X600 PCM ADPCM MPEG4 ASP 800X600 ADPCM MJPEG 800X600 PCM mp4 H 264 BP 1920X1080 AAC H 264 MP 1920X1080 PCM AAC mpg MPEG2...

Страница 90: ...NK Pro menu 2 Press the or button to select Movie then press the ENTER button Movie files are displayed 3 Press the or button to select a sorting standard Title Timeline Folder Preference The movies a...

Страница 91: ...selected group of movie files from the sublist Preference Sorts movies by preference Favorite You can change the movie preferences 1 Select Preference as the sorting standard in the Movie List 2 Pres...

Страница 92: ...deleted If you select Cancel the deletion is cancelled 5 To exit WISELINK Pro mode press the W LINK button on the remote control You cannot remove read only files You cannot restore the deleted Movie...

Страница 93: ...he file Press the button while playing a video file to rewind by 20 seconds Press the button to fast forward by 20 seconds 4 To exit WISELINK Pro mode press the W LINK button on the remote control Pla...

Страница 94: ...utton on the remote control Movie function information icon Displayed at the top left of the screen Icon Current OSD Function Movie Repeat When all movie files in the folder or the selected file are r...

Страница 95: ...er appears Press the or button to select Screen Saver Run Time Press the or button to select 1 min 3 min or 5 min Information Select to viewing the information of the connected device Press the or but...

Страница 96: ...AN Cable 1 PC LAN Cable 2 1 Connect the LAN port on the rear panel of the TV to the external modem with a LAN Cable 2 Connect the PC to which the DLNA PC Share Manager program will be installed and th...

Страница 97: ...ring the hard disk drive space used for the thumbnail information is also freed Supported Formats 1 Image JPEG jpg jpeg 2 Audio MP3 mp3 3 Video MPEG1 mpg mpeg MPEG2 PS TS mpg mpeg trp ts tp divx mpg m...

Страница 98: ...to share the selected PC server folder see page 100 3 Click to cancel sharing see page 100 4 Click to refresh the PC folder and files 5 Click to synchronize the share status see page 101 6 The folders...

Страница 99: ...thod 2 Select a file or folder right click over the selected file or folder and then select Property from the pop up menu Exit Exits the DLNA application If you select Exit without applying the change...

Страница 100: ...nd drag drop the folder into the Shared Folders pane If a message appears asking you to confirm the shared folder select Yes Cancelling a Shared Folder You can cancel a shared folder on your PC Select...

Страница 101: ...er is not applied to the server Changes to the shared folders are not applied to your PC until you select the Set Changed State menu Method 1 Select the Share menu and select the Refresh DB sub menu M...

Страница 102: ...can determine whether to start the PC server automatically when Windows starts Change server name You can rename the PC server Enter a new name and click OK The new name will appear at the top right...

Страница 103: ...e W LINK button on the remote control Photo Photo List Sorting Photo List Refer to page 74 Viewing the Information Refer to page 77 Rotating the Photo file Refer to page 76 Viewing a Slide Show Refer...

Страница 104: ...Background Music Setting functions Sorting files by preference in the Photo Music and Movie folders The Change Group Info function The Delete function The Safe Remove function The REW FF key function...

Страница 105: ...he Content Library menu 3 Press the or button to select an icon Gallery Cooking Children Fitness then press the ENTER button To return to TV mode press the CH button on the remote control If you press...

Страница 106: ...s the CH button on the remote control Art You can view masterpieces of the impressionists including Van Gogh Monet Degas Cezanne and so on Relaxation You can view beautiful and serene images of nature...

Страница 107: ...d in the Cooking contents on the Samsung TV are based on recipes published by Anness Publishing The copyrights of the Cooking contents and all issues related to them are reserved by Practical Pictures...

Страница 108: ...Boowa and Kwala characters Play You can enjoy exciting and fun interactive games using the remote control The copyrights of the Children contents and issues related to them are reserved by UpToTen 3 P...

Страница 109: ...d by the DK Publishing Company The copyrights to the Massage content are reserved by Practical Pictures All issues related to copyrights are reserved by the corresponding company 3 Press the or button...

Страница 110: ...samsung com website and open the Content Library page Enter the product number UDN Unique Device Number when it is asked Select a content item in the Contents Download page 4 Download the contents ont...

Страница 111: ...You can connect the LAN port and the TV directly depending on your network status The LAN Port on the Wall You can connect the LAN via a Sharer Router LAN Cable The terminals the position of the port...

Страница 112: ...ls the position of the port and the type of the external device may differ depending on the manufacturer If you are using a static IP address your ISP will inform you of the IP address subnet mask gat...

Страница 113: ...s IP sharer is currently being used by another device nearby this will result in interference and communications may fail When applying the security key for the AP wireless IP sharer only the followin...

Страница 114: ...ble Network Setup then press the ENTER button 3 Press the ENTER button to select Internet Protocol Setup 4 Press the or button to select Manual Setup then press the ENTER button 5 Press the or button...

Страница 115: ...other than your PC such as your TV to the Internet 2 If your Internet service provider requires an ID or password to connect to the Internet network your TV may not be able to connect to the Internet...

Страница 116: ...Setup Network Test Access Point Select AP1 IPAddress 0 0 0 0 Subnet Mask 0 0 0 0 Gateway 0 0 0 0 DNS Server 0 0 0 0 Enter Move Return Wireless Network Setup The menu is activated only if the Samsung...

Страница 117: ...Enter the security key and press the ENTER button Using the Remote Control Buttons on the Security Key Input Screen Setup Screen can be different depending on the security types Button Operations Whee...

Страница 118: ...for the first time and authenticates the MAC address each time you connect to the Internet your TV may not be able to connect to the Internet as the MAC address differs from that of the device PC used...

Страница 119: ...ECTION WITH THE INFOLINK SERVICE MAY BE TIME DELAYED AS SPECIFIED BY THE CONTENT OWNER AND OR ITS AFFILIATES INFOLINK IS PROVIDED THROUGH AGREEMENT BETWEEN SAMSUNG AND THE CONTENT OWNER INFOLINK MAY B...

Страница 120: ...w button Input the postal zip code of the region by pressing the number buttons on the remote then press the ENTER button You can check the weather of the selected region If you select the Weather ser...

Страница 121: ...move to the Category Press the or button to select a Category Press the ENTER button 3 Press the or button to select a stock item and press the ENTER button The selected stock is set as a Favorite Sto...

Страница 122: ...ndard or Large through InfoLink service Background Color You can select the Background Colors Black Blue Red Green or Gray of InfoLink service The color is applied to each service option and setup win...

Страница 123: ...ainment InfoLink Content Library Entertainment Mode Connectivity WISELINK Pro DLNA 4HDMI Anynet 5 Press the EXIT button to exit Using the Remote Control Button in Product Guide Menu Button Operations...

Страница 124: ...jack only outputs 2 channel audio You will only hear sound from the Home Theater s Front Left and Right speakers and the subwoofer If you want to hear 5 1 channel audio connect the DIGITAL AUDIO OUT...

Страница 125: ...then press the ENTER button 2 Press the or button to select Yes then press the ENTER button The Auto Turn Off function is enabled If you select No the Auto Turn Off function is canceled Press the EXIT...

Страница 126: ...vices may take up to 2 minutes You cannot cancel the operation during the switching operation The time required to scan for devices is determined by the number of connected devices When the device sca...

Страница 127: ...er switching to the device when you are watching a TV program CH CH button Audio Device When a Receiver is activated VOL VOL MUTE button The Anynet function only works when the active source on the TV...

Страница 128: ...s in TV mode Check whether it is Anynet exclusive remote control Anynet doesn t work in certain situations Searching channels Operating WISELINK When connecting or removing the HDMI 1 3 cable please m...

Страница 129: ...production method is digital High visual quality If the original production method is analog The digital program displayed on the screen is originally an analog program which has been converted to dig...

Страница 130: ...1 is displayed 5 Press the ENTER button The saved Position appears on the left side of the OSD Moving to the remembered position 1 Complete Step 1 of Entering the menu Pressing a Color Red Green Yello...

Страница 131: ...e standard dimension as they may cause damage to the inside of the TV set For wall mounts that do not comply with the VESA standard screw specifications the length of the screws may differ depending o...

Страница 132: ...attach the monitor to the stand base The exterior of the set may be different from the picture When mounting your TV on a wall install the cover 1 on the stand base using two screws Preparing before...

Страница 133: ...inches 1531 0 x 1005 0 x 418 0 mm Weight Body With stand 86 5 lbs 39 2 Kg 95 9 lbs 43 5 Kg 129 6 lbs 58 8 Kg 141 1 lbs 64 0 Kg 127 9 lbs 58 0 Kg 185 2 lbs 84 0 Kg Environmental Considerations Operati...

Страница 134: ...are subject to change without prior notice Refer to dimensions on each unit prior to performing any carpentry Not responsible for typographical or printed errors 2008 Samsung Electronics America Inc T...

Страница 135: ...e subject to change without prior notice Refer to dimensions on each unit prior to performing any carpentry Not responsible for typographical or printed errors 2008 Samsung Electronics America Inc TOP...

Страница 136: ...e subject to change without prior notice Refer to dimensions on each unit prior to performing any carpentry Not responsible for typographical or printed errors 2008 Samsung Electronics America Inc TOP...

Страница 137: ...ditions for copying distribution and modification follow TERMS AND CONDITIONS FOR COPYING DISTRIBUTION AND MODIFICATION 0 This License applies to any program or other work which contains a notice plac...

Страница 138: ...t otherwise to copy modify sublicense or distribute the Program is void and will automatically terminate your rights under this License However parties who have received copies or rights from you unde...

Страница 139: ...Your New Programs If you develop a new program and you want it to be of the greatest possible use to the public the best way to achieve this is to make it free software which everyone can redistribute...

Страница 140: ...problems that might be introduced by others Finally software patents pose a constant threat to the existence of any free program We wish to make sure that a company cannot effectively restrict the use...

Страница 141: ...cility other than as an argument passed when the facility is invoked then you must make a good faith effort to ensure that in the event an application does not supply such function or table the facili...

Страница 142: ...inking with the Library A suitable mechanism is one that 1 uses at run time a copy of the library already present on the user s computer system rather than copying library functions into the executabl...

Страница 143: ...distribution limitation excluding those countries so that distribution is permitted only in or among countries not thus excluded In such case this License incorporates the limitation as if written in...

Страница 144: ...of the GNU Lesser General Public License as published by the Free Software Foundation either version 2 1 of the License or at your option any later version This library is distributed in the hope that...

Страница 145: ...This page is intentionally left blank...

Страница 146: ...e con este manual del usuario se suministra con licencia bajo derechos de propiedad intelectual de otras empresas En concreto este producto se suministra con licencia bajo las siguientes patentes de E...

Страница 147: ...ido a un cambio ambiental de temperatura o humedad Este hecho es normal y no se trata de ning n defecto en la unidad Defecto de celda La PDP utiliza un panel compuesto de 1 230 000 nivel SD a 3 150 00...

Страница 148: ...zaci n fina de los canales anal gicos 47 Comprobaci n de la potencia de la se al digital 48 Pantalla de PC Utilizaci n del televisor como pantalla del PC 49 Modos de visualizaci n 49 Ajuste del televi...

Страница 149: ...e garant a Manual de seguridad no esta disponible en todas las localidades Pa o de limpieza BN63 01798B Cubierta inferior Tornillos 2 S lo PN50A760T1F PN58A760T1F Consulte la p gina 131 N cleo de ferr...

Страница 150: ...pantalla con las opciones del televisor 3 VOL P lselos para subir o bajar el volumen En el men de la pantalla use los botones VOL del mismo modo que los botones y del mando a distancia 4 CH Pulse para...

Страница 151: ...LAN Conecte un cable LAN a este puerto para conectarse a la red Servicio InfoLink de SAMSUNG Consulte la p gina 96 9 COMPONENT IN 1 2 AV IN 1 Conexi n para el componente de v deo audio El terminal CO...

Страница 152: ...NK etc CC Controla el decodificador de subt tulos E MODE Pulse este bot n para seleccionar los modos de visualizaci n y de sonido establecidos para deportes pel culas y juegos Use estos botones en los...

Страница 153: ...opcional disponible en la mayor a de tiendas de electr nica 1 Conecte los dos cables de antena al combinador 2 Enchufe el combinador en el terminal ANT IN de la parte inferior del panel posterior Ins...

Страница 154: ...cador de cable Este terminal puede estar etiquetado como ANT IN VHF IN o sencillamente IN 2 Conecte este cable al separador de se ales de dos v as 3 Conecte un cable de antena entre un terminal OUTPUT...

Страница 155: ...odificador Qu es HDMI HDMI o interfaz multimedia de alta definici n es una interfaz que permite la transmisi n de se ales digitales de audio y de v deo mediante un solo cable La diferencia entre los d...

Страница 156: ...rminales COMPONENT Y PB PR del DVD Blu Ray o receptor de televisi n por cable sat lite decodificador Conecte cables de audio entre los terminales COMPONENT IN 1 o 2 R AUDIO L del televisor y los el te...

Страница 157: ...VIDEO OUT del aparato de v deo y el terminal AV IN 2 S VIDEO del televisor Conecte los cables de audio entre los terminales AUDIO OUT del aparato de v deo y los terminales AV IN 2 R AUDIO L del telev...

Страница 158: ...l control del volumen del sistema de audio Qu quiere decir OPTICAL Un cable ptico convierte una se al el ctrica en una se al de luz ptica que se transmite a trav s de fibra ptica S PDIF es un sistema...

Страница 159: ...de 3 5 mm entre el terminal DVI IN HDMI2 L AUDIO R del televisor y el terminal de salida de audio de la tarjeta de sonido del ordenador Cada ordenador tiene una configuraci n diferente del panel post...

Страница 160: ...liario y a continuaci n pulse el bot n ENTER Es recomendable configurar el televisor en el modo Uso domiciliario para obtener la mejor imagen en un entorno dom stico El modo Demo comercio s lo es nece...

Страница 161: ...a continuaci n pulse el bot n ENTER Se muestra el mensaje Seleccionar la zona horaria en la que vive 10 Pulse los botones o para resaltar la zona horaria del rea local y para mover la selecci n a la z...

Страница 162: ...ambiar de canal cuando pulse el segundo n mero Pulse los botones num ricos y despu s el bot n ENTER para cambiar r pidamente de canal Puede pulsar los botones num ricos del mando a distancia para acce...

Страница 163: ...n hay cinco iconos Imagen Sonido Canal Configuraci n Entrada Aplicaci n 2 Pulse losbotones o para seleccionar uno de los iconos A continuaci n pulse el bot n ENTER para acceder al men secundario de lo...

Страница 164: ...ndicar el tipo de origen de la se al conectada al televisor es decir antena o sistema de cable 1 Pulse el bot n MENU para mostrar el men Pulse los botones o para seleccionar Canal a continuaci n pulse...

Страница 165: ...ia la eliminaci n de los canales codificados ver p gina 47 A continuaci n vuelve a mostrarse el men Prog Auto Si desea detener la programaci n autom tica pulse el bot n ENTER Aparece el mensaje Detene...

Страница 166: ...bre al dispositivo conectado en las tomas de entrada de esta manera ser m s f cil seleccionar el dispositivo de entrada 1 Pulse el bot n MENU para ver el men Pulse los botones o para seleccionar Entra...

Страница 167: ...de una opci n concreta Pulse el bot n ENTER Pulse el bot n EXIT para salir Cuando se cambian Luz de la celda Contraste Brillo Definici n Color o Tinte V R la presentaci n en pantalla OSD se ajusta con...

Страница 168: ...un nivel bajo Medio Establece la profundidad del color negro en un nivel medio Alto Establece la profundidad del color negro en un nivel alto Activaci n del contraste din mico Se puede ajustar el cont...

Страница 169: ...ulse los botones o para aumentar o reducir el valor de una opci n concreta Pulse el bot n ENTER En Color se pueden ajustar los valores RGB del color seleccionado Para restablecer el valor RGB ajustado...

Страница 170: ...sta la intensidad del color verde Bal Azul Ajusta la intensidad del color azul Gan Rojo Ajusta el brillo del color rojo Gan Verde Ajusta el brillo del color verde Gan Azul Ajusta el brillo del color a...

Страница 171: ...ot n ENTER En el modo PC s lo se pueden hacer cambios en los elementos Tono Color Tama o y Protecci n de Pantalla del men Opciones de imagen Ajuste del tono de color 1 Siga las instrucciones 1 y 2 de...

Страница 172: ...o hacia abajo Reiniciar Pulse los botones o para seleccionar Reiniciar y a continuaci n pulse el bot n ENTER Puede inicializar la configuraci n Configuraci n sencilla 1 Pulse el bot n TOOLS del mando...

Страница 173: ...rucciones 1 y 2 de Activaci n de las opciones de la imagen Consulte la p gina 27 2 Pulse los botones o para seleccionar Digital NR y pulse el bot n ENTER 3 Pulse los botones o para seleccionar Apagado...

Страница 174: ...Consulte la p gina 27 2 Pulse los botones o para seleccionar N neg HDMI y pulse el bot n ENTER 3 Pulse los botones o para seleccionar Normal o Bajo y pulse el bot n ENTER Normal La pantalla adquiere...

Страница 175: ...uctores DVD sistemas Home Cinema etc Con esta funci n se puede ajustar el color y el matiz de acuerdo con los valores preferidos adecuados al nivel de la se al de cada dispositivo de v deo mediante lo...

Страница 176: ...i n con una relaci n de pantalla de 4 3 sta se puede proteger de un posible da o si se ajusta el balance de blanco en ambos extremos el izquierdo y el derecho Para prevenir que la pantalla se queme se...

Страница 177: ...eles de forma detallada en el PDP en sentido horizontal o vertical para evitar restos de im genes en la pantalla 4 Pulse los botones o para seleccionar la opci n que desea cambiar y a continuaci n pul...

Страница 178: ...modo de imagen Cambio del tama o de la ventana PIP 3 Pulse los botones o para seleccionar Tama o a continuaci n pulse el bot n ENTER Pulse los botones o para seleccionar el tama o deseado de la ventan...

Страница 179: ...n ENTER Pulse el bot n EXIT para salir Se pueden seleccionar s lo TV en la pantalla PIP imagen secundaria Configuraci n sencilla 1 Pulse el bot n TOOLS del mando a distancia 2 Pulse los botones o par...

Страница 180: ...ot n MENU para mostrar el men Pulse los botones o para seleccionar Sonido a continuaci n pulse el bot n ENTER 2 Pulse los botones o para seleccionar Ecualizador y a continuaci n pulse el bot n ENTER 3...

Страница 181: ...rnos del televisor Es totalmente compatible con todos los formatos multicanal 1 Pulse el bot n MENU para mostrar el men Pulse los botones o para seleccionar Sonido a continuaci n pulse el bot n ENTER...

Страница 182: ...isponible s lo en el modo de televisi n anal gica Seg n el programa concreto emitido puede escuchar en modo Mono Est reo o SAP Configuraci n sencilla 1 Pulse el bot n TOOLS del mando a distancia Pulse...

Страница 183: ...n operativos cuando Seleccionar altavoz se ajusta en Altavoz externo Altavoz del televisor Se puede configurar para tener salida de sonido de los altavoces internos del televisor o de los altavoces co...

Страница 184: ...reinicio de sonido Reajuste de los valores del sonido a los valores predefinidos de f brica Puede restaurar la configuraci n del sonido con los valores predeterminados de f brica Conexi n de los auric...

Страница 185: ...ENTER Pulse el bot n CH LIST del mando a distancia para mostrar las listas de canales Uso de los botones de colores del mando a distancia con la lista de canales Rojo antena Cambia a DTV a rea o DTV...

Страница 186: ...es agregados de la misma manera Para agregar de nuevo un canal a la lista Canales agregados primero hay que borrarlo Para volver a a adir restablecer un canal a la lista de canales agregados siga los...

Страница 187: ...a de favoritos y la marca desaparece Pulse el bot n EXIT para salir Puede a adir o borrar un canal en la lista de favoritos en el men Canales agregados de la misma manera Todos los canales favoritos s...

Страница 188: ...c mo confirmar una reserva de visualizaci n consulte la p gina 46 S lo se pueden reservar los canales memorizados Puede ajustar el canal el mes el d a el a o la hora y el minuto directamente pulsando...

Страница 189: ...lse los botones o para seleccionar Aceptar y pulse el bot n ENTER Se cancela la reserva de visualizaci n Pulse el bot n EXIT para salir Men Programados Cambiar informaci n Selecci nelo para cambiar la...

Страница 190: ...iento de los canales en la memoria programa autom tico Los canales se pueden etiquetar con el prop sito de que cuando stos se seleccionan se pueda ver su nombre 1 Pulse el bot n MENU Pulse los botones...

Страница 191: ...al a continuaci n pulse el bot n ENTER 2 Pulse los botones o para seleccionar Sinton a Fina y a continuaci n pulse el bot n ENTER 3 Pulse los botones o para ajustar la sintonizaci n Para guardar la si...

Страница 192: ...de los canales digitales disponibles 1 Pulse el bot n MENU para mostrar el men Pulse los botones o para seleccionar Canal a continuaci n pulse el bot n ENTER 2 Pulse los botones o para seleccionar In...

Страница 193: ...de di logo Modos de visualizaci n Si la se al desde el sistema es igual al modo de se al est ndar la pantalla se ajustar autom ticamente Si la se al del sistema no es igual al modo de se al est ndar a...

Страница 194: ...l y vuelva a realizar la sintonizaci n fina Cuando se hayan reducido las interferencias vuelva a ajustar la imagen de forma que est centrada en la pantalla Preselecci n Pulse el bot n SOURCE para sele...

Страница 195: ...a pantalla Puede recuperar todos los ajustes de imagen predeterminados de f brica Preselecci n Pulse el bot n SOURCE para seleccionar el modo PC 1 Pulse el bot n MENU para ver el men Pulse los botones...

Страница 196: ...ir a Mes Dia A o Hora Minuto o am pm Seleccione la fecha y la hora que desee pulsando los botones o pulse despu s el bot n ENTER Pulse el bot n EXIT para salir La hora actual aparecer siempre que se...

Страница 197: ...u s pulse el bot n ENTER Pulse el bot n EXIT para salir Seg n la estaci n emisora y la se al puede que el ajuste autom tico de la hora no se realice correctamente En este caso ajuste la hora manualmen...

Страница 198: ...fotos o de audio TV USB Permite seleccionar TV o USB Compruebe que haya un dispositivo USB conectado al televisor Antena Permite seleccionar Aire o Cable Canal Permite seleccionar el canal deseado M...

Страница 199: ...ara seleccionar Apagado y a continuaci n pulse el bot n ENTER Pulse el bot n EXIT para salir Configuraci n sencilla 1 Pulse el bot n TOOLS del mando a distancia 2 Pulse los botones o para seleccionar...

Страница 200: ...botones o para seleccionar el idioma English Espa ol o Fran ais y a continuaci n pulse el bot n ENTER Pulse el bot n EXIT para salir Plug Play Idioma Espa ol Tiempo Selecci n de red Cable Configuraci...

Страница 201: ...ba su c digo PIN de 4 d gitos El n mero PIN predeterminado de un televisor nuevo es 0 0 0 0 3 Aparece la pantalla V Chip Pulse los botones o para seleccionar Cambiar C digo y a continuaci n pulse el b...

Страница 202: ...asificaci n MPAA 1 Pulse el bot n MENU para mostrar el men Pulse los botones o para seleccionar Configuraci n y a continuaci n pulse el bot n ENTER 2 Pulse los botones o para seleccionar V Chip y a co...

Страница 203: ...bloquear todos los programas de televisi n Las categor as TV Y TV Y7 TV G TV PG TV 14 y TV MA disponen de opciones adicionales Consulte el siguiente paso para cambiar cualquiera de las subclasificacio...

Страница 204: ...o desbloquear la categor a Pulse el bot n EXIT para salir G Audiencia general sin restricciones PG Se sugiere supervisi n paterna PG 13 Menores acompa ados de un adulto R Restringidos Menores de 17 a...

Страница 205: ...i n C Programaci n para ni os menores de 8 a os C8 Programaci n generalmente considerada aceptable para ni os mayores de 8 a os sin acompa amiento de adultos G Programaci n general ideal para todas la...

Страница 206: ...ra bloquear todos los programas de televisi n G General 8 ans No recomendada para ni os peque os 13 ans Es posible que la programaci n no sea adecuada para ni os menores de 13 a os 16 ans Es posible q...

Страница 207: ...indica el s mbolo Pulse el bot n EXIT para salir Perm todo Se pulsa para desbloquear todos los programas de televisi n Bloq todo Se pulsa para bloquear todos los programas de televisi n Los niveles d...

Страница 208: ...tones CH o CH En ciertas condiciones seg n la clasificaci n de los programas de televisi n locales la funci n V Chip puede bloquear todos los canales En este caso utilice la funci n V Chip como salida...

Страница 209: ...arente Tama o Esta opci n consta de Programado Peque o Normal y Grande El valor predeterminado es Programado Estilo fuente Esta opci n consta de Programado Estilo0 Estilo7 Puede cambiar el tipo de let...

Страница 210: ...incronizado Este canal transporta datos que est n destinados a ampliar la informaci n del programa CC3 Servicio de subt tulos secundarios sincronizados Datos alternativos de subt tulos relacionados co...

Страница 211: ...l LED azul Se puede apagar o encender el LED azul del frontal del televisor 1 Pulse el bot n MENU para mostrar el men Pulse los botones o para seleccionar Configuraci n y a continuaci n pulse el bot n...

Страница 212: ...ptima de imagen para los deportes Cine Proporciona una calidad ptima de imagen para ver pel culas Se obtienen mejores im genes y se resalta el sonido Juegos Proporciona una calidad ptima de imagen par...

Страница 213: ...ar hasta 30 segundos 5 Si el firmware se reconoce adecuadamente en el USB aparece el mensaje El sistema se reiniciar despu s de la actualizaci n Actualizar la versi n xxxx a la versi n xxxx Pulse los...

Страница 214: ...5 segundos Aparece el men Self Diagnostic Test Prueba de autodiagn stico 2 Pulse los botones o para seleccionar Sound Test Prueba de sonido y pulse el bot n ENTER Aparece el mensaje Does the problem...

Страница 215: ...deben llevar un nombre en ingl s franc s o espa ol De lo contrario los archivos no se pueden reproducir Si es necesario p ngales un nombre ingl s franc s o espa ol Cuanto mayor sea la resoluci n de la...

Страница 216: ...el mando a distancia Uso de la lista de fotos Este men muestra carpetas y archivos de las fotos guardadas en un dispositivo de memoria USB Lista de fotos 1 Pulse el bot n W LINK del mando a distancia...

Страница 217: ...emento Muestra el n mero de fotos seleccionadas cuando se pulsa el bot n amarillo 6 Elementos de ayuda Bot n rojo Dispositivo Selecciona un dispositivo conectado Bot n verde Conf fav Cambia la configu...

Страница 218: ...a seleccionar en la lista secundaria de archivos agrupados por meses Para ir al grupo anterior siguiente pulse los botones RETURN TOOLS INFO W LINK CH LIST EXIT REW o RETURN TOOLS INFO W LINK CH LIST...

Страница 219: ...Pulse los botones o para seleccionar en la lista secundaria de fotos archivos agrupados por composici n Para ir al grupo composici n anterior siguiente pulse los botones RETURN TOOLS INFO W LINK CH L...

Страница 220: ...anterior para seleccionar varias fotos La marca aparece a la izquierda de la foto seleccionada 2 Pulse varias veces el bot n verde hasta que aparezca el valor de configuraci n que desee Se ha complet...

Страница 221: ...n ENTER Las fotos seleccionadas se borran Si selecciona Cancelar se cancela la operaci n de borrar 5 Para salir del modo WISELINK Pro pulse el bot n W LINK en el mando a distancia No se pueden borrar...

Страница 222: ...resentaci n pulse de nuevo el bot n RETURN TOOLS INFO W LINK CH LIST EXIT reproducir ENTER del mando a distancia Contin a Para ver una presentaci n s lo con los archivos seleccionados 1 Pulse los boto...

Страница 223: ...st desactivada El archivo girado no se guarda El icono de informaci n de la funci n de giro aparece en la parte superior derecha de la pantalla Icono Presentaci n en pantalla Funci n Giro 0 Para girar...

Страница 224: ...resentaci n Se puede seleccionar la velocidad de la presentaci n Pulse los botones o para seleccionar Velocidad visionado autom tico Pulse los botones o para seleccionar la opci n deseada R pido Lento...

Страница 225: ...figuraci n de la imagen Cambio de los ajustes de pantalla Consulte la p gina 23 Configuraci n del sonido Cambio de los ajustes de audio Consulte la p gina 36 Informaci n Se muestra la informaci n del...

Страница 226: ...ulo Artista G nero nimo Carpeta Preferencias 3 Ver grupos Muestra los grupos de clasificaci n El grupo de clasificaci n que incluye el archivo de m sica seleccionado se resalta 4 Dispositivo actual Mu...

Страница 227: ...ot n TOOLS 4 Pulse los botones o para seleccionar Repr grupo actual 5 Pulse ENTER para reproducir el grupo seleccionado de los archivos de m sica de la lista secundaria 5 Informaci n de selecci n del...

Страница 228: ...OLS 3 Pulse los botones o para seleccionar Cambiar info grupo Pulse el bot n ENTER La marca aparece en la parte superior izquierda del archivo de m sica seleccionado Wiselink identifica el estado de n...

Страница 229: ...REW o FF 3 Pulse el bot n TOOLS 4 Pulse los botones o para seleccionar Repr grupo actual 5 Pulse ENTER para reproducir el grupo seleccionado de los archivos de m sica de la lista secundaria Cambio de...

Страница 230: ...ot n W LINK en el mando a distancia No se pueden borrar los archivos de s lo lectura No se pueden restaurar los archivos de m sica eliminados Visualizaci n de la informaci n Se muestra la informaci n...

Страница 231: ...si la informaci n del tiempo de reproducci n no se encuentra al inicio del archivo 4 Para salir del modo WISELINK Pro pulse el bot n W LINK en el mando a distancia Reproducci n de un grupo de m sica 1...

Страница 232: ...ancela la reproducci n repetitiva 4 Para salir del modo WISELINK Pro pulse el bot n W LINK del mando a distancia Icono de informaci n de la funci n de la m sica aparece en la parte superior izquierda...

Страница 233: ...n C dec de audio avi Xvid 800 x 600 PCM ADPCM H 264 MP 1920 x 1080 AC3 MPEG4 SP 800 x 600 PCM ADPCM MPEG4 ASP 800 x 600 ADPCM MJPEG 800 x 600 PCM mp4 H 264 BP 1920 x1080 AAC H 264 MP 1920 x 1080 PCM...

Страница 234: ...n W LINK del mando a distancia para mostrar el men WISELINK Pro 2 Pulse los botones o para seleccionar Movie y despu s pulse el bot n ENTER Se muestran los archivos de pel culas 3 Pulse los botones o...

Страница 235: ...ia Preferencias Ordena las pel culas por preferencias Favoritos Se puede cambiar las preferencias de las pel culas 1 Seleccione Preferencias como orden est ndar de la lista de pel culas 2 Pulse los bo...

Страница 236: ...a seleccionados Si selecciona Cancelar se cancela la operaci n de borrar 5 Para salir del modo WISELINK Pro pulse el bot n W LINK en el mando a distancia Los archivos de s lo lectura no pueden suprimi...

Страница 237: ...v deo para rebobinar en 20 segundos Pulse el bot n para hacer un avance r pido en 20 segundos Para salir del modo WISELINK Pro pulse el bot n W LINK en el mando a distancia Reproducci n de un grupo d...

Страница 238: ...Reproducci n de archivos de pel culas seleccionados 1 Pulse el bot n W LINK del mando a distancia para mostrar el men WISELINK Pro Pulse los botones o para seleccionar Movie y despu s pulse el bot n E...

Страница 239: ...e el salvapantallas Pulse los botones o para seleccionar Tiemp ejec protect pant Pulse los botones o para seleccionar 1 min 3 min o 5 min Informaci n Puede configurar que se muestre la informaci n del...

Страница 240: ...Cable LAN 1 PC Cable LAN 2 1 Conecte el puerto LAN del panel posterior del televisor al m dem externo con un cable LAN 2 Conecte el ordenador en el que se instalar el programa DLNA PC Share Manager y...

Страница 241: ...tambi n se libera el espacio en disco duro utilizado para la informaci n de las miniaturas Formatos compatibles 1 Imagen JPEG jpg jpeg 2 Audio MP3 mp3 3 V deo MPEG1 mpg mpeg MPEG2 PS TS mpg mpeg trp...

Страница 242: ...0 3 Haga clic para cancelar el acceso compartido consulte la p gina 100 4 Haga clic para actualizar la carpeta y los archivos del ordenador 5 Haga clic para sincronizar el estado de acceso compartido...

Страница 243: ...chivo o una carpeta haga clic con el bot n derecho sobre el archivo o la carpeta seleccionados y despu s seleccione Pertenencia desde el men emergente Salir Sale de la aplicaci n DLNA Si selecciona Sa...

Страница 244: ...el panel Compartici n Carpeta Si aparece un mensaje que le pide que confirme la carpeta compartida seleccione Yes Cancelaci n de una carpeta compartida Se puede cancelar el acceso a una carpeta compar...

Страница 245: ...PC al servidor Los cambios en las carpetas compartidas no se aplican al ordenador hasta que se selecciona el men Aplicar los cambios del PC al servidor M todo 1 Seleccione el men Compartici n y selec...

Страница 246: ...se inicie autom ticamente cuando Windows se inicie Cambiar Servidor Nombre Es posible cambiarle el nombre al servidor del ordenador Escriba un nombre nuevo y haga clic en OK El nombre nuevo aparecer e...

Страница 247: ...n de la lista de fotos Consulte la p gina 74 Visualizaci n de la informaci n Consulte la p gina 77 Giro del archivo de fotograf a Consulte la p gina 76 Visualizaci n de una presentaci n Consulte la p...

Страница 248: ...a m sica de fondo La clasificaci n de archivos por preferencias en las carpetas Photo Music y Movie La funci n del cambio de informaci n del grupo La funci n de eliminar La funci n de extracci n segur...

Страница 249: ...para seleccionar un icono Gallery Cooking Game Children Fitness y despu s pulse el bot n ENTER Para volver al modo TV pulse el bot n CH del mando a distancia Si pulsa los botones de volumen o MUTE no...

Страница 250: ...rary pulse el bot n CH en el mando a distancia Art Muestra obras maestras de pintores impresionistas como Van Gogh Monet Degas Cezanne y otros Relaxation Muestra im genes bellas y serenas de la natura...

Страница 251: ...incluidas en el apartado Cooking del TV Samsung se basan en recetas publicadas por Anness Publishing Los copyrights de los contenidos de Cooking y todas las cuestiones relacionadas con los mismos est...

Страница 252: ...a Play Permite disfrutar de juegos emocionantes y divertidos con el mando a distancia Los copyrights de los contenidos del apartado Children y todas las cuestiones relacionadas con los mismos est n re...

Страница 253: ...hing Company Los copyrights de los contenidos de Massage est n reservados por Practical Pictures Todas las cuestiones relacionados con los copyrights est n reservadas por la compa a correspondiente 3...

Страница 254: ...pagina web Samsung com Descarga de contenidos 1 Visite la p gina web www samsung com y abra la p gina Biblioteca de contenidos Introduzca el n mero del producto UDN n mero de dispositivo exclusivo Sel...

Страница 255: ...m dem externo con un cable M dem Panel posterior del TV Puerto m dem en la pared M dem externo ADSL VDSL TV por cable Compartidor IP Cable LAN Cable del m dem Panel posterior del TV Cable LAN Se puede...

Страница 256: ...r enrutador Los terminales la posici n del puerto y el tipo del dispositivo externo puede variar seg n el fabricante Si usa una direcci n IP est tica su ISP le informar de la direcci n IP la m scara d...

Страница 257: ...IP inal mbrico lo est usando en ese momento otro dispositivo cercano se producir n interferencias y es posible que la comunicaci n falle Cuando aplique la clave de seguridad para el punto de acceso c...

Страница 258: ...R 3 Pulse el bot n ENTER para seleccionar Configuraci n del protocolo de Internet 4 Pulse los botones o para seleccionar Configuraci n manual y despu s pulse el bot n ENTER 5 Pulse los botones o para...

Страница 259: ...Internet 2 Si su proveedor de servicios de Internet necesita un ID o una contrase a para conectarse a Internet red su televisor quiz s no puede conectarse a Internet En tal caso debe introducir su ID...

Страница 260: ...ot n ENTER 3 Pulse el bot n ENTER para seleccionar Configuraci n del protocolo de Internet 4 Pulse los botones o para seleccionar Configuraci n autom tica y despu s pulse el bot n ENTER El protocolo d...

Страница 261: ...ER Utilizaci n de los botones del mando a distancia en la pantalla de introducci n de la clave de seguridad La pantalla de configuraci n puede diferir seg n los tipos de seguridad Bot n Funci n RUEDA...

Страница 262: ...direcci n MAC cada vez que Ud se conecta a Internet su televisor quiz s no pueda conectarse a Internet ya que la direcci n MAC difiere de la del dispositivo PC utilizado para conectarse a Internet po...

Страница 263: ...CONTENT OWNERS IN CONNECTION WITH THE INFOLINK SERVICE MAY BE TIME DELAYED AS SPECIFIED BY THE CONTENT OWNER AND OR ITS AFFILIATES INFOLINK IS PROVIDED THROUGH AGREEMENT BETWEEN SAMSUNG AND THE CONTE...

Страница 264: ...ot n amarillo Escriba el c digo postal de la regi n con los botones num ricos del mando a distancia y pulse el bot n ENTER Podr consultar el tiempo de la regi n seleccionada Si selecciona el servicio...

Страница 265: ...les favoritos 2 Pulse los botones para desplazarse por las categor as Pulse los botones o para seleccionar una categor a Pulse el bot n ENTER 3 Pulse los botones o para seleccionar una opci n y pulse...

Страница 266: ...e los caracteres Normal o Grande del servicio InfoLink Color de fondo Puede seleccionar el Color de fondo Negro Azul Rojo Verde o Gris del servicio InfoLink El color se aplica a cada ventana del servi...

Страница 267: ...tertainment InfoLink Content Library Modo Entertainment Connectivity WISELINK Pro DLNA 4HDMI Anynet 5 Pulse el bot n EXIT para salir Uso de los botones del mando a distancia en el men de la gu a del p...

Страница 268: ...HDMI 4 del televisor y la toma HDMI OUT del dispositivo Anynet correspondiente mediante el cable HDMI Conecte la toma HDMI IN del sistema cine en casa y la toma HDMI OUT del dispositivo Anynet corresp...

Страница 269: ...ontinuaci n pulse el bot n ENTER 2 Pulse los botones o para seleccionar S y a continuaci n pulse el bot n ENTER La funci n Desact auto se activa Si selecciona No se cancela la funci n de desactivaci n...

Страница 270: ...de tardar unos 2 minutos No se puede cancelar la operaci n de cambio de dispositivo mientras sta se est efectuando El tiempo necesario para la b squeda de dispositivos depende de la cantidad de dispos...

Страница 271: ...ma de TV Botones CH CH Dispositivo de audio Cuando la opci n Receptor est activada Botones VOL VOL MUTE La funci n Anynet s lo funciona cuando la fuente activa del mando a distancia del televisor est...

Страница 272: ...ebe si es un mando a distancia exclusivo para Anynet Anynet no funciona en algunas situaciones b squeda de canales funcionamiento de WISELINK Cuando se conecta o se desconecta el cable HDMI 1 3 se han...

Страница 273: ...odo de producci n original es digital Calidad visual alta Si el m todo de producci n original es anal gico el programa digital mostrado en la pantalla es originalmente un programa anal gico que se ha...

Страница 274: ...se el bot n ENTER La posici n guardada se muestra en la parte izquierda de la OSD Desplazamiento a la posici n memorizada 1 Complete el paso 1 de Acceso al men Pulse un bot n de color rojo verde amari...

Страница 275: ...ama o superior al est ndar ya que pueden causar da os en el interior del televisor Para montajes murales que no cumplen las especificaciones de tornillos est ndar VESA la longitud de stos puede variar...

Страница 276: ...tor al soporte Es posible que el exterior del equipo sea diferente del que se muestra en la imagen Cuando instale el televisor en una pared fije la tapa 1 al soporte con dos tornillos Preparaci n para...

Страница 277: ...0 x 1005 0 x 418 0 mm Peso Cuerpo principal Con soporte 86 5 lbs 39 2 Kg 95 9 lbs 43 5 Kg 129 6 lbs 58 8 Kg 141 1 lbs 64 0 Kg 127 9 lbs 58 0 Kg 185 2 lbs 84 0 Kg Consideraciones medioambientales Temp...

Страница 278: ...previo aviso Consulte las dimensiones de cada unidad antes adaptar el mueble para el televisor La empresa no se responsabiliza de los errores tipogr ficos o de impresi n 2008 Samsung Electronics Amer...

Страница 279: ...revio aviso Consulte las dimensiones de cada unidad antes adaptar el mueble para el televisor La empresa no se responsabiliza de los errores tipogr ficos o de impresi n 2008 Samsung Electronics Americ...

Страница 280: ...revio aviso Consulte las dimensiones de cada unidad antes adaptar el mueble para el televisor La empresa no se responsabiliza de los errores tipogr ficos o de impresi n 2008 Samsung Electronics Americ...

Страница 281: ...Esta p gina se ha dejado en blanco expresamente...

Страница 282: ...Esta p gina se ha dejado en blanco expresamente...

Отзывы: