background image

Connect the audio cable for your LCD Display to the audio port on the back of
your computer.

 Note

Turn on both your computer and the LCD Display.

The DVI cable is optional.

Contact a local SAMSUNG Electronics Service Center to buy optional items.

Connecting to Other devices

Using a Power cord with Earth

In the event of failure, the earth lead may cause electric shock. Make sure to
wire the earth lead in correctly, before connecting the AC power. When un-
wiring the earth lead, make sure to disconnect the AC power in advance.

 Note

AV input devices such as DVD players, VCR's or camcorders as well as your computer can be con-
nected to the LCD Display. For detailed information on connecting AV input devices, refer to the
contents under Adjusting Your LCD Display.

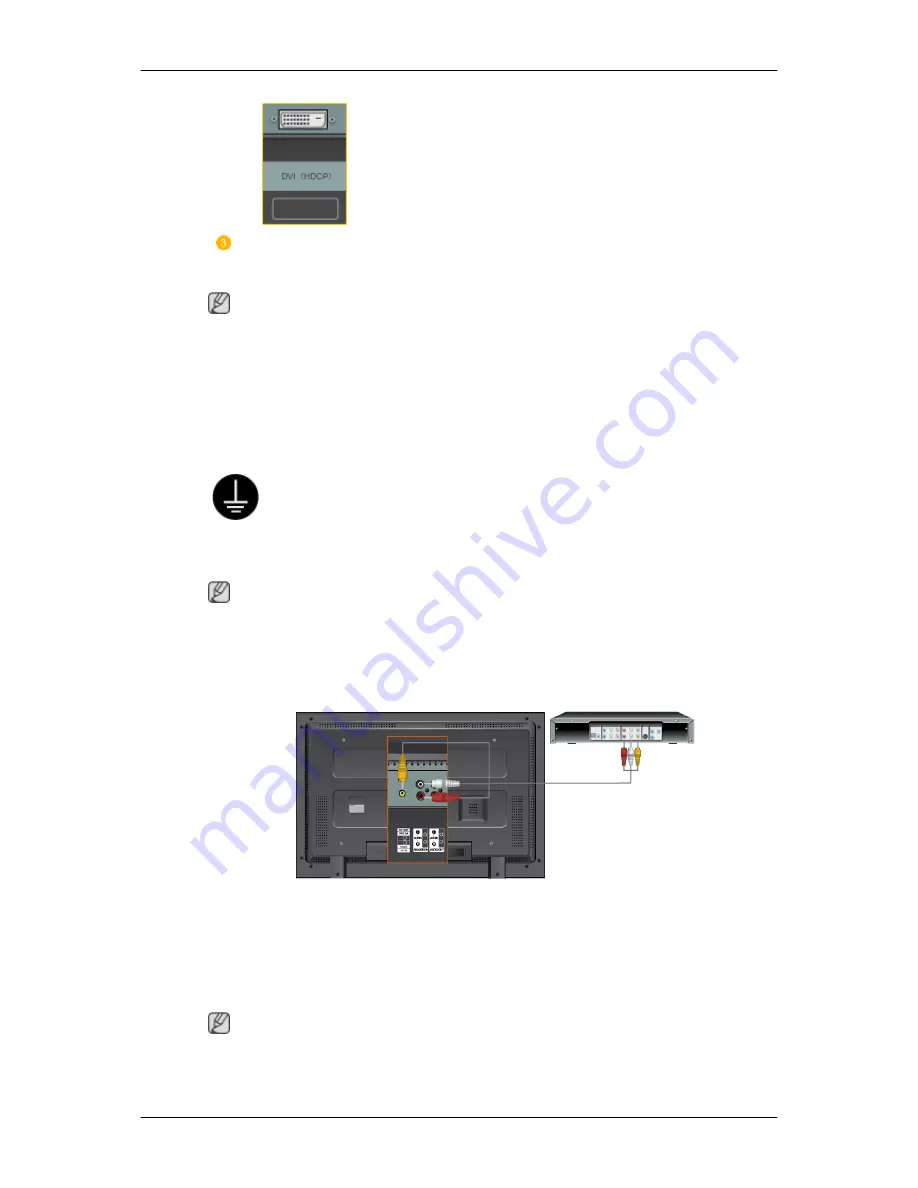
Connecting AV Devices

1.

Connect the port of the DVD, VCR (DVD / DTV Set-Top Box) to the [R-AUDIO-L] port of the
LCD Display.

2.

Then, start the DVD, VCR or Camcorders with a DVD disc or tape inserted.

3.

Select 

AV

 using the SOURCE .

 Note

The LCD Display has AV connection terminals to connect AV input devices like DVDs, VCRs or
Camcorders. You may enjoy AV signals as long as the LCD Display is turned on.

Connections

Содержание 400MX - SyncMaster - 40" LCD Flat Panel...

Страница 1: ...SyncMaster 400MX 460MX 400MXn 460MXn LCD Monitor User Manual...

Страница 2: ...d for extended period of time set your computer to DPM If using screen saver set it to active screen mode The images here are for reference only and are not applicable in all cases or countries Shortc...

Страница 3: ...d Service Center when installing your monitor in a location with heavy dust high or low temperatures high humidity and exposed to chemical substances and where it operates for 24 hours such as at airp...

Страница 4: ...rnal tem perature Ensure that the packaging vinyl is kept away from children Otherwise it may result in serious harm suffocation if children play with it If the height of your monitor is adjustable do...

Страница 5: ...duct and that it is not wet Otherwise this may result in electric shock fire or a malfunction Others The product is a high voltage product Ensure that users do not disas semble repair or modify the pr...

Страница 6: ...alfunction electric shock or fire Do not use or keep combustible spray or flammable material near the product Otherwise this may result in an explosion or fire Do not insert any metal such as chopstic...

Страница 7: ...tc that may attract the attention of children and to the product Your children may hang onto the product causing it to fall and this may result in personal injury or death Be careful that children do...

Страница 8: ...r fire If the product has been turned on for a long time the display panel becomes hot Do not touch it Keep the small accessories in a location out of the reach of children Be careful when adjusting t...

Страница 9: ...CD Display If any items are missing contact your dealer Contact a local dealer to buy optional items Note This stand is not for the Floor Standing Type Unpacking LCD Display Manuals Quick Setup Guide...

Страница 10: ...le Applicable to the MXn mod el only TV tuner box NetWork Box Applicable to the MX model only Semi Stand KIT Note You can purchase and connect a separate network box or TV tuner box For information on...

Страница 11: ...Note The TV menu is available when a TV tuner box is installed The MagicInfo menu is available when a network box is installed in the MXn or MX model D MENU Opens the on screen D MENU Note This is ava...

Страница 12: ...MI AUDIO IN PC DVI HDMI Audio Connection Terminal Input DVI PC HDMI IN HDMI Connect the HDMI terminal at the back of your LCD Display to the HDMI terminal of your dig ital output device using a HDMI c...

Страница 13: ...AUDIO OUT L AUDIO R LCD Dis play Audio Connection Terminal Output RGB OUT Applicable to the MXn model only LAN LAN Connection Terminal Applicable to the MXn model only USB USB Connection Terminal Keyb...

Страница 14: ...of the Kensington Lock may be dif ferent depending on its model Using the Anti Theft Kensington Lock 1 Insert the locking device into the Kensington slot on the Monitor and turn it in the locking dire...

Страница 15: ...TONS TTX MIX STILL AUTO S MODE MDC LOCK SOURCE ENTER PRE CH CH P D MENU GUIDE RETURN Up Down Left Right buttons EXIT SRS MagicInfo P MODE DUAL MTS PIP SWAP 1 POWER Turns the product On 2 Off Turns the...

Страница 16: ...freeze the screen Press it again to un freeze 14 AUTO AdjuststhescreendisplayautomaticallyinPC mode Bychanging the resolution in the control panel auto function is performed 15 S MODE When pressing t...

Страница 17: ...mage you are watching Then push button again to circle through available preconfigured modes Entertain Internet Text Custom 29 DUAL MTS DUAL STEREO MONO DUAL l DUAL ll and MONO NICAM MONO NICAM STEREO...

Страница 18: ...LCD Display Head Introduction...

Страница 19: ...ation Please contact your nearest SAMSUNG Distributor to place an order After your order is placed installation professionals will visit you and install the bracket At least 2 persons are needed in or...

Страница 20: ...when the installation is done by the customer This product is for installing on cement walls The product may not stay in place when installed on plaster or wood Components Only use the components and...

Страница 21: ...roduct is correct If the length is too short or long loosen all or some of the 4screws on the wall bracket to adjust the length A Length between the two locking holes 3 Check the installation diagram...

Страница 22: ...plastic hanger Notice Mount the product on the wall bracket and make sure it is properly fixed to the left and right plastic hangers Be careful when installing the product on the bracket as fingers c...

Страница 23: ...safety pin 3 to securely hold the product to the bracket A LCD Display B Wall Bracket C Wall Wall Bracket Angle Adjustment Adjust the bracket angle to 2 before installing it on the wall 1 Fix the pro...

Страница 24: ...Make sure to use the top center and not the leftor the right side of the product to adjust the angle Mechanical Layout 460MX 460MXn Mechanical Layout LCD Display Head Introduction...

Страница 25: ...ation Please contact your nearest SAMSUNG Distributor to place an order After your order is placed installation professionals will visit you and install the bracket At least 2 persons are needed in or...

Страница 26: ...is done by the customer This product is for installing on cement walls The product may not stay in place when installed on plaster or wood Components Only use the components and accessories shipped wi...

Страница 27: ...he length is too short or long loosen all or some of the 4screws on the wall bracket to adjust the length A Length between the two locking holes 3 Check the installation diagram and mark the drill poi...

Страница 28: ...plastic hanger Notice Mount the product on the wall bracket and make sure it is properly fixed to the left and right plastic hangers Be careful when installing the product on the bracket as fingers c...

Страница 29: ...safety pin 3 to securely hold the product to the bracket A LCD Display B Wall Bracket C Wall Wall Bracket Angle Adjustment Adjust the bracket angle to 2 before installing it on the wall 1 Fix the pro...

Страница 30: ...Make sure to use the top center and not the leftor the right side of the product to adjust the angle Introduction...

Страница 31: ...information on connecting AV input devices refer to the contents under Adjusting Your LCD Display Connect the power cord for your LCD Display to the power port on the back of the LCD Display Trun on t...

Страница 32: ...ure to disconnect the AC power in advance Note AV input devices such as DVD players VCR s or camcorders as well as your computer can be con nected to the LCD Display For detailed information on connec...

Страница 33: ...splay 3 Select AV for the Camcorder connection using the Source button on the front of the LCD Display or on the remote control 4 Then start the Camcorders with a tape inserted Note The audio video ca...

Страница 34: ...ect a set of audio cables between the AUX L R jacks on the AUDIO SYSTEM and AUDIO OUT L AUDIO R on LCD Display Connecting a LAN Cable Using a Power cord with Earth In the event of failure the earth le...

Страница 35: ...ting the AC power When un wiring the earth lead make sure to disconnect the AC power in advance Note AV input devices such as DVD players VCR s or camcorders as well as your computer can be con nected...

Страница 36: ...ating system you have Prepare a blank disk and download the driver program file at the Internet web site shown here Internet web site http www samsung com Worldwide Installing the Monitor Driver Autom...

Страница 37: ...rt your Manual CD into your CD ROM drive 2 Click Start and Control Panel Then double click on Appearance and Personalization 3 Click Personalization and then Display Settings 4 Click Advanced Settings...

Страница 38: ...osted on Samsung Monitor homepage 6 Click Update Driver in the Driver tab 7 Check the Browse my computer for driver software checkbox and click Let me pick from a list of device drivers on my computer...

Страница 39: ...that matches your monitor from the list of monitor models on the screen and click Next 10 Click Close Close OK OK on the following screens displayed in sequence Microsoft Windows XP Operating System...

Страница 40: ...Click Display icon and choose the Settings tab then click Advanced 4 Click the Properties button on the Monitor tab and select Driver tab 5 Click Update Driver and select Install from a list or then c...

Страница 41: ...owing message window then click the Continue Anyway button Then click OK button Note This monitor driver is under certifying MS logo and this installation doesn t damage your system The certified driv...

Страница 42: ...n is active click the Properties button then follow next steps continually 5 Click Driver and then click on Update Driver then click on the Next button 6 Choose Display a list of the known drivers for...

Страница 43: ...clicking Test If the screen is not normal change to a different mode lower mode of resolution colors or frequency Note If there is no Mode at All Display Modes select the level of resolution and vert...

Страница 44: ...e 3 When the Install Shield Wizard window appears click Next 4 Select I agree to the terms of the license agreement to accept the terms of use 5 You are required to log in to the MagicInfo Pro Server...

Страница 45: ...6 Choose a folder to install the MagicInfo Pro program 7 Click Install Using the Software...

Страница 46: ...8 The Installation Status window appears 9 It is recommended restarting the system for the normal operation of the MagicInfo Pro Server program Click Finish Using the Software...

Страница 47: ...utable icon appears on your desktop 11 Double click the icon to start the program System Requirements CPU RAM Ethernet OS Application Minimum P1 8 256M 100M 1G Windows XP Windows 2000 Serv ice Pack 4...

Страница 48: ...a standard of serial communication is used for the communication between a PC and a display Therefore a serial cable should be connected between the serial port on a PC and the serial port on a displ...

Страница 49: ...g for the PC Serial Port can change The original value is COM1 5 Click Select all or Clear to select or clear all displays 6 Use Grid to view brief information on selected display 7 Select a display f...

Страница 50: ...the Port Selection Menu 3 If the exact port name that is connected to the LCD Display using a serial cable is not selected communication will be unavailable 4 The selected port is stored in the progr...

Страница 51: ...ary to Power Control 1 Power Status 2 Input 3 Image Size 4 On Timer 5 Off Timer 2 Use the Select All button or Check Box to choose a display to control Power Control allows controlling some of the fun...

Страница 52: ...lecting one set at a time turn on the Mute function for the selected set The Mute function is disabled automatically when you adjust the volume level The values return to the default settings when you...

Страница 53: ...deo Changes the Input Source of the selected display to S Video 8 Component Changes the Input Source of the selected display to Component 9 MagicInfo The Input source of MagicInfo works only on MagicI...

Страница 54: ...en you click Image Size the PC Source tab first appear The Image Size Control button controls Image Size available for PC BNC DVI 6 Video Source Click the Video Source tab to control Image Size for re...

Страница 55: ...source 3 Switch Image Size of the selected display randomly Note Auto Wide Zoom1 and Zoom2 are not available for selection when the input signal type for Component and DVI HDCP is 720p or 1080i The Au...

Страница 56: ...f Time Setup of the selected display 4 Shows the On Time settings 5 Shows the Off Time settings The Input source of MagicInfo works only on MagicInfo model The Input source of TV works only on TV mode...

Страница 57: ...mall 5 Double 1 Turns on the PIP of the selected display and changes the size to Double 1 6 Double 2 Turns on the PIP of the selected display and changes the size to Double 2 7 Double 3 Picture By Pic...

Страница 58: ...V 6 S Video Changes the source of the PIP of the selected display to S Video 7 Component Changes the source of the PIP of the selected display to Component 8 HDMI Changes the source of the PIP of the...

Страница 59: ...y 4 Sharpness Adjusts Sharpness of the selected display 5 Color Adjusts Color of the selected display 6 Tint Adjusts Tint of the selected display Available only for NT 7 Color Tone Adjusts the Color T...

Страница 60: ...ess Adjusts Brightness for the selected display 4 Red Adjusts red Color of the selected display Available only for NT 5 Green Adjusts green Color of the selected display Available only for NT 6 Blue A...

Страница 61: ...de to CUSTOM 1 Audio Controls audio settings for all input sources 2 Bass Adjusts Bass of the selected display 3 Treble Adjusts Treble of the selected display 4 Balance Adjusts Balance of the selected...

Страница 62: ...ion Adjusts Position of the selected display 5 Auto Adjustment Self Adjust to the incoming PC signal The Input source of MagicInfo works only on MagicInfo model The Input source of TV works only on TV...

Страница 63: ...p Control 3 Manual Lamp Control Allows you to adjust the backlight of the selected display regardless of the time The Auto Lamp Control automatically turns off if you adjust using the Manual Lamp Cont...

Страница 64: ...xel Bar and Eraser by Screen Type The Input source of MagicInfo works only on MagicInfo model The Input source of TV works only on TV model Setting Second you can set to 1 2 3 4 5 for Scroll Type and...

Страница 65: ...y pressing a number in the selected mode z The MDC program supplied by Samsung supports up to 5x5 LCD Displayes 3 On Off Turns on off the Video Wall function of the selected display 4 Format The forma...

Страница 66: ...e is showing Apply current time to synchronize the display clocks 5 The remote may not function properly when you turn off the remote Function disconnect the RS 232C cable or exit the program in an Ir...

Страница 67: ...erver is MagicInfo Pro only the monitors whose server name is MagicInfo Pro can receive schedules from it If a monitor cannot find a server whose name is the same as the server name configured in it i...

Страница 68: ...allow you to control view the status of and diagnose monitors 7 VNC The VNC function allows you to connect to a monitor remotely and view the status of and control and diagnose it 8 Update and PXE Th...

Страница 69: ...Pro runs select Log In from the File menu 3 Enter the user name and password and click OK If you log in for the first time select Administrator as enter the user name and the password you set when in...

Страница 70: ...make sure to select Direct connection using an IP address in the Value field of the Network Connection item as the connection method When setting up the monitor make sure to use the same settings Sett...

Страница 71: ...he server File Sub Menus Registering a Library 1 Select Library from the File menu to open the Library View 2 Select a photo file music file movie file document or Flash file etc on the server 3 Right...

Страница 72: ...lick either Photo Movie Flash Web Text or Source from the displayed menu 3 When the mouse pointer changes to the crosshair icon drag it to the Edit View to set the area for the file to be displayed 4...

Страница 73: ...Select the monitors to which the schedule is to be registered in the Tree View at the left The Operating Mode of the selected monitors must be set to Schedule if they can display the schedule registe...

Страница 74: ...to open the Message View 2 Select the checkbox next to the monitors for which you want to register a message 3 Configure the settings for the message in the List View at the bottom right The text you...

Страница 75: ......

Страница 76: ...word you enter when installing MagicInfo Pro becomes the password of the Administrator account by default Log Out z Once you are logged onto the server you can log out If you log out from the server a...

Страница 77: ...ls Menu Synchronize z Synchronizes the library files of the main server with the files of the content server Option z Changes the server settings For more information refer to the Options section Libr...

Страница 78: ...the files that you can register to a library are displayed in the list view in the right pane Displays all the folders which are created in the libraries in a tree view Function If you select a folde...

Страница 79: ...iew Function If you select a folder its subfolders and a list of content servers are displayed in the list view in the right pane Hot Key z F2 key Renames the selected folder z Delete key Deletes sele...

Страница 80: ...ion is not supported for folders Context Menu z Open If you click Open for a folder you are moved to that folder If you click Open for a file the file is run z Send To Library If you click Send To Lib...

Страница 81: ...the selected location However this menu item is deactivated when the folder selected in the tree view is a Library or Office folder z Rename Renames the selected folder However this menu item is deac...

Страница 82: ...rename a file z Delete key Deletes the selected folders subfolders and library files z Ctrl X keys Cuts the selected library files to the clipboard so that you can paste them to other location However...

Страница 83: ...ted for a screen file z Delete Deletes the selected screen files and folders However if the selection includes which refers to a higher level folder this menu item is deactivated z Cut Cuts the select...

Страница 84: ...y the user for the selected screen You can edit them z New Folder This is only activated when neither a folder nor a file is selected If you select this menu item a new folder is created in the select...

Страница 85: ...created content server Server Name The name of the newly created content server Comments Comments about the newly created content server z New Folder This is only activated when neither a folder nor...

Страница 86: ...cted content servers to the clipboard so that you can paste them to another location However this hot key is not supported for folders z Ctrl V keys Pastes the content servers cut to the clipboard to...

Страница 87: ...Hot Key z Ctrl C Copies the selected message to the clipboard so that you can paste it to another location...

Страница 88: ...changes a new window is displayed so that you can save them Save Save As z Saves the changes in the current screen file or as a new screen file Close z Closes the screen view you are working with If t...

Страница 89: ...d dropping it into the Screen Edit window More than one Source Area cannot be played at the same time Therefore if the playing time of a source area overlaps the source area whose playing time ends la...

Страница 90: ...ed in accordance with the order of the areas created in the Edit View You can check the area currently selected in the Edit View using the Tree View If you select a property of an area the detailed pr...

Страница 91: ...ic function allows you to set the background music The Effect function allows you to set the effect used when the background changes z New Initializes the screen view you are currently working with If...

Страница 92: ...Screen Type Sets the type of background Color Photo File Office File Source List If Office File or Source List is selected you cannot create another area Color Selects the color to use when the backgr...

Страница 93: ...To use an office file you must install the corresponding viewing program on your product You can select only one office file Source List Selects the source when the background type is set to Source L...

Страница 94: ...eated Effect Effect Selects the type of effect to be applied when the background is created z None No effect is used z Slide The background is created while it is moving z Block The background is crea...

Страница 95: ...photo is displayed The Effect function allows you to set an effect for when the background changes The following section describes the detailed options used with the Photo function Area Name Changes t...

Страница 96: ...file is tiled continuously across the entire background Time Interval Sets the slide show time between selected photo files Background Type Sets the background type Color Picture File for the Photo a...

Страница 97: ...when the background type for the Photo area is set to Picture File Sound Turns the background sound for the Photo area on or off Music File Selects a music file for the background in the Photo area V...

Страница 98: ...music when the movie is displayed The Effect function allows you to set an effect for when the background changes z Effect Selects the type of effect to be applied when the Photo area is created None...

Страница 99: ...an the background playing time Screen Movie File Selects the movie file to be played in the Movie area Aspect Ratio Selects the aspect ratio for the movie file to be played in the Movie area z Full Th...

Страница 100: ...e File Only one picture file can be selected in the Movie area Picture Aspect Ratio Selects the aspect ratio for the photo file to be played in the Movie area when the background type of the Movie are...

Страница 101: ...Adds and deletes a file and changes the playing order Effect z Effect Selects the type of effect to be applied when the Movie area is created None No effect is used Slide The Movie area is created whi...

Страница 102: ...ction allows you to set the effect for when the background changes If no flash player is installed on the PC where the server is installed the operation may not be normal Make sure to install a flash...

Страница 103: ...ut using the mouse in the Flash area Background Type Sets the background type Color Picture File for the Flash area Color Selects the color when the background type for the Flash area is set to Color...

Страница 104: ...ash area is set to Picture File Sound Turns the background sound for the Flash area on or off Music File Selects a music file for the background in the Flash area Volume Controls the volume of the bac...

Страница 105: ...round image and music when the web page is displayed The Effect function allows you to set the effect for when the background changes z Effect Selects the type of effect to be applied when the Flash a...

Страница 106: ...e Duration Sets the playing time in seconds It cannot be longer than the background playing time Screen Website Sets a web page to display in the Web area Only one URL can be selected in the Web Area...

Страница 107: ...when the background type of the Web area is set to Picture File z Full The photo file is enlarged or reduced to fit the entire background z Original The photo file is displayed at the original size z...

Страница 108: ...wn Adds and deletes a file and changes the playing order Effect z Effect Selects the type of effect to be applied when the Web area is created None No effect is used Slide The Web area is created whil...

Страница 109: ...The Effect function allows you to set the effect used when the background changes The following section describes the detailed options used with the Text function Area Name Changes the area name You...

Страница 110: ...the Text area Font Font Size Italic Bold Underline Strikeout Font Color Sets the formatting for the text in the Text area The font type shows the font of the computer where the server is operating The...

Страница 111: ...n or off Music File Selects a music file for the background in the Text area Volume Controls the volume of the background music in the text area Repeat A music file can be played repeatedly When set t...

Страница 112: ...area fades in when it is created z Effect Speed Adjusts the speed of an effect being created z Effect Direction Sets the direction when the Slide effect is selected z Effect Size Sets the size of the...

Страница 113: ...the source to be played in the Source area Sound Turns the sound for the source you want to play in the Source area on or off TV DTV When selecting TV from the TV External Input list you can select ei...

Страница 114: ...size using your mouse z Preview Area Previews the current state of the selected area More than one Source Area cannot be played at the same time Therefore if the playing time of a source area overlaps...

Страница 115: ...ny one of its functions You can log in to the server to perform a server program The password you enter when installing MagicInfo Pro becomes the password of the Administrator account by default Log O...

Страница 116: ...the Publish View They are created in the folder named after the monitor name which is used as the local publishing directory If you copy all the files and subfolders under the folder created in the na...

Страница 117: ...iently manage the monitors by creating network groups You can move a networked monitor by dragging and dropping it into a group Network z The server is connected to the monitor in Player mode z The se...

Страница 118: ...o the server Power On Turns the selected monitor on or off If the server and the monitor are on a private network the Power On function cannot be operated on that monitor However if there is content s...

Страница 119: ...tes the selected monitor EPG View You can edit the schedule by selecting the monitor and time to schedule and register screens You can move a registered screen by dragging dropping it and changing the...

Страница 120: ...pastes it after selecting a monitor and time by clicking in the EPG window Auto Size Changes the currently selected screen in accordance with the time of the background set when editing automatically...

Страница 121: ...ll the screens within the specified publishing period This is the total size of the files whose play mode is set to Download in all screens However for a local monitor the size of the files whose play...

Страница 122: ...password you enter when installing MagicInfo Pro becomes the password of the Administrator account by default Log Out z Once you are logged onto the server you can log out If you log out from the ser...

Страница 123: ...z Refreshes the value of each client for the currently selected remote control item Option z Changes the server settings For more information refer to the Options section Remote Management Tree View L...

Страница 124: ...l TV or Analog TV at the MDC source If you select Digital TV in the MDC Source screen and change the channel a red part is displayed in the Channel Selection screen so that you can change the sub chan...

Страница 125: ...Select whether to use the turn on time PIP Displays the PIP information You can control it in the list view Sound Displays the current sound state You can control it in the list view Signal Balance D...

Страница 126: ...control them by using the context menu and clicking each detailed function In addition you can update the current state using Refresh from the Tool menu and in the toolbar MDC Displays the items for...

Страница 127: ...item is only enabled if the Size item is set to a setting other than Off z You can turn the PIP on by setting the Size item to a setting other than Off Sound Displays the current state of the Sound M...

Страница 128: ...re Context Menu Power On Off This item is only enabled when a monitor name is selected and used to turn the client monitor on or off Copy Copies the settings of the selected item z If you select a mon...

Страница 129: ...ddress Type IP Address Subnet Mask Default Gateway Preferred DNS Server Altermate DNS Server You can change the settings by double clicking the monitor name or using the Edit item from the context men...

Страница 130: ...rtup Automatic update Use password lock and Content server You can change the settings by double clicking the monitor name or using the Edit item from the context menu 1 Startup Select the program to...

Страница 131: ...reen resolution item of Windows cannot be copied Paste Pastes the copied setting to the monitor z Only available if the copied item is the same as the currently selected item z Only available if the c...

Страница 132: ...tly working with If there are any unsaved changes a new window is displayed so that you can save them Log In z You must log in to the server before you can use any one of its functions You can log in...

Страница 133: ...els the previously performed command or performs the canceled command again You can change the maximum number of commands that you can undo using the Option menu Send Stop z Checks the edited message...

Страница 134: ...f the message flow on the monitor None Right to Left Left to Right Top to Bottom Bottom to Top Text Speed Sets the speed of the message flow on the monitor Step Sets the interval at which the message...

Страница 135: ...Server Troubleshooting Option Option General Network Connection Selects the connection method between the server and the monitor The server and monitor can be connected to each other only if the same...

Страница 136: ...ts the maximum number of virtual local monitors that can be created for publishing the schedule locally Maximum number of network groups Sets the maximum number of network groups that can be created t...

Страница 137: ...edules to multiple monitors one by one Screen Default Resolution Adds deletes and sets the default resolution for a newly created screen z New Adds a new resolution that can be used in a screen It is...

Страница 138: ...er it is registered as the content server Name The name of the content server configured by the MagicInfo Pro Server Connection Server IP Enter the IP address of the MagicInfo Pro Server you want to c...

Страница 139: ...mmand Displays the EWF state which will be applied at the next boot up EWF command z Disable and restart Disables and restarts the EWF The EWF state is actually disabled at the next boot up z Enable a...

Страница 140: ...Connection Tab Schedule server z Server Connection Settings The client automatically connects to the server When a connection is disconnected the client connects to another server automatically The c...

Страница 141: ...e network the client cannot connect to it Therefore the schedule server must be installed with a public IP address on a network 2 Content server z Connect content servers Select this option when you w...

Страница 142: ...e Checks the update version at the specified time every day and updates the client if necessary z Check and update whenever the program starts Checks the update version whenever the program starts and...

Страница 143: ...e can be set 3 Local schedule z Sets the options required when you perform a schedule using a USB device instead of the network Copy and Play from a removable disk Copies the schedule that exists on a...

Страница 144: ...he network state When publishing is not performed successfully z Check whether the checkbox next to the monitor to which you want to publish to is selected z Check whether the monitor to which you wan...

Страница 145: ...file you want to preview is corrupt and whether it actually exists z You cannot preview an office file or a source Removing the Program You can remove MagicInfo Pro using Add Remove Programs in Window...

Страница 146: ...Screen Design Message Schedule Library Remote Management Option MagicInfo Pro Windows MagicInfo Pro 1 2 Windows XP 3 4 MagicInfo Pro 5 6 MagicInfo Pro 7 RDP Update 1 ALT F12 2 RDP ID PW ID Administra...

Страница 147: ...n a network box is installed Source List MENU ENTER Input ENTER Source List ENTER Use to select PC DVI or other external input sources connected to the LCD Display Use to select the screen of your cho...

Страница 148: ...election easier 1 PC 2 DVI 3 AV 4 HDMI Picture PC DVI MagicInfo Mode Available Modes PC DVI AV HDMI MagicInfo TV Note The TV menu is available when a TV tuner box is installed The MagicInfo menu is av...

Страница 149: ...graphics 3 Text Normal brightness For documents or works involving heavy text 4 Custom Although the values are carefully chosen by our engineers the pre configured values may not be comfortable to you...

Страница 150: ...Warm 5 Custom Note If you set the Color Tone to Cool Normal Warm or Custom the Color Temp function is disabled If you set the Color Tone to Off the Color Control function is disabled Color Control Ad...

Страница 151: ...able in Dynamic Contrast mode of On Note This function is only enabled if the Color Tone is set to Off Image Lock Image Lock is used to fine tune and get the best image by removing noise that creates...

Страница 152: ...clock speed H Position MENU ENTER Picture ENTER Image Lock ENTER H Position ENTER Adjusts the screen location horizontally V Position MENU ENTER Picture ENTER Image Lock ENTER V Position ENTER Adjust...

Страница 153: ...TER Selects either On or Off with the signal control Signal Control MENU ENTER Picture ENTER Signal Balance ENTER Signal Control 1 R Gain MENU ENTER Picture ENTER Signal Bal ance ENTER Signal Control...

Страница 154: ...TER Signal Bal ance ENTER Signal Control ENTER G Offset ENTER ENTER 6 B Offset MENU ENTER Picture ENTER Signal Bal ance ENTER Signal Control ENTER B Offset ENTER ENTER Size MENU ENTER Picture ENTER Si...

Страница 155: ...AV HDMI MagicInfo TV Note The TV menu is available when a TV tuner box is installed The MagicInfo menu is available when a network box is installed Mode MENU ENTER Picture ENTER Mode ENTER The LCD Di...

Страница 156: ...ersonal preference MENU ENTER Picture ENTER Custom Not available in Dynamic Contrast mode of On Contrast MENU ENTER Picture ENTER Custom ENTER Contrast ENTER Adjusts the Contrast Brightness MENU ENTER...

Страница 157: ...ne ENTER The color tones can be changed The individual Color components are also user adjustable Not available in Dynamic Contrast mode of On 1 Off 2 Cool2 3 Cool1 4 Normal 5 Warm1 6 Warm2 Note If you...

Страница 158: ...Tone is set to Off Size MENU ENTER Picture ENTER Size ENTER The Size can be switched 1 16 9 2 Zoom 1 3 Zoom 2 4 4 3 5 Just Scan Not available in Dynamic Contrast mode of On Note The Zoom1 Zoom2 are n...

Страница 159: ...m Mode Off On The Film Mode feature offers you a theater quality viewing experience Not available in HDMI Mode 1 Off 2 On Dynamic Contrast MENU ENTER Picture ENTER Dynamic Contrast ENTER Dynamic Contr...

Страница 160: ...Info TV Note The TV menu is available when a TV tuner box is installed The MagicInfo menu is available when a network box is installed Mode MENU ENTER Sound ENTER Mode ENTER The LCD Display has a buil...

Страница 161: ...ustom Note You can hear the sound even when sound value is set to 0 If you adjust sound using Custom function Mode will turn to Custom mode Bass MENU ENTER Sound ENTER Custom ENTER Bass ENTER Emphasiz...

Страница 162: ...laying 5 1 multichannel content over two speakers TruSurround delivers a compelling virtual surround sound experience through any two speaker playback system including internal television speakers It...

Страница 163: ...nguages Note The language chosen affects only the language of the OSD It has no effect on any software running on the computer Time Selects from one of 4 time settings Clock Set Sleep Timer On Timer a...

Страница 164: ...150 7 180 On Timer MENU ENTER Setup ENTER Time ENTER On Timer ENTER Turns the LCD Display on automatically at a preset time Controls the mode and the volume level at the time the LCD Display turns on...

Страница 165: ...Setup ENTER Menu Transparency ENTER Change the transparency of the background of the OSD 1 High 2 Medium 3 Low 4 Opaque Safety Lock PIN MENU ENTER Setup ENTER Safety Lock PIN 0 9 0 9 0 9 The password...

Страница 166: ...e black level a low contrast or discoloration etc depending on the external device connected In this case adjust the screen quality of your TV by configuring the HDMI black level 1 Normal 2 Low Video...

Страница 167: ...up ENTER Video Wall ENTER Format ENTER The Format can be selected to see a divided screen 1 Full Provides a full screen without any margins 2 Natural Displays a natural image with the original aspect...

Страница 168: ...es A number of screens can be selected with a different layout when dividing Select a mode in Screen Divider Select a display in Display Selection The selection will be set up by pressing a number in...

Страница 169: ...al or vertical direction 1 Off 2 On Horizontal Dot MENU ENTER Setup ENTER Safety Screen ENTER Pixel Shift ENTER Horizontal Dot ENTER Sets how many pixels the screen moves horizontally Five adjustment...

Страница 170: ...ER Safety Screen ENTER Timer ENTER Timer ENTER You can set the timer for Screen Burn Protection If you start the operation to erase any residual image the operation will be performed for the set perio...

Страница 171: ...the set period of time specify a time for execution Mode Scroll 1 5 sec Mode Bar Eraser 10 50 sec Scroll MENU ENTER Setup ENTER Safety Screen ENTER Scroll This function prevents after images on the sc...

Страница 172: ...oving a rectangular pattern Resolution Select MENU ENTER Setup ENTER Resolution Select ENTER When the picture is not displayed properly on the screen when setting the graphics card resolution of the c...

Страница 173: ...1360 x 768 60Hz or 1366 x768 60Hz Power On Adjustment MENU ENTER Setup ENTER Power On Adjustment ENTER Adjusts the Power On time for the screen Caution Set the Power On time to be loger to avoid overv...

Страница 174: ...in PC mode only Note The Reset function is not available when Video Wall is On Color Reset MENU ENTER Setup ENTER Reset ENTER Color Reset ENTER Lamp Control MENU ENTER Setup ENTER Lamp Control ENTER A...

Страница 175: ...rol ENTER 0 9 ID Setup Assigns distinctive IDs to the SET ID Input Use to select the transmitter functions of the individual SET Only a SET where the ID corresponds to the transmitter setting becomes...

Страница 176: ...n option when the LCD Display is in the process of shutting down since this may cause system errors on the LCD Display In the OSD image of MagicInfo Network mode is the same as Device When using Magic...

Страница 177: ...Auto Automatically fits the image to the window Original Shows the properties of the original file Slide Show Displays the properties of the original file as they are Adjusting the LCD Display...

Страница 178: ...terval Controls the time intervals between image files for a slide show 5 Sec 10 Sec 20 Sec 30 Sec 60 Sec Rotation Displays an image file by turning it clockwise by 90 degrees Adjusting the LCD Displa...

Страница 179: ...Zoom Displays a reduced picture Close Closes the image control Menu Adjusting the LCD Display...

Страница 180: ...Music The MP3 file format is supported Movie The MPEG1 WMV file format are supported Play Plays a movie file Adjusting the LCD Display...

Страница 181: ...ull screen OFFICE HTML PPT Power Point DOC MS Word XLS MS Excel PDF HTML HTM files are displayed Note Install the proper viewer freeware program to see the MS Office Word Excel Power Point or PDF douc...

Страница 182: ...Internet Connects to the Internet Setup Sets various functions in MagicInfo mode A password must be entered to access Setup mode Schedule View Displays a schedule Adjusting the LCD Display...

Страница 183: ...TCP IP Changes the TCP IP settings Connection Modifies the network settings Adjusting the LCD Display...

Страница 184: ...mat If you enter the wrong password three times the setup configuration is reset and a warning message appears from the server If you forget the password enter Info 8 2 and 4 on the remote control to...

Страница 185: ...ets the screen resolution to 1366x768 pixels Portrait Sets the screen resolution to 768x1366 pixels EWF Enhanced Write Filter Prevents change to and loss of the data saved on the disk Disable Disables...

Страница 186: ...connect the video cable then turn on both your computer and the LCD Display If your LCD Display screen remains blank after using the previous procedure check your video con troller and computer system...

Страница 187: ...re than 3 times when booting If it does request an a service for the main board of the computer 3 If you installed a new video card or if you assembled the PC check if you installed the Adaptor video...

Страница 188: ...ignal cable is securely connected Re connect it if necessary Refer to Connecting a Computer Q The image is not clear picture is blurred A Run Frequency Coarse and Fine tuning A Turn on again after rem...

Страница 189: ...d the computer to ensure that the con nector is properly connected Problems related to Audio Note Problems related to audio signals and their solutions are listed below Q No sound A Ensure that the au...

Страница 190: ...xe and choose Local Partition From Image from the menu Choose the ghost image to update your USB disk with and choose the target disk A 6 When the ghost image update finishes the set will be rebooted...

Страница 191: ...r Do not leave any detergent or scratches on the case Do not let any water enter the LCD Display Q How can I play the video A The video supports the MPEG1 and WMV codecs only Install the corresponding...

Страница 192: ...cMaster 460MX n 0 53025 mm H x 0 53025 mm V Synchronization Horizontal 30 81 kHz Vertical 56 85 Hz Display Color 16 7 M Resolution Optimum resolu tion SyncMaster 400MX n 1360 x 768 60 Hz 1366 x 768 60...

Страница 193: ...nsing Storage Temperature 4 F 113 F 20 C 45 C Humidity 5 95 non condensing Plug and Play Capability This LCD Display can be installed on any Plug Play compatible system The interaction of the LCD Disp...

Страница 194: ...the version Install the proper viewing freeware program to see MS Office Word Excel Power Point or PDF documents Internet Browser MS Internet Explorer Not Support Flash Java Applet Security Site Langu...

Страница 195: ...Timing Modes the screen will be adjusted automatically However if the signal differs the screen may go blank while the power LED is on Refer to the video card manual and adjusts the screen as follows...

Страница 196: ...66 587 59 934 138 500 Horizontal Frequency The time to scan one line connecting the right edge to the left edge of the screen horizontally is called the Horizontal Cycle and the inverse number of the...

Страница 197: ...f you are not satisfied with the picture quality you can get better quality of picture by performing the Auto Adjustment function in display screen that is appeared as window termination button is pre...

Страница 198: ...2 hours in use Set the Monitor to power off with the PC Display Properties Power Scheme Use a Screen saver if possible Screen saver in one color or a moving image is recom mended Change the Color Info...

Страница 199: ...play Moving image together with Logo periodically Cycle Display moving image together with Logo for 60 seconds after 4 hours in use The best way to protect your monitor from Image retention is to turn...

Страница 200: ...1 Time Period 10 50 second Recommend 50 Apply the Screen Bar function Symptom Horizontal Vertical Bar with Black Color move up and down Select method Instruction Guide OSD Menu Set Up Safety Screen Ba...

Страница 201: ...ruction Guide OSD Menu Set Up Safety Screen Eraser Time Interval 1 10 hours Recommend 1 Time Period 10 50 second Recommend 50 Note Please check CD s User Guide at OSD Function some model s will not av...

Страница 202: ...www samsung com latin GUATEMALA 1 800 299 0013 http www samsung com latin HONDURAS 800 7919267 http www samsung com latin JAMAICA 1 800 234 7267 http www samsung com latin NICARAGUA 00 1800 5077267 h...

Страница 203: ...7267864 http www samsung com uk CIS ESTONIA 800 7267 http www samsung ee LATVIA 8000 7267 http www samsung com lv LITHUANIA 8 800 77777 http www samsung lt KAZAKHSTAN 8 10 800 500 55 500 http www sams...

Страница 204: ...ge to the left edge of the screen horizontally is called the Horizontal Cycle The in verse number of the Horizontal Cycle is called Horizontal Fre quency Unit kHz Interlace and Non Interlace Methods S...

Страница 205: ...m for environmentally safe recycling Business users should contact their supplier and check the terms and conditions of the purchase contract This prod uct should not be mixed with other commercial wa...

Отзывы: