background image

- AFTER SALES SERVICE

- Do not hesitate to contact your retailer or service

agent if a change in the performance of your product
indicates that a faulty condition may be present.

AA68-01407A (ENG)

ELECTRONICS

Содержание 29A200

Страница 1: ...COLOUR TELEVISION 29A7 29A6 29A200 34A7 Owner s Instructions Before operating the unit please read this manual thoroughly and retain it for future reference TELETEXT OPTION PICTURE IN PICTURE OPTION ...

Страница 2: ...tore it in a cool dry place THIS DEVICE IS NOT FOR USE IN INDUSTRIAL ENVIRONMENTS WARNING TO PREVENT DAMAGE WHICH MAY RESULT IN FIRE OR SHOCK HAZARD DO NOT EXPOSE THIS APPLIANCE TO RAIN OR MOISTURE The main voltage is indicated on the rear of the TV set and the frequency is 50 or 60Hz CAUTION TO PREVENT ELECTRICAL SHOCK DO NOT REMOVE REAR COVER NO USER SERVICEABLE PARTS INSIDE REFER SERVICING TO Q...

Страница 3: ...Language 15 SETTING THE CHANNELS Automatic Storing of Channels 16 Sorting the Stored Channels 17 Manual Storing of Channels 18 Assigning Names to Channels 20 Activating the Child Lock and Skipping unwanted channels 21 Selecting a Channel by Informations 22 USING YOUR TELEVISION Changing the Scan Mode 22 Activating Deactivating the Digital Noise Reduction Feature 23 Using the Tilt Control Feature 2...

Страница 4: ...tching the TV On Off Automatically 33 Picture In Picture Feature Option 34 USING THE TELETEXT FEATURE OPTION Teletext Feature 36 Displaying the Teletext Screen 36 Selecting Display Options 37 Selecting a Teletext Page 38 ADDITIONAL INFORMATION ON CONNECTIONS Connecting to the AV 1 2 or 3 Input Outputs 39 Connecting to the AV 4 Input 39 Connecting to the S Video Input 40 Connecting to the DVD Input...

Страница 5: ... television to Switch on the television when it is in Standby mode and select channels CH Access the local menu LOCAL MENU Adjust the volume VOL Switch among Video input modes TV VIDEO Front Control Panel depending on the model TV VIDEO SELECTION ACCESS TO LOCAL MENU VOLUME ADJUSTMENT CHANNEL SELECTION POWER STAND BY INDICATOR REMOTE CONROL SENSOR ...

Страница 6: ...SPEAKER CONNECTORS RCA AUDIO OUTPUT CONNECTORS CENTER SPEAKER CONNECTORS OPTION AUDIO VIDEO INPUT OUTPUT CONNECTORS S VIDEO INPUT CONNECTOR DVD INPUT CONNECTORS 75Ω COAXIAL CONNECTOR FOR AERIAL CABLE NETWORK RCA AUDIO INPUT CONNECTORS RCA VIDEO INPUT CONNECTOR S VIDEO INPUT CONNECTOR HEADPONE CONNECTOR PC INPUT CONNECTOR OPTION ...

Страница 7: ...XT CANCEL PICTURE SIZE TELETEXT SIZE PREVIOUS CHANNEL TELETEXT PREVIOUS PAGE VOLUME INCREASE CONTROL THE CURSOR IN THE MENU MENU DISPLAY PROGRAMME SELECTION BY NAME TUNER CABLE NETWORK SELECTION MAKE THE REMOTE CONTROL WORKS FOR TV VCR CABLE DVD PLAYER AV LINK VCR RECORD OPTION AV LINK VCR STOP OPTION EXTERNAL INPUT SELECTION It is possible that the work of the transmitter is dull or not operated ...

Страница 8: ...the 75Ω coaxial socket on the rear of the television 2 If you are using an indoor aerial you may need to turn it when tuning your television until you obtain a picture that is both sharp and clear For further details refer to Automatic Storing of Channels on page 16 Manual Storing of Channels on page 18 If you wish to subscribe to a cable network contact your local dealer 8 ENG 75Ω or Cable Televi...

Страница 9: ...rial output socket Television aerial input socket 3 Connect Audio Video cable from the Audio Video output connector to the Audio Video input connector of television 4 Follow the instructions supplied with your VCR to tune the VCR to your television ENG Connecting a VCR ATT M A IN FROM ANT OUT TO TV TEST M A L G COUL N B DECODER AV 75Ω Rear of the TV Aerial output RCA cable Aerial input ...

Страница 10: ... the Receiver output socket Television aerial input socket In order to descramble a coded transmission signal you must connect a decoder to the TV set If you wish to connect both a decoder and a VCR you should connect the Decoder to the VCR VCR to the television see pages 39 40 for further details Otherwise connect the decoder directly to the television Using a coaxial cable Connect a coaxial cabl...

Страница 11: ...ch wire 5 Connect the other end of the wires to the loudspeakers You must insert or replace the batteries in the remote control when you Purchase the television Find that the remote control is no longer operating correctly 1 Remove the cover on the rear of the remote control by pressing the symbol downwards and then pulling firmly to remove it 2 Insert two R03 UM4 AAA 1 5V or equivalent batteries ...

Страница 12: ...levision off press the ON OFF button again Your television can be placed in Standby mode in order to reduce Power consumption Wear of the cathode ray tube The Standby mode can be useful when you wish to interrupt viewing temporarily during a meal for example 1 Press the POWER button on the remote control Result The screen is turned off and a red Standby indicator appears on the front of the televi...

Страница 13: ... in a single digit channel being displayed Used to increase the volume Used to reduce the volume Used to Display a submenu containing selections for the current menu option Search forwards backwards manually for channels Increase reduce a menu option value Used to confirm your choice MENU Used to display the Used to return to the previous on screen menu system menu or normal viewing to Used to dis...

Страница 14: ... button to confirm your choice Result The message Antenna input check is displayed 4 Make sure that the antenna is connected to the TV and then press the joystick button Result The Area menu is displayed 5 Select your country or area by moving the joystick up or down 6 Press the joystick button to confirm your choice Result The Auto store menu is displayed 7 To start the search press the joystick ...

Страница 15: ...joystick button to confirm your choice 7 When you are satisfied with your choice press the TV button to return to normal viewing ENG Blue screen Time Plug Play Function Move Enter Off Language English Choosing Your Language Plug and Play cont If you want to reset this feature 1 Press the MENU button Result The main menu is displayed 2 Move the joystick up or down until the Function is selected Res...

Страница 16: ...Move the joystick right Result The Auto store menu is displayed 10 Press the joystick button to start the search Result The search will end automatically Channels are sorted and stored in an order which reflacts their position in the frequency range with lowest first and highest last The programme originally selected is then displayed To stop the search before it has finished press the TV button 1...

Страница 17: ...ight Result The Sort menu is displayed 6 Move the joystick up or down to select the channel that you wish to move Then move the joystick right 7 Move the joystick up or down to select the number of the programme to which the channel is to be moved 8 Move the joystick left Result The channel is moved to its new position and all other channels are shifted accordingly 9 Repeat Steps 6 to 8 until you ...

Страница 18: ...te the broadcasting standard required by moving the joystick up or down to select the Color system option followed by moving the joystick left or right The color standards are displayed in the following order depending on your model Auto PAL SECAM or Auto NTSC3 58 NTSC4 43 PAL60 7 Select the Sound system option by moving the joystick up or down and followed by moving the joystick left or right The...

Страница 19: ...utton If you are unable to fine tune a channel check that the Color system and Sound system settings are correct 10 To assign a programme number to a channel select the Prog No option Move the joystick left or right until you find the correct number 11 To store the channel and associated programme number press the joystick button 12 Repeat Steps 8 to 11 for each channel to be stored ENG Manual Sto...

Страница 20: ...ystick right Result Arrow indications are displayed around the name box 8 To Then move the joystick Select a letter number or symbol up or down Move on the next letter right Move back the previous letter left The characters available are Letters of the alphabet A Z Numbers 0 9 Special characters _ space 9 When you have finished entering the name press the joystick button to confirm the name 10 Pre...

Страница 21: ...joystick right Result The Channel edit menu is displayed with the current channel automatically selected 6 Move the joystick up or down to select the number of the programme to which the channel is to be locked 7 Move the joystick right 8 To Then Lock the channel Select On Press the joystick button Result The channel is locked Unlock the channel Select Off Press the joystick button Result The chan...

Страница 22: ... MODE button on the remote control 22 ENG Changing the Scan Mode You can display the list of stored channels 1 Press the INFO button Result A list is displayed with the first 13 channels Two text boxes to the right of the list indicate Whether the Teletext feature is available Which sound mode is being used 2 To Then Scroll through the Move the joystick up or down stored channels Result The corres...

Страница 23: ...tivate the Digital Noise Reduction feature to help reduce any static and ghosting that may appear on the screen 1 Press the MENU button Result The options available in the Picture group are displayed 2 Move the joystick right 3 Move the joystick up or down until the Digital NR option is selected Move the joystick right Result The Digital NR menu is displayed with the current option 4 To Then Chang...

Страница 24: ...l in the weak signal area but not noise This feature is working only weak signal condition and that is memorized on current channel additional 1 Press the MENU button Result The main menu is displayed 2 Move the joystick up or down until the Function is selected Result The options available in the Function group are displayed 3 Move the joystick right 4 Move the joystick up or down until the LNA o...

Страница 25: ... right Result The Size menu is displayed with the current option 4 To Then Change a setting Move the joystick left or right Result The picture is changed accordingly Confirm the option Press the joystick button Return to normal viewing Press the TV button If the PC is connected you can adjust the VGA mode by moving the joystick up down left or right You can also select these options by simple pres...

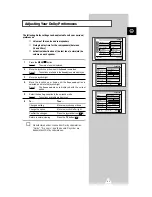
Страница 26: ... Tint NTSC only 1 Press the MENU button Result The options available in the Picture group are displayed 2 Move the joystick right Result The Adjust option is selected 3 Move the joystick right again Result The Adjust menu is displayed with the current option 4 Move the joystick up or down to select the option to be adjusted 5 To change the Then move the joystick Color tone right until the required...

Страница 27: ...s its own signal conditions and so it is not easy for you to adjust the volume every time the channel is changed Auto volume lets you automatically adjust the volume of the desired channel by lowering the sound output when the modulation signal is high or by raising the sound output when the modulation signal is low 1 Press the MENU button Result The main menu is displayed 2 Move the joystick up o...

Страница 28: ...Stereo depending on the current transmission If the receiving conditions deteriorate listening will be easier if the mode is set to the Mono position using the S MODE button If the stereo signal is weak or if intermittent Stereo Mono and automatic switching occurs then switch to the Mono mode When receiving mono sound in the AV mode connect to the L input jack on the panels If the mono sound comes...

Страница 29: ... right 4 Move the joystick up or down until the Audio out option is selected 5 Select the your requirement If you want to adjust the volume level with the volume control on the TV set to Volume When set to Standard you can adjust the volume level with the volume control on the audio amplifier 6 If you wish to silence the internal speakers set the Int mute to On 7 Move the joystick up or down until...

Страница 30: ... Result The following surround modes are available Pro Logic 3D Sound Hall Off 5 Select the Pro Logic option in the surround mode Result The options available are displayed 6 Move the joystick up or down until the Pro Logic option is selected and move the joystick right 7 Select the required option by moving the joystick left or right Result The following options are available Normal Phantom Wide ...

Страница 31: ...isplayed with the current option 5 Select the Pro Logic option in the surround mode Result The options available are displayed 6 To Then Change a setting Move the joystick up or down Change the option Move the joystick left or right Confirm the changes Press the joystick button Return to normal viewing Press the TV button Manufactured under license from Dolby Laboratories Dolby Pro Logic and the d...

Страница 32: ...are available Volume Bass Treble Balance 1 Press the MENU button Result The main menu is displayed 2 Move the joystick up or down until the Sound is selected Result The options available in the Sound group are displayed 3 Move the joystick right 4 Move the joystick up or down until the Headphone option is selected Move the joystick right Result The Headphone menu is displayed 5 To Then Change the ...

Страница 33: ...played 2 Move the joystick up or down until the Function is selected Move the joystick right Result The options available in the Function group are displayed 3 Move the joystick up or down until the Time option is selected Move the joystick right Result The Time menu is displayed with the Clock option selected 4 Set the Clock by pressing the numeric buttons 5 Move the joystick up or down to select...

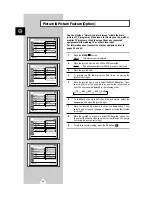
Страница 34: ...ect a source of the sub picture by moving the joystick left or right The sources are displayed in the following order TV AV1 AV2 AV3 AV4 6 To interchange the main picture and the sub picture select the Swap option and move the joystick right 7 Move the joystick up or down to select the Size option Then select a size of the sub to Large or Small by moving the joystick left or right 8 Move the joyst...

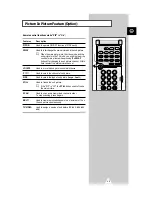
Страница 35: ...his time reselect the main picture channel LOCATE Used to move the sub picture counterclockwise P Used to select the channel of sub picture SIZE Used to select the type of sub picture Large Small STILL Used to freeze the sub picture If the PIP is Off the STILL button used to freeze the main picture SCAN Used to scan every memorized channel in order To stop scanning press it again MULTI Used to vie...

Страница 36: ... E F A B C D You can display Teletext information at any time on your television For Teletext information to be displayed correctly channel reception must be stable otherwise Information may be missing Some pages may not be displayed To activate the Teletext mode and display the contents page follow the instructions below 1 Select the channel providing the Teletext service using the P or P buttons...

Страница 37: ...xt reveal answers to quiz games for example The screen normally again reveal again A secondary page by entering its number The broadcast when searching for a page The next page P The previous page P In letters the upper or lower half of the page size repeatedly To a full page To return to the normal display after using the reveal or size features press the TV button again Selecting Display Options...

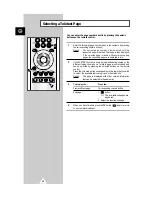
Страница 38: ...casting company the different topics covered on a Teletext page are color coded and can be selected by pressing the coloured buttons on the remote control Press the coloured button corresponding to the topic that you wish to select the available topics are given on the status line Result The page is displayed with other colored information that can be selected in the same way 3 To display the Pres...

Страница 39: ...s video audio L and R An S Video connector and two audio RCA connectors L R AV 1 3 Rear of the TV or VCR Video disc player Satellite receiver Decoder Video game device The RCA AUDIO L R VIDEO connectors are used for equipment such as camcorders video disc players and some video game devices Side of the TV Camcorder Video disc player Video game device ...

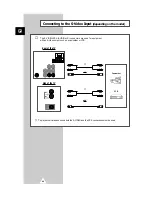
Страница 40: ...he model The S VIDEO RCA AUDIO L R connectors are used for equipment with an S Video output such as a camcorder or VCR To playback pictures and sound both the S VIDEO and the RCA connections must be used Side of the TV and Camcorder VCR Rear of the TV and ...

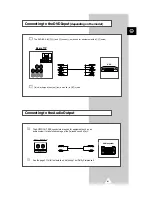
Страница 41: ...r of the TV AUDIO OUT L R Audio system Connecting to the Audio Output See the page 31 for further details on Adjusting Your Dolby Preferences Connecting to the DVD Input depending on the model The DVD RCA AUDIO L and R connectors are used for equipment with a DVD output Rear of TV DVD Only black signal is output from a monitor in DVD mode ...

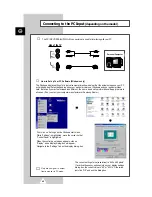
Страница 42: ...ls If a vertical frequency option exists on your display settings dialog box the correct value is 60 or 60 Hz Otherwise just click OK and exit the dialog box How to Set up Your PC Software Windows only The Windows display settings for a typical computer are shown below But the actual screens on your PC will probably be different depending upon your particular version of Windows and your particular...

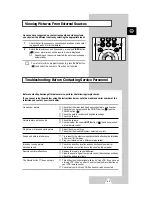
Страница 43: ...at you have pressed the ON OFF button and the POWER button Check the picture contrast and brightness settings Check the volume Check the volume Check whether the volume MUTE button has been pressed on the remote control Adjust the colour settings Check that the broadcast system selected is correct Try to identify the electrical appliance that is affecting the television and move it further away Pl...

Страница 44: ... AFTER SALES SERVICE Do not hesitate to contact your retailer or service agent if a change in the performance of your product indicates that a faulty condition may be present AA68 01407A ENG ELECTRONICS ...

Отзывы: