background image

42

41

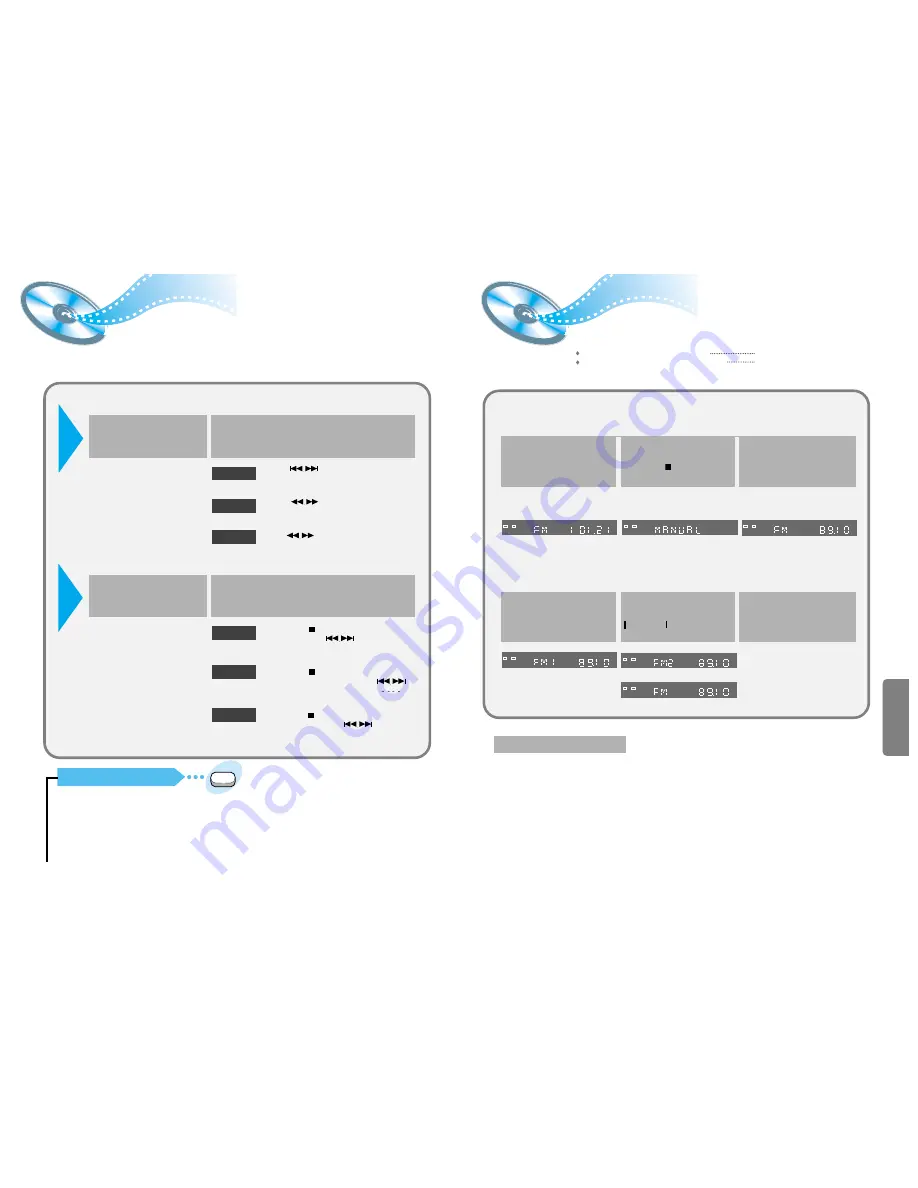
When the                   button is pressed, a preset
broadcast station is selected.

Hold in the                 button. Automatic searching
begins, and then stops when a station is tuned in.

Press the                    button to tune to the chosen
station. The frequency changes incrementally in either
direction each time the corresponding button is pressed.

Listening to the Radio

Presetting stations

Auto Station 1

Auto Station 2 

Manual Station 

Press the Tuner(Band)
button.

1

Select a broadcast station.

2

• 

The selection toggles back
and forth between "FM" and
"AM" each time the
Tuner(Band) button is
pressed.

Press the MO/ST button. (FM only)

• 

The selection toggles back and forth between “STEREO” and “MONO”
each time the MO/ST button is pressed.

• 

In a poor reception areas, select Mono mode for a clear, interference-free
broadcast.

To Listen in Mono/Stereo 

Audio

MO/ST

See the previous page.

To tune in a preset station

Example: Presetting FM 89.1 in the memory 

MH

Z

L

R

PRGM

MH

Z

L

R

PRGM

MH

Z

L

R

MH

Z

L

R

L

R

MH

Z

L

R

Press the Tuner(Band) button
and select the FM band.

Select MANUAL by pressing
the Stop (     )  button on the
main unit.

1

Use the          and
button to tune to 89.1

2

• 

The selection toggles back and forth between “FM” and “AM”
each time the Tuner(Band) button is pressed.

3

4

5

6

Remote 
Control

Unit 

Press the Stop (       ) button to select the PRESET
mode. Then press the                     button to select a
station stored in the preset. See the instructions on the
next page to preset stations.

Press the Stop (       ) button to select the MANUAL
mode on the front panel. Then hold in the
button to make the unit begin automatically searching for
broadcast stations.

Press the Stop (      ) button to select the MANUAL mode
on the front panel. Press the                     button to tune
to the desired station. The frequency changes
incrementally in either direction each time the
corresponding button is pressed.

Auto Station 1

Auto Station 2 

Manual Station 

1

Select a broadcast station.

2

Main
Unit

Press the Function button to
select the desired band (FM,
AM).

You can listen to the chosen band (FM, AM broadcast stations) by using either the
automatic or manual tuning operation.

Press the Program button on
the remote control, FM1 will
flash. If you want to save 89.1
to FM1, press Program again. 

To preset other stations,
follow steps 1~5 again.

If you want to save 89.1 to another
preset location(FM2~FM15), press   

or          , then press

Program to save it to that location.

▲ ▲

▲ ▲

You can store up to:

15 FM stations
15 AM stations       

• 

FM

Frequency Modulation

• 

AM(MW)

Medium Wave

Содержание 2.004111218363e16

Страница 1: ...IGITAL VIDEO Instruction Manual AH68 01142R SAMSUNG ELECTRONICS CANADA INC Bureau chef 7037 Financial Drive Mississauga Ontario Canada L5N 6R3 TEL 1 905 542 3535 www samsung ca Centre de service 7037 Financial Drive Mississauga Ontario Canada L5N 6R3 1 800 SAMSUNG 1 800 726 7864 ...

Страница 2: ... the unit CLASS 1 LASER PRODUCT This Compact Disc player is classified as a CLASS 1 LASER product Use of controls adjustments or performance of procedures other than those specified herein may result in hazardous radiation exposure CAUTION INVISIBLE LASER RADIATION WHEN OPEN AND INTERLOCKS DEFEATED AVOID EXPOSURE TO BEAM This symbol indicates that dangerous voltage which can cause electric shock i...

Страница 3: ... G CD I CD ROM and DVD ROM cannot be played on this player If such discs are played a WRONG DISC FORMAT message appears on the TV screen DVD discs purchased abroad may not play on this player If such discs are played a WRONG REGION CODE message appears on the TV screen Do not use the following types of disc Safety Warnings Precautions Description Remote Control CHAPTER 1 PREPARATION 1 2 5 7 Settin...

Страница 4: ...rs External Audio Component Input Connector Video Output Connector Connect the TV s video input jacks VIDEO IN to the VIDEO OUT connector S Video Output Connector If the TV is equipped with an S Video input connector S VIDEO IN connect it to the player s S Video output jack AM Antenna Connector COMPONENT VIDEO OUTPUT INPUT jacks Connect a TV with component video inputs to these jacks TITLE indicat...

Страница 5: ...nd Edit button SPK Mode button Pro Logic II button Test Tone button D R C button 30 30 7 10m Remove the battery cover on the back of the remote by pressing down and sliding the cover in the direction of the arrow Insert Remote Batteries Range of Operation of the Remote Control 1 Insert two 1 5V AAA batteries paying attention to the correct polarities and 2 Replace the battery cover 3 The remote co...

Страница 6: ...ack on the back panel of the system to the VIDEO IN jack on your television S Video Better Quality If you television is equipped with an S Video input connect an S Video cable not supplied from the S VIDEO OUT jack on the back panel of the system to the S VIDEO IN jack on your television Component Video Best Quality If your television is equipped with Component Video inputs connect a component vid...

Страница 7: ...es If they are blocked by a newspaper or cloth etc the heat may not be able to escape Snap the tabs on the loop into the slots of the base to assemble the AM loop antenna Cooling fan See About Cooling Fan below ANTENNA 1 2 3 If FM reception is poor connect an outdoor FM antenna not supplied FM Antenna supplied AM Loop Antenna supplied If AM reception is poor connect an outdoor AM antenna not suppl...

Страница 8: ...rand TV example For SAMSUNG 1TVs While holding down the button enter TV Manufacturer 01 06 32 12 12 09 17 21 11 13 14 24 32 02 30 02 16 29 23 13 14 24 08 23 27 02 20 22 13 14 22 24 12 16 02 10 31 15 16 14 24 28 13 14 24 33 34 07 16 19 21 Samsung Akai FIisher Grundig Hitachi JVC LG Mitsubishi Mival Nokia Nordmende Panasonic Philips Saba Sanyo Schneider Sharp Sony Telefunken Thomson Toshiba CODES If...

Страница 9: ...old the P SCAN button down for longer than 1 second The selection switches back and forth between P SCAN and I SCAN each time the button is held down for a minimum of 1 second The previous mode is indicated in the display first followed by the selected mode in about a second Press the Setup P Adj button Play mode only Each time the Setup P Adj button is pressed the following appears on the TV scre...

Страница 10: ...ored in the memory and STOP is shown on the display When the Play Pause button or Return button is pressed subsequently playback resumes from the position at which it was stopped If the Stop button is pressed a second time the resume play memory function is canceled and STOP is shown on the display When the Play Pause button is pressed playback starts from the beginning Turning the sound off tempo...

Страница 11: ...high bit rate e g 32Kbps 320Kbps the sound may skip during playback Depending on the recording mode some MP3 CDs cannot be played 20 Turn on your TV when playing back an MP3 disc Operations Using the On Screen Display When the loaded MP3 disc is recognized the following on screen display appears on the TV screen The contents of this on screen display vary according to the disc the way MP3 tracks w...

Страница 12: ... played The slow playback speed changes and the selections 1 2X 1 4X 1 8X 1 16X and normal play are repeated Checking the Remaining Time REMAIN TIME CHAPTER REMAIN TIME TITLE CHAPTER TIME TITLE TIME REMAIN TIME DISC REMAIN TIME TRACK DISC TIME TRACK TIME Playing Frame by Frame The picture moves forward one frame each time the button is pressed Step Each time the Remain button is pressed Slow Remai...

Страница 13: ...title of each movie Depending on the disc this function may either not work at all or may work differently Using the Title Menu Repeat playback operation is not possible with version 2 0 VCD discs if PBC is turned on To operate this feature press the MENU button and then select PBC OFF Press the Repeat A B button at the beginning A of the segment you want to review Press the Repeat A B button agai...

Страница 14: ... Audio MO ST Subtitle Press the Audio button Press the Subtitle button If the word INVALID appears on the TV screen while buttons are being operated that operation is not possible with that particular disc Depending on the disc the audio or subtitle language function may not work 26 OFF 1 3 2 3 3 3 To enlarge an image Images can be enlarged 2x and 4x During DVD playback press the Zoom button to zo...

Страница 15: ...additional tracks appears The selected track number is programmed and the cursor moves to the next number Press the Stop button twice during playback Press the Stop button once when in the Stop mode Press the Open Close button on the main unit The disc tray will open and then close The program will then be deleted To Playback the Tracks in Programmed Order Press the Play Pause button Press either ...

Страница 16: ...he Enter button or Right button Press the Up Down button to select the desired language and then press the Enter button 30 Sleep D R C Function To set up Sleep Each time the button is pressed the selection toggles as follows SLEEP 10 SLEEP 20 SLEEP 30 SLEEP 60 SLEEP 90 SLEEP 120 SLEEP 150 OFF Press the Sleep button The remaining time for the selected Sleep time is displayed on the front panel Pres...

Страница 17: ... 4 3 LB OFF RATING LEVEL BITSTREAM OUTPUT DIGITAL Move Setup Exit LANGUAGES SYSTEM TV SCREEN 4 3 LB OFF RATING LEVEL OUTPUT DIGITAL TV SCREEN 4 3 PS 16 9 4 3 LB Move Setup Exit LANGUAGES SYSTEM OFF RATING LEVEL BITSTREAM OUTPUT DIGITAL TV SCREEN Move Setup Exit LANGUAGES SYSTEM 4 3 LB Press the Up Down button to select the desired sub item and then press the Enter button 4 5 From the stop mode pre...

Страница 18: ...r Small Subwoofer Use Center Speaker Delay Time Rear Speaker Delay Time Center speaker Not Used Rear speaker Not Used Setting up Delay Time from 00 05ms Setting up Delay Time from 00 15ms 1 Press the Left Right button to select the desired item Press the SPK Mode button 2 SMALL When this setting is selected low frequencies of below 200 Hz are assigned to the subwoofer only USE Select when using sp...

Страница 19: ...nnel sound tracks of the software encoded with DTS Digital Surround DTS Digital Surround is another discrete 5 1 channel digital audio format available on CD LD and DVD software Compared to Dolby Digital audio compression rate is relatively low This fact allows DTS Digital Surround format to add breadth and depth to the reproduced sounds As a result DTS Digital Surround features natural solid and ...

Страница 20: ...oofer and Surround Left Right Channels STEREO Left Right and Subwoofer Channels Dolby Pro Logic II decoder Dolby Pro Logic II is a new format for playing multichannel audio signals that offers improvements over conventional Dolby Pro Logic It can be used to decode not only sources recorded in Dolby Surround but also regular stereo sources into five channels front left right center and surround lef...

Страница 21: ...eling of a live music club with a low ceiling LIVE CLUB This function works only in the STEREO Mode To increase Effect level Adjusting DSP Sound Parameters You can fine adjust DSP modes more minutely by changing three parameters room liveness and reverberation To increase Effect level The effect level can be set in steps from 1 to 4 EFFECT1 EFFECT2 EFFECT3 OFF DEFAULT Each time the button is press...

Страница 22: ...e selection toggles back and forth between FM and AM each time the Tuner Band button is pressed 3 4 5 6 Remote Control Unit Press the Stop button to select the PRESET mode Then press the button to select a station stored in the preset See the instructions on the next page to preset stations Press the Stop button to select the MANUAL mode on the front panel Then hold in the button to make the unit ...

Страница 23: ...Dolby Digital 5 1 Channel Surround Sound is not being reproduced Problem Check Is the TV power turned on Are the video cables properly connected Is it the player in PAUSE mode Is there any dirt on the disc or is the disc damaged It may not be possible to play some DVD discs due to poor manufacture When a dark scene changes to a bright scene during playback the screen may flicker vertically Some di...

Страница 24: ...ve the disc and let the player stand for 1 or 2 hours with the power on Do not allow the discs to become contaminated with dirt Do not load cracked discs or discs that are scratched Do not keep in direct sunlight Keep in a clean Protection jacket Store vertically Keep in a cool ventilated area Disc Type and Protection COMPACT DIGITAL VIDEO V I D E O COMPACT DIGITAL AUDIO Marks Audio Video DVD VIDE...

Страница 25: ...Canada Inc SECA warrants that this product is free from defective material and workmanship SECA further warrants that if this product fails to operate properly within the specified warranty period and the failure is due to improper workmanship or defective material SECA will repair or replace the product at its option All warranty repairs must be performed by a SECA authorized service centre The n...

Отзывы: