9-12
EB 8055 EN
Servicing
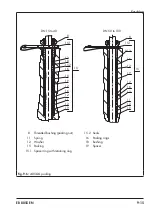
ing a suitable tool. Observe the proper
sequence (see section 9.4.3).
25. Firmly press the top plug (5) into the seat
(4). Fasten down the bonnet (2) with the
top body nuts (14). Tighten the nuts
gradually in a crisscross pattern. Ob-
serve tightening torques.
26. Screw in the threaded bushing (8) and
tighten it.
27. Loosely screw the lock nut (10) and stem
connector nut (9) onto the plug stem.
28. Place the yoke assembly (60) on the bon-
net (2) and fasten using the castellated
nut (92).
29.
Insert a new bottom gasket (17) into the
body.
30. Place the seat body (20) onto the body
(1) and fasten down it with the bottom
body nuts (14). Tighten the nuts gradual-
ly in a crisscross pattern. Observe tight-
ening torques.
31. Place the sleeves (75 and 76) and the
new bottom plug (5) onto the plug stem.
The sleeves of valves in DN 65 and larger
are constructed to act as an internal anti-ro-
tation fixture.
Î
Make sure during assembly that the
sleeves engage in each other.
32.
DN 15 to 50:
tighten the nut (225) on
the end of the plug stem while holding
the stem connector nut (9) stationary.
DN 65 to 100:
Place the ring (230) and
tab washer (224) on the end of the plug
stem. Tighten the nut (225) at the bottom
end of the plug stem while holding the
stem connector nut (9) stationary.
Note
Содержание 3253
Страница 22: ...3 8 EB 8055 EN...
Страница 27: ...EB 8055 EN 4 5 Shipment and on site transport...
Страница 28: ...4 6 EB 8055 EN...
Страница 74: ...12 2 EB 8055 EN...
Страница 76: ...13 2 EB 8055 EN...
Страница 79: ...EB 8055 EN 14 3...
Страница 80: ...14 4 EB 8055 EN...
Страница 81: ...EB 8055 EN 14 5...
Страница 82: ...14 6 EB 8055 EN...
Страница 88: ...15 6 EB 8055 EN...
Страница 89: ......
Страница 90: ......
Страница 91: ......


