


EB 8055 EN
9-11
Servicing
11.
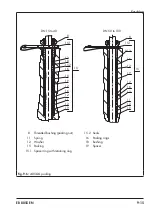
Unscrew the threaded bushing (8).
12.
Pull the plug stem (36) together with the
top plug (5) out of the bonnet (2).
13. Pull the entire packing out of the packing
chamber using a suitable tool.
14. Make sure that the guide bushing (7) is
not damaged. If necessary, replace the
guide bushing using a suitable tool.
15. Unscrew the top plug (5) from the plug
stem (36).
16. Unscrew the bottom and top seat (4) us-
ing a suitable tool.
17. Apply a suitable lubricant to the thread
and the sealing cone of the new seats.
18. Screw in the top and bottom seat (4).
Observe tightening torques.
19.
Insert a new top gasket (17) into the
body.
20.
Apply a suitable lubricant to the plug
stem (36).
21.
Screw the new top plug (5) onto the plug
stem (36).
22.
Slide the plug stem (36) into the bonnet
(2).
23. Place the bonnet (2) and plug stem (36)
together with the top plug (5) onto the
body (1).
24. Carefully slide the packing parts over the
plug stem into the packing chamber us
-
c) Multi-piece body · Diverting
valve
1.
DN 15 to 50:
unscrew the nut (225) from
the bottom end of the plug stem while
holding the stem connector nut (9) sta
-
tionary.
DN 65 to 100:
unscrew the nut (225)
from the bottom end of the plug stem
while holding the stem connector nut (9)
stationary. Remove the tab washer (224)
and ring (230) from the end of the plug
stem.
2.
Remove the bottom plug (5) and sleeves
(75 and 75) from the plug stem.
3. Undo the bottom body nuts (14) gradual-
ly in a crisscross pattern.
4. Remove the seat body (20) from the
body (1).
5. Remove the bottom gasket (17). Carefully
clean the sealing faces in the valve body
(1) and on the seat body (20).
6.
Unscrew the castellated nut (92) and take
the yoke assembly (60) off the bonnet
(2).
7. Undo the top body nuts (14) gradually in
a crisscross pattern.
8. Remove the bonnet (2) and plug stem
(36) together with the top plug (5) from
the body (1).
9.
Remove the top gasket (17). Carefully
clean the sealing faces in the valve body
(1) and on the bonnet (2).
10. Unscrew the stem connector nut (9) and
lock nut (10) from the plug stem.
224
Tab washer
225
Nut
230
Ring (internal anti-rotation
fixture)
230
224
225
Fig. 9-3:
Arrangement for valves in DN 65 to 100
Содержание 3253
Страница 22: ...3 8 EB 8055 EN...
Страница 27: ...EB 8055 EN 4 5 Shipment and on site transport...
Страница 28: ...4 6 EB 8055 EN...
Страница 74: ...12 2 EB 8055 EN...
Страница 76: ...13 2 EB 8055 EN...
Страница 79: ...EB 8055 EN 14 3...
Страница 80: ...14 4 EB 8055 EN...
Страница 81: ...EB 8055 EN 14 5...
Страница 82: ...14 6 EB 8055 EN...
Страница 88: ...15 6 EB 8055 EN...
Страница 89: ......
Страница 90: ......
Страница 91: ......


