background image

5

R. 03/23 853 822

 SAMOA Industrial, S.A. · Pol. Ind. Porceyo,  I-14 · Camino del Fontán, 831 · 33392 -  Gijón - Spain · Tel.: +34 985 381 488 · www.samoaindustrial.com

2023_03_06-16:00

EN

Please see figure 4, a typical installation shown with all the recommended accesories for the pump to operate correctly.

NOTE: 

The compressed air supply must be between 30 and 170 psi (2 - 12 bar), and 80 to 100 psi is ideal.

K

I

L

A

B

C

D

E

J

F

G

H

TO OIL 
CONTAINER

Fig. 4

POS. DESCRIPTION

 PART. NO

A

Ball Valve, Low Pressure

239004

Filter/Regulator 

241001

Air hose 

247710

Quick coupling 

251438

Connection nipple

255338

Pump 

535530

G

Pressure Relief Valve 

609008

H

Oil hose 

946605

Ball Valve, Medium Pressure 

950300

Wall bracket 

360139 / 360140

Oil suction hose 

945724

Ball Valve, Low Pressure 

945567

TROUBLESHOOTING

SYMPTOMS

POSSIBLE REASONS

SOLUTIONS

The pump is not working or there is 
no oil delivery.

Not enough air supply pressure.

Increase the air supply pressure.

Some outlet line component is clogged or closed.

Clean or open the outlet circuit.

The pump begins to operate very 
fast.

The tank is empty or the oil level is beneath the 
suction tube inlet.

Fill the tank or lower the suction tube until you 
reach to the oil level.

The pump keeps on operating 
although the oil outlet is closed.

There is an oil leakage in some point of the outlet 
circuit.

Verify and tighten or repair.

Oil leakage through the air outlet 
muffler or the leakage warning hole 
on the pump body.

Oil has by-passed to the air motor caused by worn or 
damaged seal.

Replace the seal. Check if the pump piston is scratched. 
If so, replace the air piston assembly.

Air leakage through the air outlet 
muffler.

Damaged or worn piston O ring.

Replace O Ring.

The air seal of the inverter assembly is damaged or 
worn.

Replace the air seal.

Damaged or worn spool seals.

Replace the seals.

Oil output too low or diminishes 
over time.

Contamination in the foot valve.

Remove and clean. Replace if damaged.

Contamination in the upper valve.

Remove and clean. Replace if damaged.

The exhaust felt is clogged by compressed air dirt or 
lubricant.

Replace the muffler felt.

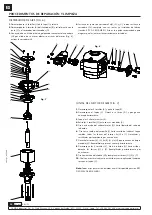
CLEAN THE MUFFLER (FIG. 5)

1.

  Unscrew and remove the plug (C).

2.

  Remove the muffler diffuser (B).

3.

 Replace the felt (A) with a new one.

4.

 Replace the diffuser (B) together with the new felt (A).

5.

 Replace the plug (C).

REPAIR AND CLEANING PROCEDURE

WARNING

: Before starting any kind of maintenance or repair, 

disconnect the compressed air supply and open a downstream 
valve to relieve the oil pressure.
During the assembly, ensure to apply grease to all the seals.

!

Fig. 5

A

B

C

Vuelva a colocar el difusor (B) junto con el nuevo fieltro (A).

TYPICAL INSTALLATION

Содержание PM35

Страница 1: ...DE ACEITE PM35 RATIO 5 1 8 POMPE HUILE PNEUMATIQUE PM35 RAPPORT DE PRESSION 5 1 14 DRUCKLUFTBETRIEBENE LPUMPE PM35 BERSETZUNG 5 1 20 PM35 5 1 26 EN ES FR DE RU ADVERTENCIA LEA ATENTAMENTE EL MANUAL DE...

Страница 2: ...occurs Directive part 2014 34 EU Standard part UNE EN ISO 80079 36 2017 ATEX MARKING CAREFULLY READ THE INSTRUCTIONS AND WARNINGS BEFORE STARTING TO OPERATE THE EQUIPMENT technical documentation in t...

Страница 3: ...e extremely flammable highly flammable flammable highly toxic toxic oxidizing or those whose vapor pressure is greater than 0 5 bar 7 psi above the atmospheric pressure at the maximum allowable temper...

Страница 4: ...60140 and attach it with the bung adapter 360001 Fig 1 b Wall mounting with screws Insert the pump through the wall bracket 360140 and fix it with 4xM8 screws Fig 2 C Adjustable drum or tank mounting...

Страница 5: ...o the oil level The pump keeps on operating although the oil outlet is closed There is an oil leakage in some point of the outlet circuit Verify and tighten or repair Oil leakage through the air outle...

Страница 6: ...H DISTRIBUIDOR DE AIRE 3 AIR DISTRIBUTOR FIG 6 1 Unscrew the 4 bolts J from the cover I and remove it 2 Unscrew the 4 screws A from the muffler B and remove it together with the gasket C and the muff...

Страница 7: ...P gina 9 09 09 2021 SPARE PARTS KITS TECHNICAL DATA DIMENSIONS SPARE PARTS SEE PAGES 32 34 and 35 Fig 8 LOWER SEALS KIT FIG 8 For easier service it is recommended to stop the pump near the lowest stro...

Страница 8: ...to por funcionamiento en seco durante varias horas Parte directiva 2014 34 EU Parte norma UNE EN ISO 80079 36 2017 MARCADO ATEX LEA ATENTAMENTE EL MANUAL DE INSTRUCCIONES Y SUS ADVERTENCIAS ANTES DE E...

Страница 9: ...ables inflamables muy t xicos t xicos u oxidantes O aquellos fluidos cuya presi n de vapor sea superior a 0 5 bar 7 psi sobre la presi n atmosf rica a la m xima temperatura permitida La bomba puede pr...

Страница 10: ...adaptador 360001 Rosque a la bomba el tubo prolongador correspondiente ver Fig 3 Rosque la tuerca del adaptador ajustable a la tapa del bid n cisterna Inserte el tubo por la tuerca y f jelo con la est...

Страница 11: ...de salida La bomba empieza a funcionar con mucha m s velocidad El dep sito est vac o o el nivel est por debajo del tubo de succi n Llene el dep sito o cale el tubo de succi n hasta llegar al nivel de...

Страница 12: ...ido inverso aplicando fijador de rosca en el tap n C Nota Todas estas juntas est n incluidas en el kit disponible secci n KITS DE PIEZAS DE RECAMBIO 4 Sustituya las juntas de corredera 2x E F y G o bi...

Страница 13: ...la arandela G Sustituya el collar n H 3 Desenrosque los cuatro tornillos K separe el cuerpo de salida D del motor de aire y sustituya las dos juntas B E y el aro gu a C 4 Vuelva a montar en orden inve...

Страница 14: ...nt sec pendant plusieurs heures Gb indique l EPL de la bombe Pi ce directive 2014 34 EU Pi ce norme UNE EN ISO 80079 36 2017 MARQUAGE ATEX LIRE ATTENTIVEMENT LE MANUEL D INSTRUCTIONS ET SES AVERTISSEM...

Страница 15: ...oxydants ou lorsque la pression de la vapeur est sup rieure de 0 5 bar 7 psi la pression atmosph rique la temp rature maximale admissible La pompe peut g n rer des pressions lev es ou tr s lev es Ne...

Страница 16: ...port mural 360140 et la fixer avec 4 vis M8 Fig 2 c Montage direct sur f t ou citerne en utilisant l adaptateur de bonde r glable 360001 Vissez le tube d aspiration appropri au clapet de pied de la po...

Страница 17: ...ce fonctionner beaucoup plus rapidement Le r servoir est vide ou le niveau d huile est sous l entr e du tube d aspiration Remplir le r servoir au minimum au dessus de l entr e du tube d aspiration La...

Страница 18: ...ns inverse en appliquant du frein filet sur le bouchon C REMARQUE Tous les joints sont inclus dans le kit section KITS DE REMPLACEMENT 4 Remplacer les joints de la glissi re 2x E F et G ou remplacer l...

Страница 19: ...emplacer le joint hydraulique H 3 D visser les boulons K enlever le corps de pompe D et remplacer les joints d tanch it B E et la bague de guidage C 4 Remontage dans l ordre inverse application de fre...

Страница 20: ...den ls die niemals 70 C oder die Umgebungstemperatur je nachdem welche h her ist berschreiten sollte Ein Erdungskabel mit einer Erdungsklemme ist im Lieferumfang enthalten Das Erdungskabel muss fest s...

Страница 21: ...ve hochentz ndliche leichtentz ndliche entz ndliche sehr giftige giftige oder oxidierende Fl ssigkeiten Oder Fl ssigkeiten deren Dampfdruck bei der maximal zul ssigen Temperatur mehr als 0 5 bar 7 psi...

Страница 22: ...Tank mit Adapter 360001 Schrauben Sie das entsprechende Verl ngerungsrohr auf die Pumpe siehe Abb 3 Schrauben Sie die Mutter des verstellbaren Adapters auf den Fass Tankdeckel F hren Sie das Rohr durc...

Страница 23: ...ter ist leer oder der F llstand liegt unter dem Saugrohr F llen Sie den Vorratsbeh lter oder erw rmen Sie die Saugleitung bis zum lstand Die Pumpe l uft weiter auch wenn der Materialauslass geschlosse...

Страница 24: ...Erforderlichen Dichtungen Abschnitt AUSTAUSCHKITS 3 Klopfen Sie den Schieber H mit einem Kunststoffwerkzeug vorsichtig auf der Seite des kleinsten Durchmessers durch den Motor Abb 6 und entfernen Sie...

Страница 25: ...Manschette H wieder anbringen 3 Die vier Schrauben K abschrauben den Auslassk rper D vom Luftmotor trennen und die beiden Dichtungen B E und den F hrungsring C austauschen 4 In umgekehrter Reihenfolge...

Страница 26: ...Font n 831 33392 Gij n Spain Tel 34 985 381 488 www samoaindustrial com 2023_03_06 16 00 RU ATEX 2014 34 EU Samoa Industrial S A ATEX Ex h 80079 36 IIB 2G 1 T4 II T4 135 C 70 C 2014 34 EU UNE EN ISO...

Страница 27: ...R 03 23 853 822 SAMOA Industrial S A Pol Ind Porceyo I 14 Camino del Font n 831 33392 Gij n Spain Tel 34 985 381 488 www samoaindustrial com 2023_03_06 16 00 RU Samoa Industrial S A 1 0 5 7 12 170 AT...

Страница 28: ...j n Spain Tel 34 985 381 488 www samoaindustrial com 2023_03_06 16 00 RU 360140 360139 xxxx8x 360140 360139 a 360140 360001 1 b 360140 4xM8 2 c 360001 3 2 ATEX 534907 Abb 1 Abb 3 Abb 2 0 535530 535580...

Страница 29: ...2 Gij n Spain Tel 34 985 381 488 www samoaindustrial com 2023_03_06 16 00 RU K I L A B C D E J F G H 4 A 950319 239004 B 241001 C 247710 D 251438 E 255338 F 535530 G 609008 H 750361 945558 946605 I 95...

Страница 30: ...su t rica D y ponga una nueva posteriormente 3 Saque las 2 chavetas curvas E 4 Retire los 5 tornillos F junto con sus arandelas G 5 Tire hacia arriba del cabezal motor Q hasta liberarlo del resto de l...

Страница 31: ...2 34 35 8 1 J D 2 I A F G V H 3 K D B E C 4 5 8 A C B E H D F G I J K Fig 8 LABIOS HACIA ARRIBA LABIOS HACIA ABAJO LABIOS HACIA ARRIBA 5 SUSTITUCI N JUNTAS BAJOS o de sustituci n de las juntas bomba c...

Страница 32: ...539505 Part N 753288 2 3 22 30 31 13 43 33 32 35 42 41 39 23 24 4 21 19 15 16 14 24 20 40 1 38 18 34 36 37 6 8 7 9 5 11 23 17 9 12 10 25 26 28 29 27 4 4 4 70 REPLACEMENT KITS KITS DE RECAMBIO Part n...

Страница 33: ...aft Kit Kit V lvula de Aire Kit d Arbre de Valve d Air AUSTAUSCHKITS Code Incl Pos Beschreibung Bemerkungen 360001 36 37 38 Fassverschraubung 534000 5 4x 6 7 8 9 10 11 12 Schalld mpfer Kit 539500 39 4...

Страница 34: ...ftdruck 12 bar 170 psi 12 170 Minimaler Luftdruck 2 bar 30 psi 2 30 Maximale Durchflussmenge Ma 30 l min 7 bar 8 gal min 100 psi 30 7 8 100 Lufteintrittsgewinde 3 8 BSP F 3 8 NPT F lablassgewinde 1 2...

Страница 35: ...469 mm All pumps include bung adapter except references xxxx8x Todas las bombas incluyen adaptador de tap n excepto las referencias xxxx8x Toutes les pompes comprennent un adaptateur de bonde sauf les...

Страница 36: ...nuel d instructions EN FR SAMOA INDUSTRIAL S A Pol Ind Porceyo I 14 Camino del Font n 831 33392 Gij n Spain declara que los siguientes productos cumplen con las disposiciones aplicables de las directi...

Отзывы: