


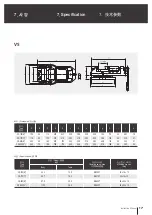


16
Vise
바이스 사용 중 이상발생시 아래와 같은 점을
재확인하시고 당사에 연락을 주시면 친절히 설
명하여 드리겠습니다.
使用虎钳时,若发生如下异常,请采取如
下对策后与我公司联系, 我公司将亲切地
说明给您。
When the vise malfunctions, check below
and troubleshoot accordingly.
문제점 / Trouble /
问题
원인 / Cause /
原因
대책 / Action /
对策
파악력 이상
Problems with gripping force
夹持力异常
파악 범위의 초과 및 이물질, 칩등이 끼어
불완전하게 물려있다.
Oversized workpiece, workpiece not
centered, debris or swarf on jaws or
workpiece.
超出夹持范围,有异物和碎屑,夹持
不完全。
죠, 슬라이드 부분을 깨끗이 청소한다.
Clean jaws and slide.
清扫卡爪和滑动部分。
증력장치의 고장(MMV)
Broken force mechanism(MMV)
重力装置出现故障(MMV)
디스크 스프링을 교체한다. 또는, 증력장치를 분해 청소한다.
Replace disc spring or clean and reassemble booster
assembly.
碟形弹簧交替,还是助推器 拆卸清洗。
정도 불량
Poor accuracy
精密度不够
설치가 잘못 되었다.
Incorrect mounting.
安装不良。
설치 권장 사항을 따르십시오.(Page.11)
Follow the recommended mounting method.(Page.11)
请遵循安装建议事项。(Page.11)
공작물 지지면에 이물질이 끼어있거나, 완
벽하게 파악되지 않았다.
Mounting surface is not level or the
workpiece is not completely clamped.
工件支持面有异物,或夹持不完全。
공작물 지지면을 청소하고, 필요에따라 청소를 반복한다.
Clean the mounting surface and workpiece.
清扫工件支持面,必要时反复清扫。
공작물의 과도한 부상량
Excessive lift of workpiece
工件浮起太多。
공작물의 경사가 심하다.
Workpiece is off center.
工件倾斜严重。
죠를 적절히 가공하여 사용한다.(Page.13)
Form jaws accordingly.(Page.13)
适当加工卡爪使用。(Page.13)
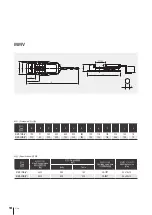
6. Trouble shooting
6. 故障和对策
6. 고장 및 대책
Содержание VS
Страница 2: ......
Страница 4: ...4 Vise 1 7 2 10 2 1 10 2 2 10 3 11 4 12 4 1 12 4 2 12 4 3 MMV 14 5 15 6 16 7 17 8 19...
Страница 6: ...6 Vise 1 7 2 10 2 1 10 2 2 10 3 11 4 12 4 1 Lock pin 12 4 2 12 4 3 MMV 14 5 15 6 16 7 17 8 19...
Страница 21: ......
Страница 22: ......
Страница 23: ......


