background image

SAM4S ER-180T SERIES                                                           

3-1 

3 Installation and Operation 

WARNING:


Before using Electronic Cash Register (ECR) for the first time, leave it powered ON in the 

 REG mode for

  at least 24 hours.

 This allows the MS-Lithium battery, which maintains 

the ECR’s memory while the power is OFF, to charge fully. 


3-1 Installation 

3-1-1. Paper Roll Installation and Take-Up Spool Installation   

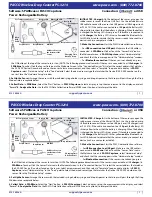
1.   Remove the printer cover.(Fig 3-1 (A),(B)) 

2.   Open the housing clam cover and Insert the paper roll as shown.(Fig 3-1 (C), (D)) 

3.   Pressing the housing clam cover.(Fig 3-1 (E)) 

4.   Lay a cover on the side and press the FEED button. 

5.   Feed the leading edge of the paper in about 150mm and fold the tip in 20mm.   

Insert the leading edge of the paper into the slot on the Spool Winding. (Fig 3-1 (F),(G)) 

6.   Turn the Spool Winding in 2~3 turns. (Fig 3-1 (H)) 

7.   Place the Spool Winding on the Paper Supply. If it loosen, turn to tighten it. (Fig 3-1 (I)) 

8.   Replace the printer cover.(Fig 3-1 (J)) 


Figure 3-1. Paper Installation and Take-Up Spool Installation


Содержание ER-180T

Страница 1: ...LECTRONIC CASH REGISTER Manual 1 Precaution Statements 2 Product Specifications 3 Installation and Operation 4 Assembly and Disassembly 5 Exploded View and Parts List 6 PCB Layout and Parts List 7 Blo...

Страница 2: ...Electronic Cash Register Notes Notes may appear anywhere in the manual They describe additional information about the item Precaution symbols Indicates a Safety Precaution that applies to this part c...

Страница 3: ...may not in whole or in part be copied photocopied reproduced translated or converted to any electronic or machine readable from without prior written permission of Shin Heung Precision SAM4S ER 180T...

Страница 4: ...shooting All information in this manual is subject to change without prior notice Therefore you must check the correspondence of your manual with your machine No part of this manual may be copied or r...

Страница 5: ...dges and especially the AC and high voltage supplies Always inspect for pinched out of place or frayed wiring Do not change the spacing between components and the printed circuit board Check the AC DC...

Страница 6: ...led Electrostatic Sensitive Devices ESDs examples include integrated circuits and some field effect transistors The following techniques will reduce the occurrence of component damage caused by static...

Страница 7: ...odel LTPZ225 SII Print Speed 30 mm sec 7 7 Line sec Type Thermal dot line printing type Detail Spec refers to next page Display Operator Display 8 Digits LED Customer Display 8 Digits LED Option Keybo...

Страница 8: ...tor Head Temperature Thermistor Sensor Paper End Sensor Mechanical Switch Sensor Reliability Life 10km 5 10 7 pulse Dimension mm 69 8 W 33 0 D 16 0 H Weight Approx 45 g Table2 2 Thermal Printer Specif...

Страница 9: ...ER 180T SERIES 2 3 2 2 Appearance A Appearance Dimensions mm Figure2 1 Dimensions B ECR Features Cover Printer Key Board Cash Drawer Cover Display Power Jack Mode Switch Front Display Rear Display Opt...

Страница 10: ...2 Product Specifications 2 4 SAM4S ER 180T SERIES Memo...

Страница 11: ...cover Fig 3 1 A B 2 Open the housing clam cover and Insert the paper roll as shown Fig 3 1 C D 3 Pressing the housing clam cover Fig 3 1 E 4 Lay a cover on the side and press the FEED button 5 Feed th...

Страница 12: ...Power Installation Warning Only use Cigar Jack Power Do not connect AC Power Cord No Description 1 1 Use the Cigar Jack cable CIGAR JACK CABLE 2 1 Insert the CIGAR JACK CABLE like below figure 2 Conn...

Страница 13: ...nd Operation SAM4S ER 180T SERIES 3 3 3 1 3 Program Download No Description 1 DOWNLOAD CABLE for Program Update Special Cable for ER 180 180T 1 5 DOWNLOAD CABLE 2 Disassemble the cover printer 3 Disas...

Страница 14: ...3 Installation and Operation 3 4 SAM4S ER 180T SERIES 3 1 3 Program Download No Description 4 Disassemble the drawer Disconnect the drawer harness and compulsory harness Disassemble the drawer...

Страница 15: ...3 Installation and Operation SAM4S ER 180T SERIES 3 5 3 1 3 Program Download No Description 5 Insert the download cable Insert the DC power cord...

Страница 16: ...Development Took Kit V4 05 program During installation choose all setting options as default value Run the Flash Development Tool Kit Basic You should install this program first Type M3030RFCP in the...

Страница 17: ...on and Operation SAM4S ER 180T SERIES 3 7 3 1 3 Program Download No Description 7 select communication speed Uncheck Use default and set 115200 to the Recommended speeds and press Next button Press Fi...

Страница 18: ...3 8 SAM4S ER 180T SERIES 3 1 3 Program Download No Description 8 Click the Options menu and check the AutoDisconnect Select the downloaded file Check the Download File and User Data Area Press arrow b...

Страница 19: ...Operation SAM4S ER 180T SERIES 3 9 3 1 3 Program Download No Description 9 After selecting downloaded file then press Program Flash If you see ID Check dialog then press OK See the progress bar is goi...

Страница 20: ...ownloading is successful green color Image successfully written to device will displayed as below Unplug the DC power cord Unplug the download cable Reassemble drawer and assemble the screw as origina...

Страница 21: ...emory while the power is OFF to fully charge 3 2 1 Mode The position of the Mode determines the action of the ECR The modes are as shown in Table 3 3 Table3 1 Mode Function Mode Key Function OFF The R...

Страница 22: ...er 2 Turn the control lock to the P position 3 Press and hold the key position where the SUB TOTAL key is located on the default keyboard layout 4 While continuing to hold the SUB TOTAL key plug the r...

Страница 23: ...totals to be erased and to be default 1 Unplug the register 2 Turn the control lock to the S position 3 Press and hold the key position where the A key is located on the default keyboard layout 4 Cont...

Страница 24: ...st Display 1 Turn the Mode switch to Service Mode position 2 Press 1 1 and SUB TOTAL key on key board 3 Check the Display 3 2 5 c Test Key Board 1 Turn the Mode switch to Service Mode position 2 Press...

Страница 25: ...e 5 1 4 Separate the DRAWER B from the CASE UPPER Page 5 1 5 Separate the seven harnesses can be removed from the MAIN BOARD 6 Separate the HOLDER MOTOR 0 and POWER CONNECTOR 3 from the CASE UPPER Pag...

Страница 26: ...4 Assembly and Disassembly 4 2 SAM4S ER 180 SERIES Memo...

Страница 27: ...SAM4S ER 180T SERIES 5 1 5 Exploded View and Parts List Exploded View Figure 5 1 Total Disassembly A ASS Y MAIN B DRAWER C KEYBOARD...

Страница 28: ...PCB Y JK92 01647A PBA DISPLAY DUAL 1 Y OPTION 17 JK92 01648A PBA DISPLAY FRONT 1 Y 18 JK39 40800A HARNESS POWER 1 Y 19 6002 000174 SCREW TAPPING PWH M3 L10 3 C UPPER KEYBOARD ASS Y Y 20 6002 000174 SC...

Страница 29: ...5 Exploded View and Parts List SAM4S ER 180T SERIES 5 3 B DRAWER B TYPE BOTTOM MOLD LOCK Figure 5 2 B TYPE DRAWER BOTTOM MOLD LOCK...

Страница 30: ...ER 180T SERIES B DRAWER B TYPE BOTTOM MOLD LOCK Figure 5 3 Lubrication Points of the B TYPE Drawer BOTTOM MOLD LOCK No Code No Description Specification Q ty Serviceable Remark A 0201 002010 GREASE N2...

Страница 31: ...PMO DRAWER BUSHING KEY 1 Y b5 6021 000225 NUT HEXAGON 2 Y b6 6031 000243 WASHER PLAIN 2 Y b7 JK75 10386A MEC ROLLER 19 2 Y b8 JK70 40302A ICT SHAFT PIN 1 Y b9 6044 000124 RING E 1 Y b10 JK72 40240C PM...

Страница 32: ...5 Exploded View and Parts List 5 6 SAM4S ER 180T SERIES B DRAWER B TYPE BOTTOM STEEL LOCK Figure 5 2 B TYPE DRAWER BOTTOM STEEL LOCK...

Страница 33: ...TTOM STEEL LOCK Figure 5 3 Lubrication Points of the B TYPE Drawer BOTTOM STEEL LOCK No Code No Description Specification Q ty Serviceable Remark A 0201 002010 GREASE N2 Y Minimum Serviceable Packing...

Страница 34: ...SHER PLAIN 2 Y b7 JK75 10386A MEC ROLLER 19 2 Y b8 JK70 40302A ICT SHAFT PIN 1 Y b9 6044 000124 RING E 1 Y b10 JK72 40240C PMO BILL PARTITION 3 4 Y JK70 20119A IPR PLATE HOLDER_B3 1 Y b11 JK70 20120A...

Страница 35: ...5 Exploded View and Parts List SAM4S ER 180T SERIES 5 9 B DRAWER G TYPE Figure 5 4 G TYPE DRAWER...

Страница 36: ...B DRAWER G TYPE Figure 5 5 Lubrication Points of the G TYPE Drawer No Code No Description Specification Q ty Serviceable Remark A 0201 002010 GREASE N2 Y Minimum Serviceable Packing Weight 40g B 0201...

Страница 37: ...IC 1 Y a1 6002 000175 SCREW TAPPING M3 L8 3 Y a2 JK70 20114A IPR HOLDER PLATE 4B8C 1 Y a3 JK70 30014B SPRING LEVER PRESS MD 4 Y a4 JK70 30015A SPRING LEVER PRESS PD 4 Y OPTION a5 JK72 20259A PMO LEVER...

Страница 38: ...PEN 1 N JK97 20098C MEA UNIT TRAY TILL 4B8C BLK 1 N e JK97 20098D MEA UNIT TRAY TILL 4B8C BLK MANUAL OPEN 1 N e1 JK73 10203A RMO TENSION 2 Y e2 JK73 30901A RMO SPONGE UNIVESAL 2 Y e3 JK75 20068A MEC R...

Страница 39: ...5 Exploded View and Parts List SAM4S ER 180T SERIES 5 13 C ASS Y KEYBOARD LASER PRINTING TYPE Figure 5 6 ASS Y KEYBOARD LASER PRINTING TYPE...

Страница 40: ...KEYBOARD ER 180T STD 1 Y C1 JK81 20085A PMO KEY TOP 1 1 34 Y C2 JK81 20086A PMO KEY TOP 1 2 2 Y C3 JK81 20094A PMO KEY TOP SET 0 9 1 Y C4 JK81 20084A PMO KEYBOARD FRAME 1 Y C5 JK81 20092A REX CONTACT...

Страница 41: ...5 Exploded View and Parts List SAM4S ER 180T SERIES 5 15 C ASS Y KEYBOARD LABEL TYPE Figure 5 7 ASS Y KEYBOARD LABEL TYPE...

Страница 42: ...1 Y C1 JK81 20089A PMO KEY TOP 1 1 46 Y C2 JK81 20090A PMO KEY TOP 1 2 2 Y C3 JK81 20087A PMO KEY CAP 1 1 46 Y C4 JK81 20089A PMO KEY CAP 1 2 2 Y C5 JK81 20095A BALANCE BAR 2 Y C6 JK81 20084A PMO KEY...

Страница 43: ...X2 Y 3002 001027 BUZZER PIEZO 85dB 1 5V 24mA 2 048KHz BK 1 AU1 Y 3601 000261 FUSE CARTRIDGE 250V 3 15A TIME LAG GLASS 1 FU1 Y 3602 000001 FUSE CLIP 30mohm 2 FU1 Y 3708 000306 CONNECTOR FFC 6P 1R 2 54...

Страница 44: ...1 U5 Y 1202 000164 IC VOLTAGE COMPARATOR KA393 SOP 8P 1 27 1 U2 Y 1203 001774 IC REGULATOR SE1117 5 0V SOT 223 4P 1 U1 Y 2008 000008 R CHIP 100 OHM 5 1 10W 1608 2 R14 R56 N 2008 000012 R CHIP 200 OHM...

Страница 45: ...01 003382 CRYSTAL SMD 14 7456MHZ SX 1 18pF 1 X1 Y 3711 004123 WAFER BOX HEADER 1R 8P 1 25mm SMD 1 CN8 Y JK41 10781A PCB MAIN ER 180T FR 4 2L T1 6 1 PCB N 6 2 FRONT DISPLAY PCB No Part No Description S...

Страница 46: ...0 DUAL 1 ASSY Y 3708 001417 CONNECTOR FFC 16P 1mm AN DIP UPSIDE IVR 1 CN1 Y JK07 00018A DISPLAY FND ER180 FND 4 12PIN Y G 4 U1 U4 Y JK39 40804A HARNESS JUMP WIRE ER180 80mm 8P DISPLAY 2 DISPLAY HAR Y...

Страница 47: ...Y 3711 000823 CONNECTOR HEADER BOX 3P 1R 2 5mm ANGLE 1 CN1 Y 3711 004099 WAFER BOX HEADER 1R 3P 2 5mm AN WHITE 1 CN4 Y JK39 40805A HARNESS CIGA JACK ER180 3P 140mm 1 Y 0404 001051 DIODE SCHOTTKY SK14...

Страница 48: ...6 PCB Layout and Parts List 6 6 SAM4S ER 180T SERIES Memo...

Страница 49: ...IMER 2 GPIO SDA GPIO GPIO GPIO nINT0 5V VCC BAT MS920S VPRT nINT3 PCF8563 nRD nCS SRAM 1 SRAM 1 A 19 0 ADD 19 0 DATA 7 0 RETURN 8LINE DIGIT 8LINE SEGMENT 8LINE DRIVER SPOOL MOTOR OPTION VBAT VBAT RETU...

Страница 50: ...7 Block Diagram 7 2 SAM4S ER 180T SEREIS Memo...

Страница 51: ...RETURN 1 4 RETURN 4 7 RETURN 7 2 RETURN 2 5 RETURN 5 8 RETURN 8 3 RETURN 3 6 RETURN 6 CN3 DRAWER Pin No Signal Name Pin No Signal Name Pin No Signal Name 1 VDRV 2 GND 3 N C CN4 DRAWER COMP Pin No Sig...

Страница 52: ...SEG 7 3 DIG 4 9 DIG 5 15 DIG 3 4 SEG 4 10 SEG 2 16 SEG 1 5 DIG 7 11 DIG 1 6 SEG 5 12 SEG 3 CN8 MODE KEY Pin No Signal Name Pin No Signal Name Pin No Signal Name 1 MODESCAN 4 RETURN 6 7 RETURN 3 2 RETU...

Страница 53: ...2 20 VPH 5 TPH_DATA 13 VDD 21 MOT_ A 6 TPH_LAT 14 THERMISTER IN 22 MOT_A 7 TPH_CLK 15 GND 23 MOT_B 8 VDD 16 PRT DISCON GND 24 MOT_ B 8 2 FRONT DISPLAY PCB CN1 DISPLAY Pin No Signal Name Pin No Signal...

Страница 54: ...Pin No Signal Name Pin No Signal Name Pin No Signal Name 1 VFD_SEG 1 A 7 VFD_SEG 2 B 13 VFD_SEG 4 D 2 VFD_GRD 3 8 VFD_GRD 5 14 VFD_GRD 4 3 VFD_SEG 7 G 9 VFD_SEG 6 F 15 VFD_SEG 8 DP 4 VFD_GRD 2 10 VFD...

Страница 55: ...180T SERIES 8 5 8 4 CIGAR JACK PCB CN1 CIGAR JACK Pin No Signal Name Pin No Signal Name Pin No Signal Name 1 12V CIGAR 2 GND 3 GND CN4 CIGAR JACK Pin No Signal Name Pin No Signal Name Pin No Signal Na...

Страница 56: ...8 Wiring Diagram 8 6 SAM4S ER 180T SERIES Memo...

Страница 57: ...KEY _RESET P_FAIL Part Page 9 2 2 MEMORY RTC DWR BAT SPOOL BUZZER Part Page 9 3 3 DISPLAY PRINTER Part Page 9 4 2 FRONT DISPLAY PCB Schematics 1 FRONT DISPLAY Part Page 9 5 3 DUAL DISPLAY PCB Schemati...

Страница 58: ...VFD_SEG 2 B VFD_SEG 1 A VFD_GRD 3 X1 14 7456MHZ STEP_PHB ADC_LOWBAT SPOOL_MOT VDD50V RESET BLOCK VDD50V VDD50V VDD50V 7 5 6 LM393D U2 B 6 8K R16 393_VREF BAT43WS D11 ER 180T MAIN SCH ER 180T ER 180 1...

Страница 59: ...BUZZER A 12 A 15 5 CN10 E 2 CN10 B 4 CN10 D R35 4 7K R38 200 FDT_D N 2 3 1 KSA1182 Y Q21 R27 10K VBAT D17 BAT43WS R40 4 7K FDT_D N PFAIL_RETURN 15pF C15 R30 4 7K 2 OSCO 3 INT 4 VSS 1 OSCI 6 SCL 7 CLKO...

Страница 60: ...24 GND STB 1 3 6 9 12 VPH STB 4 STB 3 4 B C C D 4 7K RA5 VFD_SEG 8 DP VFD_SEG 6 F 10K R54 DIG VPRT VPH 2 3 1 KSA1010Y Q25 R53 1K 1K R55 VDRV SK14 D8 SK14 D9 VPRT 2K R9 2K R10 2 1K RA2 dp 1DIG g 8DIG d...

Страница 61: ...1 1 1 1 1 1 2 CN1 B 14 CN1 N 8 CN1 H Rev File Name DIG FRONT DISPLAY 7 SEGMENT 16 16 16 16 16 16 16 16 VFD_GRD 3 3 CN1 C 100 R4 1 CN1 A 100 R2 VFD_GRD 4 VFD_GRD 5 15 CN1 O 9 CN1 I 100 R8 100 R3 13 CN...

Страница 62: ...G 7 G e c d c e c e d c d c e c e d c d c e c A C E G 1 1 1 1 1 1 1 1 1 1 A B 1 R_VFD_SEG 3 C R_VFD_SEG 6 F R_VFD_SEG 2 B R_VFD_SEG 5 E R_VFD_SEG 8 DP 1 a a a 2 B D F DP VFD_GRD 1 VFD_GRD 2 VFD_GRD 3...

Страница 63: ...470pF 3 12V CIGA_JACK 1 CN1 A 1 CN4 1 CE2 100uF R1 2K File Name Size A3 ER 180 CIGAR JACK of 0 3 Rev Sheet SERIAL INTERFACE VDD50V 5 CN5 E 2 CN5 B 1 CN5 A CON BOX 6P 1 25MM AN 12505WR 3 CN5 C COM 1_TX...

Страница 64: ...page to record any special servicing information such as Service Bulletins or Supplements When possible record changes to Code numbers directly on the actual Parts List Always records Service Bulletin...

Страница 65: ...Shin Heung Precision March 2010 Printed in KOREA V1 0 Code No JK68 70129B...

Отзывы: