Operating Instructions
5
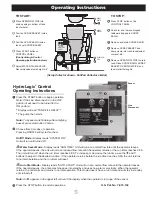
(Scrap Collector shown - Pot/Pan Collector similar)
3
B
C
SCRAP
BASIN
2
D
SCRAP
BASKET
1
E
OVERFLOW
PIPE
CONTROL
PANEL
TO START:
Place OVERFLOW PIPE into
drain opening in bottom of tank
(center hole).
Position SCRAP BASKET inside
tank.
Position SCRAP BASIN inside
tank over SCRAP BASKET.
Press START button on
CONTROL PANEL.
(See HydroLogic Control
Operating Instructions below.)
Adjust WATER PLUME VALVE.
Recommended plume height 4-6”.
TO STOP:
Press STOP button on the
CONTROL PANEL.
Check for and remove dropped
tableware trapped in SCRAP
BASIN.
Remove and drain SCRAP BASIN.
Remove SCRAP BASKET and
dump waste into trash receptacle or
compost bin.
Remove OVERFLOW PIPE to drain
tank. Rinse SCRAP BASIN, SCRAP
BASKET, OVERFLOW PIPE, and
tank interior thoroughly.
1.
Press the START button to begin operation.
Note: If the Line Disconnect is in the OFF
position it will need to be turned to the
ON position.
•
Display will read “TANK FILL DELAY”.*
•
The pump then starts.
Note: To bypass tank fill delay after emptying
basket,
press start button 2 times.
2.
Choose from 3 modes of operation.
Pressing ON/OFF will cycle thru them.
On/Off Mode - Display reads “SYSTEM ON”.
Unit will run until turned off.
Water Saver Mode - Display reads “RUN TIME”. Unit will run at a normal flow rate until the operator leaves.
If the operator leaves, the unit will run at a reduced flow rate until the operator returns or the run timer reaches 0:00.
The unit will turn off when the run timer reaches 0:00. To increase or decrease the run time, use the
+
and
-
buttons to adjust to the desired run time. If the operator returns before the run timer reaches 0:00, the unit returns
to normal operation and the run timer will reset.
Auto Start Mode - Display reads “AUTO START”. Unit will run at a normal flow rate until the operator leaves.
If the operator leaves, the entire machine goes into standby and uses no water or electricity. When the operator
returns, the unit starts and returns to normal operation. This mode doesn’t have a run timer and will stay in standby
until turned off.
Note:
An
*
appears in the upper left corner of the display when the operator is in range of the sensor.
Press the STOP button to end all operations.
HydroLogic
®
Control
Operating Instructions
Line
Disconnect
Sensor
U.S. Pat. No. 7,815,134


