Salubrion Enso Clock Скачать руководство пользователя страница 7

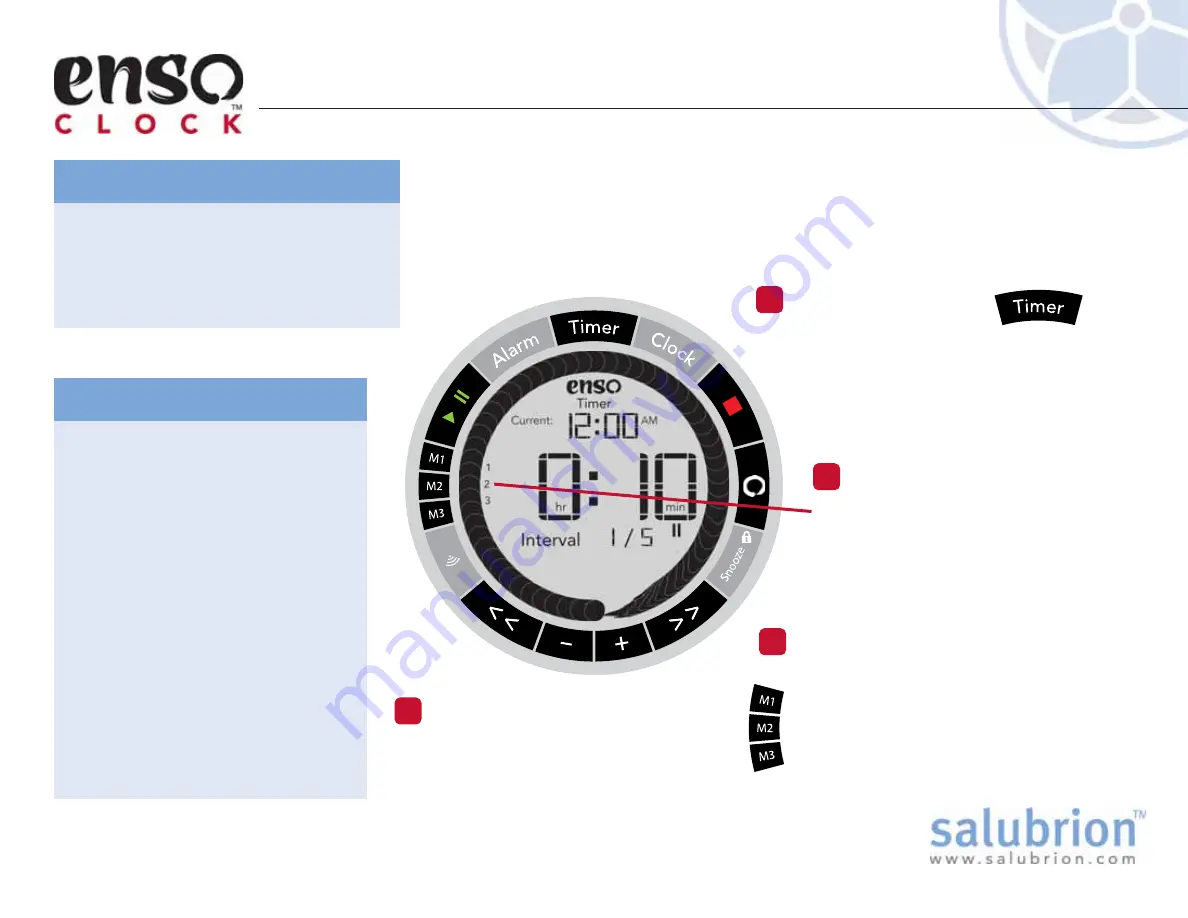
When a Snapshot is stored in a 

particular memory location (M1, 

M2, or M3) a small numerical icon 

for the memory location (1, 2, or 3) 

is visible on the screen.

Hold down the button of a memory 
location to store a Snapshot of the 
Master Timer in that location.  A single 
beep will confirm that the Snapshot has 
been saved.  The small numerical icon for 
the memory location will become visible.

Press the Timer button.

Set the timer. (See section “Setting the 

Timer” for more information)

The timer is displayed in the center of 

the display.  This is the Master Timer.

Setting the Timer Memories

Set the Timer

1

EX-EC-100-1.1

There is only one active timer in the 
Enso Clock and it is called the 

Master 

Timer

.  The 

Master Timer

 is visible in 

the center of the display when the 
Timer button is pressed.

What is the Master Timer?

The memory locations work by 
taking 

Snapshots

 of the Master 

Timer.

Snapshot 

that is stored in a 

memory location cannot be 
changed or modified in any way.  

Snapshots

 in memory can only be 

recalled or deleted.
Recalling a 

Snapshot

 from a 

memory location copies the 

Snapshot

 over the Master Timer, 

which is displayed on the screen.
After a 

Snapshot

 has been deleted 

from a memory location a new 

Snapshot

 can be saved in the 

memory location.

What is a Snapshot?

The Enso Clock is capable of storing three different timing sequences, 
or Timers, into memory for quick recall.  The three memory locations 
are M1, M2, and M3.  Each memory location can store a 

Snapshot

 of 

the 

Master Timer

, including all of its Intervals (sub-timers).

Check Memory Status

2

Save Snapshot to Memory

3

Hold down the button of a memory 
location to erase the Snapshot that 
is stored at that location. A double 
beep will confirm deletion.

Clear a Memory Location

4

Содержание Enso Clock

Страница 1: ...tting the Clock Setting the Alarm Setting the Timer Timer Functions Setting the Timer Memories Using the Timer Memories Setting the Audio Alert pg 2 3 4 6 7 8 9 TUTORIALS Setting the Clock Setting the...

Страница 2: ...e setting of hours or minutes specifically You use the and buttons to adjust the current time as a whole For example once the minute count reaches 59 pressing the button will cause the hour to increme...

Страница 3: ...alarm is set a small bell icon will be displayed to the right of the small time display In newer versions of the clock the large digits in the center of the screen will flash Setting the Alarm Press...

Страница 4: ...the top of the display The large digits in the center of the display show the number of hours and minutes for the current interval Information about the current interval is displayed below the large d...

Страница 5: ...t will increment and the large digits in the middle of the screen will update to show the duration of the newly selected Interval Repeat the momentary pressing of the button to cycle through all Inter...

Страница 6: ...The full numerical display will be visible every time a timer is started Timer Functions Hiding the Numerical Display Stop the Timer Press the red Stop button to stop and exit the timer EX EC 100 1 1...

Страница 7: ...utton is pressed What is the Master Timer The memory locations work by taking Snapshots of the Master Timer A Snapshot that is stored in a memory location cannot be changed or modified in any way Snap...

Страница 8: ...atedly until all Intervals are erased Hint If both high and low count Interval timers will be used it might be helpful to keep a Snapshot of a low count Interval timer saved in memory for quick resett...

Страница 9: ...utton to decrease the volume level A preview of the selected volume level will play Set the Volume 2 Save Changes 5 Press the green Play Pause button or Audio button to save the changes made to the so...

Страница 10: ...Select 12 or 24 hour Format If a 24 hour time display is desired use the or button to toggle between 12 and 24 hour time formats Changing this setting will affect all areas of time display within the...

Страница 11: ...old down the button will accelerate the addition of minutes and hours Use the button to subtract time if you go past 6 00 am Set the Alarm 3 Press the green Play Pause button to set the Alarm When the...

Страница 12: ...er visible indicating that the alarm is no longer set After a few minutes of inactivity the clock will automatically exit the Alarm setting mode and return to the clock display TG EC 100 1 1 Cancel th...

Страница 13: ...f 1 total Intervals The Timer screen icon is visible when the clock is in Timer Set mode The current time is displayed in the small digits at the top of the display The large digits in the center of t...

Страница 14: ...n is visible when the clock is in Timer Set mode The current time is displayed in the small digits at the top of the display The large digits in the center of the display show the number of hours and...

Страница 15: ...inued Use the button to increment the Interval 2 to 15 min Holding down the button will accelerate the rate at which time is added As shown by the display time is being added to Interval 2 2 Interval...

Страница 16: ...e 20 min 15 min 10 min 3 total Intervals Task Start the Timer 8 d d 20 min 15 min 10 min Interval 1 2 3 continued Hide the numerical display while the timer is running Task When a timer is running hol...

Отзывы: