background image


THIS APPLIANCE IS FOR HOUSEHOLD USE ONLY 


SAVE THESE INSTRUCTIONS 


TO TEST FOR GAS LEAKS 


Extinguish all naked flames (open flames) and do not smoke or bring naked flames near 

the cooker whilst testing. 


Take the cooker outside. 


Turn the cooker OFF at the cylinder (clockwise 

) and undo (clockwise 

) the 

regulator.


Check all the hose connections and inspect the condition of the seal fitted on the 
regulator. 


Refit the regulator and then slowly turn the gas ON (anticlockwise 

) one and a 

half turns.  Coat all the connections with soapy water or detergent using a 
moistened cloth or brush. 


A gas leak will form bubbles in the areas where 
the solution has been applied.  If a gas leak is 
detected, turn the gas cylinder control valve 
OFF (clockwise 

).  


Do not use the cooker again until an 
approved/authorised service agent has 
inspected it. 


OPERATING INSTRUCTIONS 


BEFORE USE 


Unpack the cooker and remove all protective 
wrapping including the blue cling-wrap that 
may be stuck to the stove body. 


Ensure that all of the parts shown in Fig.1 are 
present. 


Attach the rubber feet to the cooker by turning 
the cooker upside down and screwing them into the holes in each corner.  


Install the burners. 


Place the pot-supports on top of the burners. 


Attach the gas supply hose to the cooker by pushing it onto the cooker’s inlet pipe 
as far as possible. Secure the hose with a hose clamp. 


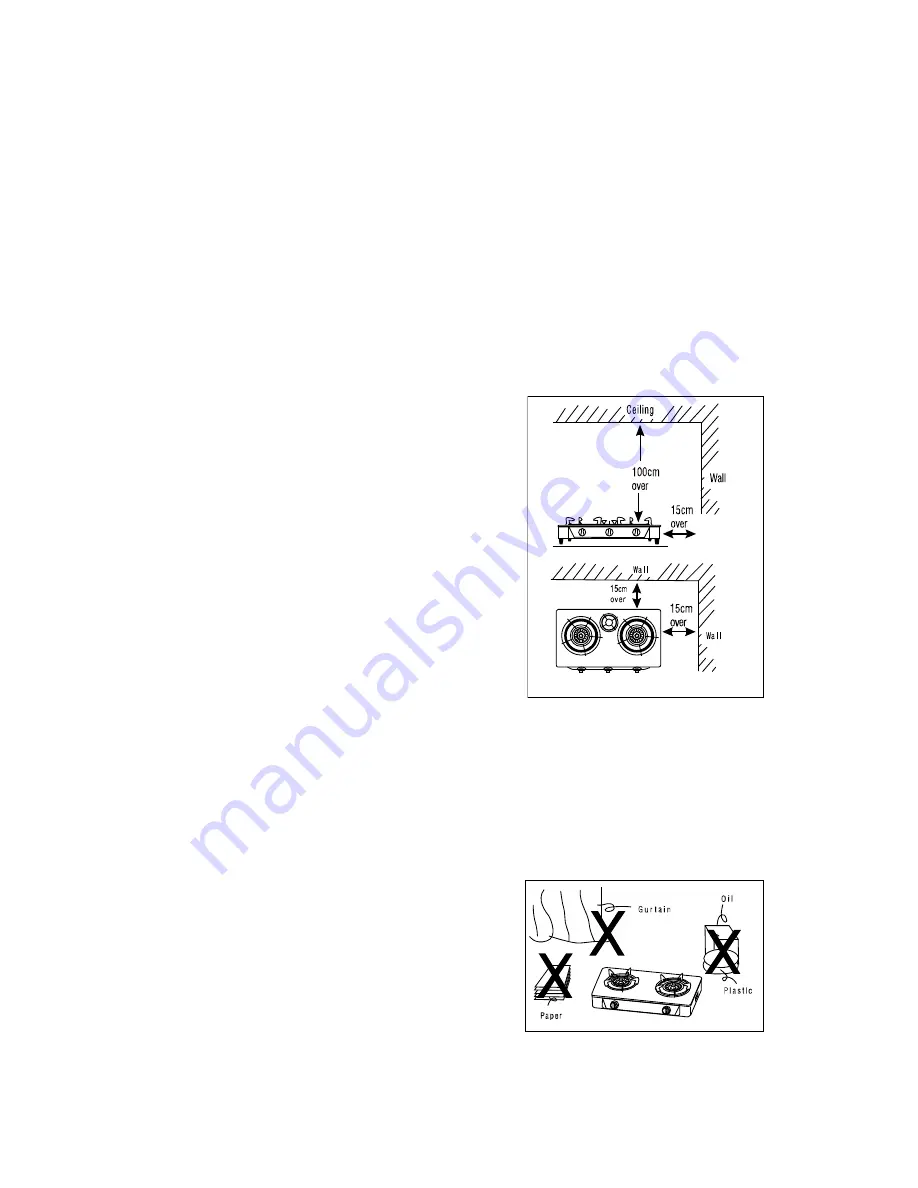
Place the cooker on a stable, level surface. Ensure that it is at least 15 cm away 
from any adjacent walls and at least 100 cm (1 metre) from any surface above 
the cooker.  


Ensure that the gas supply hose is not touching any part of the burners. 


Ensure that there are no flammable materials 
near the cooker. These could include paper, 
oil, curtains, aerosol cans etc. 


Connect the regulator to the gas cylinder by 
screwing it in an anticlockwise 

 direction.  


Before first use it is advisable to check the 
connection between the gas cylinder and the 
regulator for gas leaks as described above. 


Содержание SGS2

Страница 1: ...INSTRUCTIONS AND WARRANTY MODEL SGS2 SALTON 2 BURNER GAS COOKER IMPORTANT PLEASE READ BEFORE USE This appliance complies to the requirements of SANS 1539 LPGSASA Permit Number...

Страница 2: ...agent for examination repair or adjustment Never use a naked flame matches lighter candle to test for gas leaks The gas cylinder must always be in an upright position Do not turn the cylinder upside d...

Страница 3: ...oker and remove all protective wrapping including the blue cling wrap that may be stuck to the stove body Ensure that all of the parts shown in Fig 1 are present Attach the rubber feet to the cooker b...

Страница 4: ...eat the aforementioned procedure Reduce the flame size by turning the control knob anticlockwise If the burners do not burn properly it may be necessary to adjust the air dampers These are located und...

Страница 5: ...pports may be washed in water with a mild detergent Only clean the cooker when it is cold and not in use When not in use store the cooker by covering and placing it in a cool dry and dust free area Ne...

Страница 6: ...pair or exchange the product in terms of this warranty subject to legislative requirements This warranty shall be valid only where the customer has not broken the product himself or used the product f...

Страница 7: ...e uma chama aberta f sforos isqueiro vela para testar fugas de g s O cilindro de g s tem de estar sempre na posi o vertical N o vire o cilindro ao contr rio para o esvaziar completamente Desligue semp...

Страница 8: ...embalagem e remova todas as pel culas protectoras incluindo o inv lucro de protec o azul que pode ficar preso no corpo do forno Certifique se de que todas as pe as apresentadas na Fig 1 est o presente...

Страница 9: ...dimento acima Diminua a chama ao rodar o bot o de controlo no sentido contr rio ao dos ponteiros do rel gio Se os bicos n o tiverem uma chama adequada poder ser necess rio ajustar os registos de ar Es...

Страница 10: ...mpe o fog o apenas quando estiver frio e n o estiver em utiliza o Quando n o estiver a ser utilizado guarde o fog o ao cobri lo e coloca lo num local fresco seco e sem poeira Nunca coloque a unidade d...

Страница 11: ...ar o produto nos termos desta garantia sujeito aos requisites legislativos Esta garantia ser v lida apenas quando o cliente n o tiver quebrado ele pr prio o produto ou utilizado o produto para outro f...

Страница 12: ...our un ajustement N utilisez jamais une flamme nue des allumettes un briquet une bougie pour tester les fuites de gaz La bouteille de gaz doit toujours se trouver en position verticale Ne renversez pa...

Страница 13: ...N D ballez le r chaud retirez tous les emballages de protection y compris le film plastique bleu qui pourrait tre coinc dans le corps du r chaud Assurez vous que toutes les parties montr es dans le sc...

Страница 14: ...dure pr c demment mentionn e Diminuez la taille de la flamme en tournant le bouton de contr le dans le sens contraire des aiguilles d une montre Si les br leurs ne br lent pas correctement il peut tr...

Страница 15: ...oux Nettoyez le r chaud uniquement lorsqu il est froid et quand il n est pas utilis Lorsqu il n est pas utilis rangez le r chaud en le couvrant et en le pla ant un endroit frais sec et propre N immerg...

Страница 16: ...angera le produit selon les termes de cette garantie qui est assujettie aux exigences l gales Cette garantie devrait tre valable uniquement quand le client n a pas cass lui m me l appareil ou utilis c...

Страница 17: ...17...

Отзывы: