background image

BEFORE FIRST USE

1. Carefully unpack the VitaPro Juicer 
2. Follow the disassembly instructions. 
3.  Wash all the removable parts including the Cover, Food Pusher, Sweeper 

Basket, Strainer, Auger and Juice Bowl in warm soapy water.  Rinse and dry. 

NOTE:

  use care when handling the Strainer.  Hold by the rim only to avoid 

damaging the delicate stainless steel foil. 

DISASSEMBLING THE VITAPRO JUICER

1.  Remove the Cover by turning it counterclockwise until the tab on the Cover 

releases from the slot in the main housing. 

2.  Turn Juice Bowl counterclockwise to the unlock position and lift from the main 

housing. 

3.  Place on fl at surface. While holding bowl with one hand lift Strainer with other 

parts out of Juice Bowl. Disassemble. 

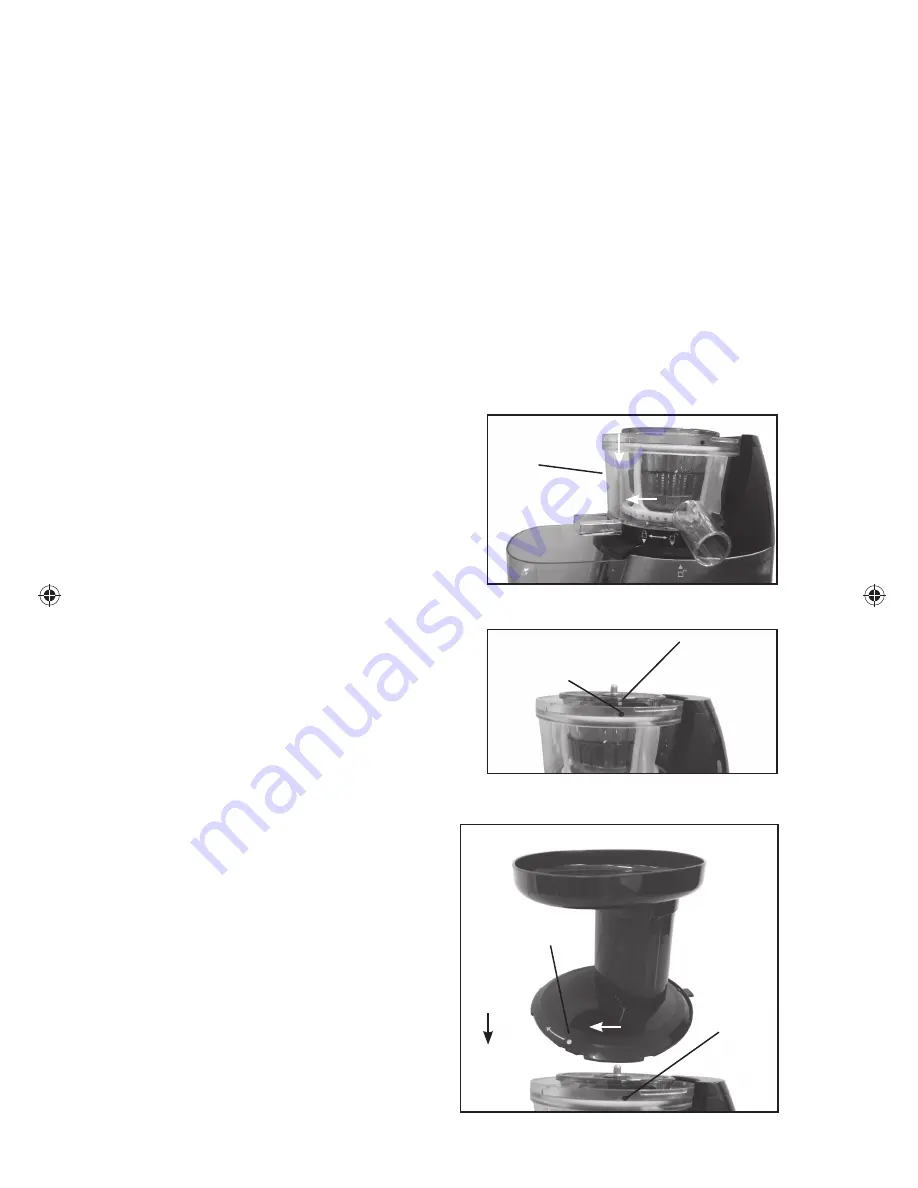
ASSEMBLING THE VITAPRO JUICER 

1.  Assemble the Juice Bowl on the Base 

by lining up the 2 unlock arrows. There 
is one arrow on the main housing and 
one on the Juice Bowl.

Turn the Bowl clockwise so that its 
arrow is aligned with the “locked” 
arrow on the main housing. 

2.  Place the Sweeper Basket inside 

the Juice Bowl. 

3.  Place the Strainer inside the 

Juice Bowl so that the red dot 
on the Strainer lines up with the 
red dot on the Juice Bowl. 

4.  Place the Auger in the center of the 

Juice Bowl. Gently push the Auger 
down and twist until you hear it click 
into position.

5.  Place the Cover onto the Juice 

Bowl.  

IMPORTANT:  Line up 

the grey dot on the Cover with
the red dot on the Juice Bowl.  

Turn the Cover clockwise until 
the arrow on the Cover is 
PERFECTLY lined up with the arrow 
printed on the Main Housing. 


5

Bowl

Base

  Ill. 1

Red dot on 
juice bowl

Red dot on 
strainer

  Ill. 2

Gray dot on 
food chute

Red dot 
on bowl

  Ill. 3

JE1372_JuicerBooklet_E.indd   5

JE1372_JuicerBooklet_E.indd   5

13-07-25   8:39 AM

13-07-25   8:39 AM

Содержание JE1372

Страница 1: ...Instruction Booklet Model JE1372...

Страница 2: ......

Страница 3: ...Extreme caution must be used when moving an appliance containing hot liquids 12 This appliance is for Household Use Only 13 Do not use appliance for other than intended use 14 Do not leave unit unatte...

Страница 4: ...at only 80 90 RPM The VitaPro actually juices faster than a typical juicer and expels a much drier pulp with a much higher yield An auger extracts the juice by masticating and slowly squeezing like a...

Страница 5: ...e ASSEMBLING THE VITAPRO JUICER 1 Assemble the Juice Bowl on the Base by lining up the 2 unlock arrows There is one arrow on the main housing and one on the Juice Bowl Turn the Bowl clockwise so that...

Страница 6: ...water through the Food Chute This will rinse out most of the residue and you are ready to keep juicing 8 When you have completed juicing turn the unit to the OFF position unplug from the wall outlet a...

Страница 7: ...he wall outlet Squeaking noise when juicing This is normal NOTE The juicer should not be run without food Leaking from underneath the juice bowl Ensure that the silicone pad is tightly in place after...

Страница 8: ...cing apples and strawberries Apple Veggie Juice 2 apples 3 carrots 1 stalk celery Alternate juicing apples carrots and celery Vegetable Juice 4 carrots 2 ozs 100 g spinach Small handful of flat leaf p...

Страница 9: ...LIMITED WARRANTY The original sales receipt is the only acceptable proof of purchase Salton Canada warrants that this appliance shall be free from defects in material and workmanship for a period of...

Страница 10: ...delivery service with tracking information when returning your product Salton Canada will not be held responsible for in transit damage or for packages that are not received This warranty does not in...

Отзывы: