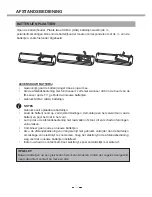
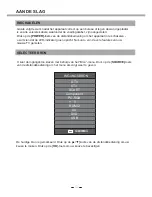
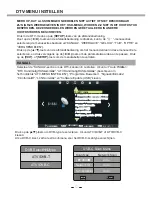
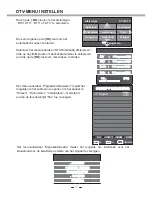
background image

OK

231$0(

INFO

6&+(0$ +(5,11(5,1*

6HOHFWHUHQ

INDEX

Index

13 Jul  09:00

1 BBC ONE               

1RLQIRUPDWLH

2 BBC TWO              No informati

H

7 BBC CHOICE        No informati

H

10 BBC FOUR          No informati

H

12 CBBC                   No informati

H

1      

ƒ


08:10 

=RQ6HS

 02 2010

No Information

576i                                                             DTV                           SD

2QGHUWLWHOLQJ

1HGHUODQGV

*HHQ

 informati

H

3URJUDPPDJLGV


7LMG


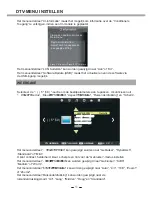
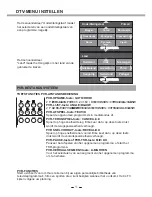
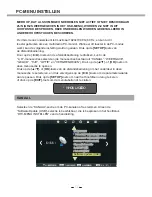
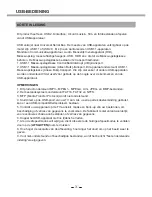
ELEKTRONISCHE PROGRAMMAGIDS (EPG) 

Door op de [

EPG

]-toets van de afstandsbediening 

te drukken, wordt een Elektronische 
Programmagids weergegeven. De EPG geeft 
informatie, zoals programmalijsten, start- en 
eindtijden van alle beschikbare kanalen. Bovendien
is de gedetailleerde informatie over het programma 
vaak in de EPG beschikbaar. (De beschikbaarheid 
en de hoeveelheid programmadetails zal variëren 
afhankelijk van de zender). 

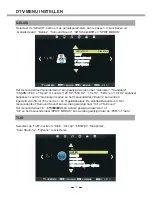
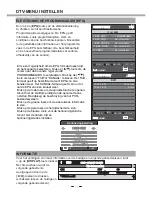
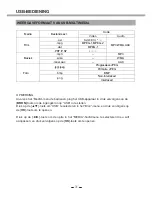
INFORMATIE 

Voor het verkrijgen van meer informatie over de huidige en volgende gebeurtenissen, kunt 
u op de [

DISPLAY

]-toets drukken

Net als voorheen wordt de 
volgende gebeurtenis 
weergegeven door op de 
[/]-toetsen te drukken 
(schakelen tussen de huidige en 
volgende gebeurtenissen): 

OK


INFO

6HOHFWHUHQ

INDEX

Index

15:25-15:45                  

 Tweenies

15:45-16:10                          

Cubix

1 BBC ONE

Herinneringinstelling


25 

Minuut 

15 

Uur

Dec Maand

12 

Datum

Eenmaal Modus

OK OK

7(58*

CH1


3URJUDPPDJLGV


.DQDDO

231$0(

6&+(0$

+(5,11(5,1*

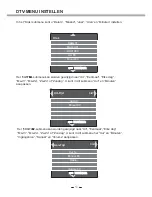
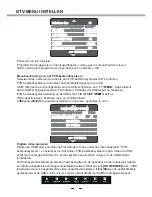
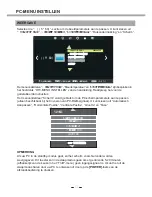
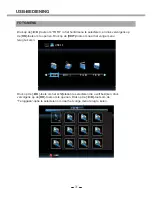
 Er is een mogelijkheid om de EPG formaat tussen tijd 

en het kanaal te selecteren. Druk op [

]-toets om de 

cursor naar de bovenste regel van de 
PROGRAMMAGIDS te verplaatsen. Druk op de [

]-

toets om tussen “TIJD”of “KANAAL” te kiezen. Het TIJD-

formaat geeft op hetzelfde moment EPG van alle 
kanalen weer. Het KANAAL-formaat geeft van uur tot 
uur de EPG van één kanaal weer. 


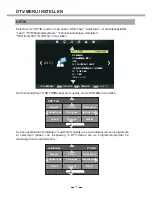
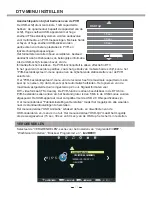
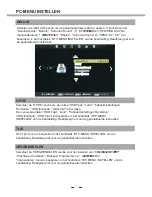
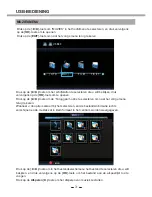
Druk op de rode toets om de opnamefunctie te openen. 
U kunt hier de starttijd, eindtijd en de opnamemodus 

i

nstellen. Raadpleeg de beschrijving van het PVR-

bestandssysteem 
Druk op de groene toets om de aanvullende informatie 
te zien. 

Druk op de gele toets om het tijdschema te zien. 
Druk op de blauwe toets voor de herinneringsfunctie. 
U kunt hier de datum, tijd en 
herinneringsmodus instellen. 

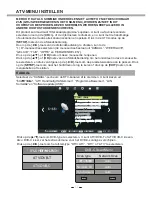
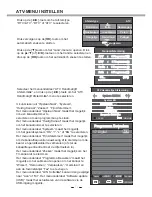
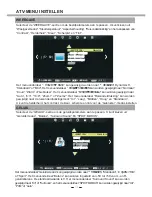
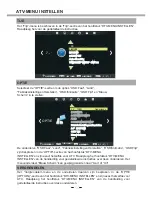
DTV-MENU INSTELLEN 

Содержание 22LED6105CD

Страница 1: ...LED KLEUREN TV GEBRUIKERSHANDLEIDING NL LEES DIT ZORGVULDIG DOOR VOOR GEBRUIK 22LED6105CD 22LED6115CDW...

Страница 2: ...pter openen x Gebruik uw TV monitor adapter nooit als het netsnoer beschadigd is Plaats geen objecten op het netsnoer en houd het snoer zo dat niemand erover kan struikelen x Houd de stekker niet het...

Страница 3: ...ctioneert als er vreemde geluiden of geuren ontstaan haal dan direct de stekker uit het stopcontact en neem contact op met een geautoriseerde verkoper of uw servicecentrum x Hoge temperaturen kunnen p...

Страница 4: ...56 8 1 OHJ GH 79 YyyU KHW SODDWVHQ YDQ GH VWDQGDDUG RS HHQ GHNHQ PHW KHW VFKHUP RPODDJ RP EHVFKDGLJLQJHQ WH YRRUNRPHQ INSTRUCTIES VOOR HET BEVESTIGEN VAN DE TV STANDAARD 1 2 M4 x 12...

Страница 5: ...Selecteer bron DTV MENU INSTELLEN Kanaal Beeld Geluid Tijd Optie Pvr bestandssysteem pvr file system Vergrendelen Elektronische programmagids EPG Informatie ATV MENU INSTELLEN Kanaal Beeld Geluid Tij...

Страница 6: ...NDERSTEUNING DVD FORMAAT BEDIENINGSVOORSCHRIFTEN DVD FUNCTIES Afspelen MP3 JPEG Functie instellingen Pagina algemene instellingen Pagina audio instellingen Dolby digital instellingen Voorkeurspagina R...

Страница 7: ...sensorraampje 1 2 TOETSFUNCTIES BEDIENINGSPANEEL 3 Ingangsbron selecteren 6 Programmanummer omhoog 5 Programmanummer omlaag 8 Volume verhogen 7 Volume verlagen 4 TV menu openen of sluiten 9 Wisselen t...

Страница 8: ...ng 2 USB aansluiting 3 Audio oortelefoonuitgang 4 AV ingang rechts links Video 5 Y Pb Pr ingang 6 CI aansluiting 7 PC VGA ingang 8 PC audio ingang 9 HDMI ingangen OPMERKING U dient eerst alle vereiste...

Страница 9: ...CHTERPANEEL 1 Aan uitschakelaar 2 AC voeding 3 SCART aansluiting 4 SPDIF uitgang 5 12 V DC voedingsingang bestemd voor de TV voeding middels een autoaccu of een externe 12 V DC voedingsadapter EXTERNE...

Страница 10: ...npassen 11 OK toets Selecties bevestigen 12 VOL Volume verhogen verlagen 13 INDEX Hoofdpagina weergeven in TV teletekstmodus Afspelen stoppen geldig in DVD USB modus 14 I II Audiokanaal wisselen tusse...

Страница 11: ...oge TV modus Terugspoelen van DVD weergave geldig in DVD USB modus 34 A B GROEN Segment herhalen geldig in DVD modus Pagina selecteren in TV teletekstmodus Menu direct openen ongeldig in DVD modus 35...

Страница 12: ...atterij nooit op vermijd kortsluitingen demontage en het verwarmen van de batterij en gooi het niet in het vuur Let op dat u de afstandsbediening niet laat vallen of stoot dit zal schade of storingen...

Страница 13: ...LED indicator groen oplicht Nu kunt u van de vele features van uw nieuwe TV genieten SELECTEER BRON U kunt de ingangsbron kiezen met behulp van het Bron menu Druk op de SOURCE toets van de afstandsbe...

Страница 14: ...Druk op de toets van de afstandsbediening om het menuonderdeel in deze menusectie te selecteren en druk vervolgens op de toets om de parameterwaarde aan te passen Druk op de EXIT of SETUP toets om de...

Страница 15: ...amma Bewerken maakt het mogelijk om het submenu te openen om het kanaal te Wissen Hernoemen Verplaatsen Overslaan en aan de favorietenlijst Fav toe te voegen Het menuonderdeel Signaalinformatie maakt...

Страница 16: ...mogelijk WEERGAVE Selecteer de 5 9 sectie om de beeldparameters aan te passen U kunt kiezen uit HHUJDYHmodus KleurWHPSHUDWXXU AspectYHUKRXGLQJ Ruisonderdrukking en Scherm Het menuonderdeel HHUJDYHPRGX...

Страница 17: ...kHz en 10 kHz equalizer aanpassen voor de Gebruiker modus en het menuonderdeel Balans kan worden ingesteld van 50 tot 50 voor de L en R geluidsbalans De standaardwaarde is 0 Het menuonderdeel Surround...

Страница 18: ...Het 8LW 7LMG submenu kan worden gewijzigd naar Uit Eenmaal Elke dag Ma Vr Ma Za Za Zo of Zondag U kunt in dit submenu Uur en Minuten aanpassen Het DQ 7LMG submenu kan worden gewijzigd naar Uit Eenmaal...

Страница 19: ...in te stellen Uit 3 uur 4 uur en 5 uur Het menuonderdeel Tijdzone maakt het mogelijk om de lokale tijdzone in te stellen 6ODDSWLPHU XWR 6WDQG 8LW 7HUXJNHUHQ 7HUXJNHUHQ 8XU 8XU 6 783 Tijdzone Canarisch...

Страница 20: ...m Fabrieksinstellingen Herstellen OSD nimatie OSD 7ijd in te stellen Het menuonderdeel OSD 7DDO maakt het mogelijk om de OSD Waal in te stellen Het menuonderdeel Audiotalen maakt het mogelijk om een a...

Страница 21: ...elsnelheid verhoogd PVR PAUSE toets of PVR TSR toets MIX II Pauzeer het afspelen van het opgenomen programma of start het TSR programma PVR HERHAAL SEGMENT toets A B GROEN Voor het selecteren van een...

Страница 22: ...een PVR bestandssysteemindeling op de USB schijf 7LPH 6KLIW URRWWH Geeft de TSR capaciteit weer Snelheid lees en schrijfsnelheid 9ULM 2pnameOLPLHW de grootste insteltijd voor opnemen eenheden in uren...

Страница 23: ...arbij een grotere capaciteit in een langere opnametijd resulteert Drukken op de II toets terwijl geen menu is geopend zal de video opnamefunctie starten totdat of Stop in de opdrachtbalk is geselectee...

Страница 24: ...male capaciteit om n keer op te nemen Op dat moment zal het automatisch afsluiten Het opnemen van de maximaal vastgestelde duur is ingesteld op 24 uur Signaal formaten voor DTV videoformaat TS streams...

Страница 25: ...t menuonderdeel 9HUJUHQGHOV VWHHP naar Aan is geschakeld Als u het menuonderdeel 9HUJUHQGHOV VWHHP wilt wijzigen moet u eerst het standaardwachtwoord invoeren 0000 Als u het standaardwachtwoord wilt w...

Страница 26: ...gebeurtenis weergegeven door op de toetsen te drukken schakelen tussen de huidige en volgende gebeurtenissen OK INFO 6HOHFWHUHQ INDEX Index 15 25 15 45 Tweenies 15 45 16 10 Cubix 1 BBC ONE Herinnerin...

Страница 27: ...nderdeel in deze menusectie te selecteren en druk vervolgens op de toets om de parameterwaarde aan te passen Druk op de SETUP toets om naar het hoofdmenu terug te keren of druk op de EXIT toets om de...

Страница 28: ...teem maakt het mogelijk om het geluidssysteem DK I L of BG te selecteren Het menuonderdeel Fijn Afstemmen maakt het mogelijk om de kanaalfrequentie nauwkeurig af te stemmen om de beeld en geluidkwalit...

Страница 29: ...ntrast de kleur scherpte en tint voor de Gebruiker modus instellen GELUID Selecteer de GELUID sectie om de geluidsparameters aan te passen U kunt kiezen uit Geluidsmodus Balans Surround Sound Hn SPDIF...

Страница 30: ...illeerde instructies over deze onderdelen Het menuonderdeel Blauw Scherm kan gewijzigd worden naar Aan of Uit VERGRENDELEN Het Vergrendelen menu en de onderdelen daarvan zijn besproken in de OPTIE OPT...

Страница 31: ...lde teletekstpagina wordt weergegeven druk opnieuw op de TEXT toets en TV en teletekstinformatie worden op hetzelfde moment op het scherm weergegeven Druk nogmaals op de TEXT toets en alleen het TV sc...

Страница 32: ...van de KANAAL sectie U kunt deze vinden op de voorgaande bladzijden OPMERKING Als er geen ingangssignaal is in DTV ATV SCART AV COMPONENT HDMI zal het scherm zoals hieronder worden weergegeven Dit toe...

Страница 33: ...RGAVE GELUID TIJD OPTIE en VERGRENDELEN Druk op de of OK toets om deze menusectie te openen Druk op de of OK toets van de afstandsbediening om het onderdeel in deze menusectie te selecteren en druk ve...

Страница 34: ...aan te passen alleen beschikbaar bij het invoeren van PC RGB signaal U kunt kiezen uit Automatisch Aanpassen Horizontale Positie Verticale Positie Grootte en Fase OPMERKING Als uw PC in de standby mo...

Страница 35: ...ngen Herstellen OSD nimatie OSD 7ijd zijn besproken in het hoofdstuk DTV MENU INSTELLEN van de handleiding Raadpleeg het voor de gedetailleerde instructies TIJD Het Tijd menu is besproken in het hoofd...

Страница 36: ...de kenmerken van de USB apparatuur OPMERKINGEN 1 Dit product ondersteunt MP3 MPEG1 MPEG2 AVI JPEG en BMP bestanden 2 Het bestandssysteem ondersteunt FAT16 FAT32 en NTFS 3 MTP Media Transfer Protocol w...

Страница 37: ...ron menu en druk vervolgens op de OK toets om te openen Druk op de toets om de optie in het MEDIA hoofdmenu te selecteren die u wilt aanpassen en druk vervolgens op de OK toets om te openen Code Media...

Страница 38: ...ns op de OK toets om te openen Druk op de EXIT toets om naar het vorige menu terug te keren Druk op de toets om het schijfstation te selecteren die u wilt bekijken druk vervolgens op de OK toets om te...

Страница 39: ...de OK toets om het menu onderaan weer te geven Druk op de toets om de optie onderaan in het menu te selecteren die u wilt uitvoeren en druk vervolgens op de OK toets om uit te voeren Druk op de EXIT t...

Страница 40: ...s om de Teruggaan optie te selecteren om naar het vorige menu terug te keren Wanneer u de optie markeert bij het selecteren zal de bestandsinformatie rechts verschijnen en de muziek zal in klein forma...

Страница 41: ...het vorige menu terug te keren Druk op de toets om het schijfstation te selecteren die u wilt bekijken druk vervolgens op de OK toets om te openen Druk op de toets om de Teruggaan optie te selecteren...

Страница 42: ...et menu onderaan weer te geven Druk op de toets om de optie onderaan in het menu te selecteren die u wilt uitvoeren en druk vervolgens op de OK toets om uit te voeren Druk op de EXIT toets om naar het...

Страница 43: ...ts om te openen Druk op de toets om de Teruggaan optie te selecteren om naar het vorige menu terug te keren Wanneer u de optie markeert bij het selecteren zal de bestandsinformatie rechts verschijnen...

Страница 44: ...de GLVF HUXLW WH KDOHQ Als de disc is uitgeworpen houd de disc licht aan de rand vast en neem het uit de uitwerpinrichting RP NUDVVHQ te voorkomen Wanneer de DVD functie niet wordt gebruikt in de stan...

Страница 45: ...oruit of achteruit afspelen Druk op de toetsen om te schakelen tussen GH verschillende snelheden in de sequentie FFx2 FFx4 FFx8 FFx16 FFx32 Afspelen of FRx2 FRx4 FRx8 FRx16 FRx32 Afspelen Tijdens het...

Страница 46: ...titalige DVD Super VCD discs druk op de SUBTITLE toets om de gewenste ondertitelingstaal te selecteren 11 Hoek voor DVD disc Druk op de ANGLE toets om de huidige beeldhoek weer te geven Druk nog een k...

Страница 47: ...Afspelen MP3 JPEG MP 3 MP 3 MP 3 MP 3 Gebruik de navigatietoetsen om uw favoriete map te selecteren en speel het eerste bestand af of verplaats deze naar uw favoriete bestand OPMERKING Druk op de toe...

Страница 48: ...rmale televisie uitzendingen en het is de standaardinstelling Het heeft een aspectratio van 4 3 Als u deze instelling kiest voor het bekijken van een DVD zal het beeld het scherm vullen maar u zult ni...

Страница 49: ...Aan DOV X GH YROJHQGH NHHU GH ZHHUJDYH VWDUW EHJLQW GH H ELM KHW SXQW ZDDU X JHVWRSW EHQW HQ KHUQHHPW KLM DOOH YRULJH LQVWHOOLQJHQ Uit JDDW DXWRPDWLVFK WHUXJ QDDU GH VWDQGDDUG LQVWHOOLQJHQ Hervatfunct...

Страница 50: ...W HQ GH VWDQGDDUGLQVWHOOLQJ LV Multi 9 VSHOHU DO KHW 79 V VWHHP YROJHQV GH GLVF NTSC LW IRUPDDW ZRUGW JHEUXLNW GRRU VRPPLJH DQGHUH ODQGHQ ELMYRRUEHHOG GH 9HUHQLJGH 6WDWHQ TV type Ondertitels Gebruik d...

Страница 51: ...elling is Engels Ouderlijk LM KHW DIVSHOHQ YDQ VRPPLJH GLVFV PHW Ouderlijk NXQW X GH OHHIWLMGLQVWHOOLQJ VHOHFWHUHQ RS EDVLV YDQ XZ YRRUNHXU H OHHIWLMGEHSHUNLQJ LV YHUGHHOG LQ DFKW YHUVFKLOOHQGH FDWHJR...

Страница 52: ...PROBLEEMOPLOSSING...

Страница 53: ...gen x Horizontale scanfrequentie 30 KHz 75 KHz x Verticale scanfrequentie 50 Hz 75 Hz GELUID EN TV PROBLEMEN OPLOSSEN Symptoom Oorzaken en Oplossing Inschakelen onmogelijk x Controleer of de voedingsk...

Страница 54: ...aan te passen 2 Stel de TV kleuren terug Disk wordt niet ingelezen 1 Disk verbogen of vuil 2 Disk verkeerd geladen 3 Condensatie op laserkop 1 Maak de disk schoon 2 Laad de disk opnieuw met de bedrukt...

Страница 55: ...estandsformaat MP3 MPEG1 MPEG2 AVI JPEG en BMP Audioparameters Audio ingang Frequentieresponsie 3 5 jack L R 0 5 0 3 Vrms TV signaal 100 Hz 12 kHz 3 dB AV 100 Hz 15 kHz 3 dB DVD Disktype DVD VIDEO MPE...

Страница 56: ...Door voor de juiste verwijdering van dit product te zorgen helpt u potenti le gevaren voor het milieu en de gezondheid van de mens te voorkomen die anders door ongeschikte afvalverwerking van dit pro...

Страница 57: ...LED COLOUR TV 22LED6105CD 22LED6115CDW...

Страница 58: ...en disconnecting the adapter from an electric socket This symbol indicates dangerous voltage inside the product that presents a risk of electric shock or personal injury This symbol indicates importan...

Страница 59: ...personnel Unplug your DC adapter from the AC outlet before any service Be sure the service technician uses authorized replacement parts or their equivalents Unauthorized parts may cause fire electrica...

Страница 60: ...CAUTION Before mounting a TV stand place TV on a blanket or quilt with the TV screen facing down to avoid surface damage TV STAND MOUNTING 1 2 M4 x 12...

Страница 61: ...e control key functions 15 PVR Functions 16 Lock 18 Electronic program guide EPG 20 Information 20 ATV MENU SETUP Channel 21 Picture 23 Sound 23 Time 24 Option 24 Lock 24 TELETEXT FUNCTION Teletext fu...

Страница 62: ...CONTENT 36 4 4 36 4 4 37 5 67 0 39 40 5 44 4 45 45 4 4 46 47 General Setup 40 Audio Setup 41 Digital Setup 42 Preferences Page 42...

Страница 63: ...LABEL SIDE green OPTION PANEL BUTTON FUNCTIONS FRONT PANEL...

Страница 64: ...ENT SIDE PANEL 1 TV signal input 2 USB connector 3 Audio Earphone output 4 AV Right Left Video input 5 Y Pb Pr input 6 CI connector 7 PC VGA input 8 PC and Y Pb Pr audio input 9 HDMI inputs CONNECTING...

Страница 65: ...NT 1 2 3 5 4 5 12V DC power input intended for feeding to the TV using a car battery power or external 12V DC power supply adapter 3 SCART connecting terminal 2 AC Power supply 1 Mains Switch 4 SPDIF...

Страница 66: ...it number valid in ATV To switch between one two or three SOURCE 8 To select input source DTV ATV DVD SCART AV S VIDEO HDMI VGA and USB CALL 5 To display the information on screen VOL 12 To increase o...

Страница 67: ...age in analog TV teletext mode Fast enter menu not valid in digital TV DVD and FM GOTO RED 35 To play from a certain time point valid in DVD mode select page in analog TV teletext mode fast enter menu...

Страница 68: ...REMOTE CONTROL BATTERY INSTALLATION 6...

Страница 69: ...de you will see the LED indicator turn green Now you can enjoy the many features of your new TV SELECT SOURCE OPERATION You can select input source by using source menu Press SOURCE button on the remo...

Страница 70: ...button on the remote control to select the item in this menu section and then press 8 9 button to adjust parameter value Press EXIT or SETUP button to exit from menu tables CHANNEL Select CHANNEL sect...

Страница 71: ...Information item enables to obtain information about the Channel Nomber quality and strength of the signal OK Programme Edit 17 Digital Delete DTV Rename Move Skip OK FAV SETUP FAV Return Signal infor...

Страница 72: ...ween On and Off Software Update USB enables to update the software via USB input PICTURE Select PICTURE section to adjust picture parameters You may select Picture Mode Colour Temperature Aspect Ratio...

Страница 73: ...Switch and SPDIF MODE Sound Mode item can be changed between User Standard Music Movie and Sports You may adjust 120Hz 500Hz 1 5kHz 5kHz and 10kHz equalizer for User mode Balance item can be adjusted...

Страница 74: ...You may adjust Hour and Minute in this submenu The On Time submenu can be changed between Off Once Every Day Mon Fri Mon Sat Sat Sun and Sunday You may adjust Hour Minute Input Source Channel and Vol...

Страница 75: ...he auto standby function Off 3 Hour 4 Hour and 5 Hour Default auto standby value is 4 Hour 3 Hour 4 Hour Return SETUP Off 5 Hour Time zone item enables to set the local time zone Time Zone Return SETU...

Страница 76: ...SETUP esky English Fran ais Dansk Espanol Hrv Deutsch E Italiano Audio Languages item enables to select primary and secondary speech language of a program available only in DTV mode if program provide...

Страница 77: ...ewinds at high speed Each time you press this button the rewind speed is increased PVR FAST FORWARD key REVEAL 22 Fast forward at high speed Each time you press this button the fast forward speed is i...

Страница 78: ...em Select Disk select the disk as a PVR file system disk Check PVR File System check the disk file format USB Disk display the USB Disk activation status PASS flag is activation Not chosen shown autom...

Страница 79: ...Zoom Out Aspect Ratio Auto Zoom 1 Zoom 2 16 9 4 3 Move View Time Shift Record TSR Press the II key to stop translation To watch translation press TEXT button To call the command line press OK To stop...

Страница 80: ...nu and select the corresponding letter PVR PVR File System menu of the Recorder will be limited one time burn the longest That time will automatically exit Recording maximum time period set for 24 hou...

Страница 81: ...desired programs Block Programs 1 BBC ONE DTV OK Lock OK SETUP Return 2 BBC TWO 7 BBC CHOICE 10 BBC FOUR 12 CBBC DTV DTV DTV DTV DTV MENU SETUP You can lock selected program or keyboard set the parent...

Страница 82: ...n button to see the additional information Press yellow button to see the schedule Press blue button for the reminder function You can set the date time and reminder mode OK PROGRAMME GUIDE RECORD INF...

Страница 83: ...nu sections menu sections consist of CHANNEL PICTURE SOUND TIME OPTION LOCK Press 5 6 or OK button to enter this menu section Press 5 6 or OK button on the remote control to select the item in this me...

Страница 84: ...bles to select the channel number Sound System item enables to select sound system DK I L BG Fine Tune item enables to adjust the channel frequency accurately to make the sound and picture effect bett...

Страница 85: ...ue is 0 Surround Sound item can be changed between Off and Surround SPDIF Mode item can be changed between Off PCM or Auto PICTURE Select PICTURE section to adjust picture parameters You may select Pi...

Страница 86: ...tly the same for ATV Please refer DTV manual for detailed instructions on these items OPTION Select OPTION section to select OSD Language Restore Factory defaults OSD Animation OSD Time Blue Screen OS...

Страница 87: ...DE This function may let you enjoy TV and teletext information at the same time When a certain teletext page displays press TEXT button again TV and teletext information will display on screen at the...

Страница 88: ...COMPONENT HDMI USB modes is the same as that of TV mode except the CHANNEL section You can find it in preceding pages NOTE If no signal input in DTV ATV SCART AV COMPONENT HDMI the screen will show as...

Страница 89: ...ns menu sections consist of CHANNEL PICTURE SOUND TIME OPTION LOCK Press 5 6 or OK button to enter this menu section Press 5 6 or OK button on the remote control to select the item in this menu sectio...

Страница 90: ...POWER button on the remote control Screen Horizontal Pos 133 Vertical Pos 27 Return SETUP Phase 100 Auto Adjust Size 100 PICTURE Select PICTURE section to adjust picture parameters You may select Pict...

Страница 91: ...or detailed instructions TIME Time menu is discussed in DTV SETUP Time section Please refer to it for the detailed instructions LOCK Select LOCK section to Lock System Set Password Block Program and K...

Страница 92: ...d out about the features of USB equipments before using it NOTES 1 This product supports MP3 MPEG1 MPEG2 AVI JPEG and BMP format files 2 The file system supports FAT16 FAT32 and NTFS 3 MTP Media Trans...

Страница 93: ...r Press 8 9 button to select the option you want to adjust in the main MEDIA menu then press OK button to enter USB OPERATION USB MULTIMEDIA PLAYBACK FORMAT Code Media File Extension Video Audio avi X...

Страница 94: ...press OK button to enter Press 8 9 button to select return option to back to the previous menu PHOTO Delete C F_IMAGES 1 1 Resolution 2900 X 2100 Size 397 KBytes Date 2010 05 07 Time 12 07 09 IMG 02...

Страница 95: ...nu Press 8 9 button to select the file you want to delete in the file selecting menu then press red button on your remote control to delete files MUSIC MENU USB2 0 PHOTO MUSIC MOVIE TEXT Press 8 9 but...

Страница 96: ...ter Stop Repeat ALL MUTE 00 03 30 00 04 45 01 U2 With or without you Pause Prev FB Next FF Press 8 9 button to select menu in the bottom you want to run then press OK button to operate Press EXIT butt...

Страница 97: ...n to select drive disk you want to watch then press OK button to enter Press 8 9 button to select return option to back to the previous menu When highlighting the option you select the file informatio...

Страница 98: ...Insert the Disc to the Disc slot mirror record side of the disc has to face towards front of the unit the player will load the disc automatically There will have an on screen indication then LOADING...

Страница 99: ...se press II button to resume Repeat for DVD Super VCD VCD CD CD G HD CD and Mp3 JPEG discs Press REPEAT button once to display the current repeat mode For Super VCD VCD CD CD G HD CD discs while playi...

Страница 100: ...etween different playback angle codes in sequent E g Angle Current Full or OFF NOTE Only for DVD with multi angle press ANGLE button to select your favorite playback angle Selectable playback angle de...

Страница 101: ...lder and playback the first file or move to the your favorite file NOTE Press buttons to move the highlight to folders documents or mode selection Press numeric buttons to select the contents directly...

Страница 102: ...most appropriate aspect ratio for the DVD being viewed TV DISPLAY MODE Use navigation buttons to select the OSD Language setup icon press OK button to confirm There are few languages for your selectio...

Страница 103: ...t playback Last Memory resumes it from the last point and restores last used settings Off automatically switches back to the default settings LAST MEMORY Enable or disable Last Memory Audio Setup Soun...

Страница 104: ...This format is used by some other countries e g USA LANGUAGE Use navigation buttons to select the Language setup icon press OK button to confirm There are few languages for your selection press button...

Страница 105: ...default language of the disc automatically The default language setting is English Only editable when password is unlocked And only can function when password is locked It does not however reset eith...

Страница 106: ...ning or power surges Handing Discs 1 To remove a disc from its storage case press on the centre of the case and take the disc out 2 Hold the disc by the edges to avoid touching the Recorded side of th...

Страница 107: ...t s receiving window Check whether receiving window has strong light Symptom Causes and Correction Symptom Causes and Correction Black screen power indicator light off Check whether power cord is well...

Страница 108: ...ailure 1 Mal fabricated disc used 2 Wrong buttons pressed 3 Static leakage into the unit from outside 1 Wait for 5 to 10 seconds to restore to normality automatically 2 Operate again 3 Power off for 1...

Страница 109: ...D VCD1 0 1 1 2 0 version CD DA DVD RGB YPbPr VGA Panel Life Hours 50 000 From DC car 12V _ _ _ _ 3 5 jack L R 0 5 0 3Vrms Hint the items with symbol are related to LED screen Specifications and design...

Страница 110: ...ms for used electrical and electronic product By ensuring the correct disposal of this product you will help prevent potentially hazardous to the environment and to human health which could otherwise...

Страница 111: ......

Страница 112: ...item incorporates copy protection technology that is protected by U S patents and other intellectual property rights of Rovi Corporation Reverse engineering and disassembly are prohibited 8T10001044...

Страница 113: ...TELEVISEUR LED COULEUR MANUEL DE L UTILISATEUR FR A LIRE ATTENTIVEMENT AVANT L UTILISATION 22LED6105CD 22LED6115CDW...

Страница 114: ...vrir le bo tier de la t l LED moniteur adaptateur N utilisez jamais votre t l LED moniteur si le cordon d alimentation a t endommag Ne rien d poser sur le c ble d alimentation et mettez le loin des pa...

Страница 115: ...ible Si votre la t l LED moniteur ne fonctionne pas normalement en particulier en cas de sons anormaux ou odeurs manant de l int rieur d branchez la imm diatement et contacter un revendeur ou un centr...

Страница 116: ...ATTENTION placer le t l viseur avant fixer le standard sur un blanchet avec l cran vers le bas pour emp cher des dommages INSTRUCTIONS POUR LE MONTAGE DU PIED TV 1 2 M4 x 12...

Страница 117: ...age 18 Guide des cha nes lectronique GCE 20 Informations 20 CONFIGURATION ATV Cha nes de television 22 Image 23 Son 23 Heure 24 Options 24 Verrouillage 24 FONCTION TELETEXTE Fonction teletexte 25 CONF...

Страница 118: ...S Sp cifications SOMMAIRE UTILISATION DU DVD Utilisation de base 3 Formats DVD pris en charge Guide sur les fonctions DVD Lecture MP3 JPEG 4 Configuration des fonctions 4 3DJH FRQILJXUDWLRQ pQpUDOH 3D...

Страница 119: ...er le volume 4 MENU pour entrer ou quitter un menu 9 POWER Pour basculer entre le mode veille et le mode fonctionnement 1 Voyant il est rouge en mode veille vert en fonctionnement normal 2 Capteur inf...

Страница 120: ...sortie pour couteurs 4 Connecteurs d entr e AV Audio droite Audio gauche Vid o 5 Connecteurs d entr e vid o Y Pb Pr 6 Fente CI 7 Connecteur d entr e Ordinateur VGA 8 Connecteur d entr e audio pour ord...

Страница 121: ...2 Alimentation lectrique CA 3 Connecteur PERITEL 4 Connecteur de sortie audio SPDIF 5 Connecteur d alimentation CC 12 V permet l alimentation du t l viseur via un adaptateur de courant pour auto ou un...

Страница 122: ...curseur vers la Gauche droite ou ajuster l l ment s lectionn dans le menu 11 Touche OK Pour confirmer les s lections 12 VOL Pour augmenter ou diminuer le volume 13 INDEX Pour afficher l heure t l text...

Страница 123: ...re rapide de DVD valable en mode DVD 34 A B VERT Pour r p ter la lecture d un segment valable en mode DVD Pour s lectionner une page t l texte en mode TV analogique Menu d acc s rapide non valable en...

Страница 124: ...recharger court circuiter d monter chauffer ou jeter les piles dans du feu Faites attention de ne pas faire tomber la t l commande ou lui donner des coups ceci peut l endommager N utilisez pas des pil...

Страница 125: ...entes fonctionnalit s de votre t l SELECTION DE LA SOURCE Vous pouvez s lectionner la source d entr e l aide du menu source Appuyez sur la touche SOURCE situ e sur le c t droit de la t l LED pour affi...

Страница 126: ...XIT ou SETUP pour quitter le menu CHAINE S lectionnez l option CHAINE pour configurer les options relatives aux cha nes de t l vision TNT Les options suivantes sont disponibles R glage automatique Rec...

Страница 127: ...r un num ro de cha ne puis appuyez sur la touche OK pour d marrer la recherche L option Modification de cha nes permet d acc der aux sous options suivantes Supprimer Renommer D placement Ignorer et Aj...

Страница 128: ...our configurer les param tres vid o de l unit Les options suivantes sont disponibles Mode d image Temp rature des couleurs Format d affichage R duction du bruit et Ecran Vous pouvez s lectionner un de...

Страница 129: ...ode Utilisateur peut tre r gl e selon les valeurs suivantes 120 Hz 500 Hz 1 5 kHz 5 kHz et 10 kHz ou de 50 50 pour les pistes son G et D La valeur par d faut est 0 L option Son Surround offre les sous...

Страница 130: ...tidien Lun Ven Lun Sam Sam Dim et Dimanche Cette option vous permet de r gler l heure et les minutes La sous option Heure de mise en marche peut tre d finie sur un des modes suivants D sactiv Une fois...

Страница 131: ...nt disponibles D sactiv 10 minutes 20 minutes 30 minutes 60 minutes 90 minutes 120 minutes 180 minutes et 240 minutes L option Activation automatique du mode Veille permet de configurer l activation a...

Страница 132: ...our acc der aux sous options suivantes Langue d affichage Langue de doublage Langue de sous titres Pays Syst me de fichiers EVP Restaurer la configuration d usine Animation d affichage D lai d afficha...

Страница 133: ...sse de rembobinage Touche Avance rapide d enregistrement vid o personnel REVEAL Permet d effectuer une avance rapide haute vitesse Chaque pression de cette touche permet d augmenter la vitesse d avanc...

Страница 134: ...Formater Permet de formater un emplacement de stockage USB et de le cr er un syst me de fichiers EVP Espace m moire allou la fonction Lecture d cal e Permet d afficher la quantit de m moire allou e l...

Страница 135: ...strer sur une plus longue dur e Lorsqu aucun menu n est affich appuyer sur la touche II permet de d buter l enregistrement appuyez sur la touche pour arr ter l enregistrement l enregistrement s arr te...

Страница 136: ...fichiers EVP est d finie au maximum par d faut L interface se ferme automatiquement La dur e d enregistrement maximale est de 24 heures Les formats de signaux pour le format vid o TNT flux TS La fonc...

Страница 137: ...e niveau de limitation de lecture lorsque le Verrou du syst me est d fini sur activ Pour modifier l tat de l option Verrou du syst me il est n cessaire de saisir le mot de passe par d faut 0000 Pour m...

Страница 138: ...st p Electro Appuy ligne s Progra Temps Electro m me Electro heure Appuy pouvez d enreg SYSTE Appuy informa Appuy Appuy de rap mode d possible de choi onique des Prog yez sur p sup rieure du G ammes A...

Страница 139: ...er le menu CHAINE S lectionnez l option CHAINE pour configurer les options relatives aux cha nes de t l vision ATV Les options suivantes sont disponibles R glage automatique Recherche manuale ATV Modi...

Страница 140: ...fr quence afin d am liorer la qualit de l image et du son vous pouvez galement s lectionner une fr quence l aide des touches num riques L option Recherche permet de r gler une cha ne de t l vision L...

Страница 141: ...teur vous permet de r gler les options suivantes Contraste Luminosit Couleurs Nettet et Teinte SON S lectionnez l option SON pour configurer les param tres audio de l unit Les modes audio suivants son...

Страница 142: ...TV Veuillez vous y r f rer pour obtenir davantage de d tails L option Ecran bleu peut tre activ e ou d sactiv e VERROUILLAGE L option VERROUILLAGE et ses sous options sont pr sent es dans la section T...

Страница 143: ...une page t l texte est affich e appuyez nouveau sur la touche TEXT la cha ne de t l vision et l interface T l texte s affichent Appuyez nouveau sur la touche TEXT pour afficher nouveau la cha ne de t...

Страница 144: ...mode T l vision l exception de l option CHAINES DE TELEVISION Vous pouvez vous r f rer cette section situ e dans les pages pr c dentes de ce manuel REMARQUE En cas d absence de signal en mode TNT ATV...

Страница 145: ...ONS et VERROUILLAGE Utilisez les touches ou OK pour acc der Utilisez les touches ou OK de la t l commande pour s lectionner une option puis utilisez les touches pour configurer l option Appuyez sur la...

Страница 146: ...de votre moniteur ces options sont seulement disponibles lors de la r ception de signaux PC RGB Les options suivantes sont disponibles R glage automatique Position horizontale Position verticale Tail...

Страница 147: ...ion d affichage D lai d affichage sont d crites dans la section CONFIGURATION TNT de ce manuel Veuillez vous y r f rer pour obtenir davantage de d tails HEURE L option HEURE est d crite dans le chapit...

Страница 148: ...donn es Masse de la cat gorie des p riph riques de stockage de masse USB 1 1 la compatibilit des autres quipements USB n est pas garantie Veuillez donc attentivement lire l emballage du p riph rique...

Страница 149: ...nu Source d entr e appuyez ensuite sur la touche OK pour y acc der Utilisez les touches pour s lectionner l option du menu MEDIA configurer appuyez ensuite sur la touche OK pour y acc der Codec M dia...

Страница 150: ...sur la touche OK pour y acc der Appuyez sur la touche EXIT pour revenir au menu pr c dent Utilisez les touches pour s lectionner le disque contenant les fichiers utilisez ensuite la touche OK pour con...

Страница 151: ...onn Appuyez sur la touche OK pour afficher le menu sur la partie inf rieure de l cran Utilisez les touches pour s lectionner l option de votre choix appuyez ensuite sur la touche OK pour y acc der App...

Страница 152: ...l option Retour et revenir au menu pr c dent Une fois le fichier mis en surbrillance les informations relatives au fichier s affichent sur la partie de droite de l cran d aper u du contenu du fichier...

Страница 153: ...sez les touches pour s lectionner le disque contenant les fichiers utilisez ensuite la touche OK pour confirmer Utilisez les touches pour s lectionner l option Retour et revenir au menu pr c dent Une...

Страница 154: ...id o s lectionn e Appuyez sur la touche OK pour afficher le menu sur la partie inf rieure de l cran Utilisez les touches pour s lectionner l option de votre choix appuyez ensuite sur la touche OK pour...

Страница 155: ...uches pour s lectionner l option Retour et revenir au menu pr c dent Une fois le fichier mis en surbrillance les informations relatives au fichier s affichent sur la partie de droite de l cran d aper...

Страница 156: ...rayer Pour prot ger le chargeur et le disque vitez de laisser un disque dans le plateau du lecteur DVD pour une longue p riode surtout lorsque le lecteur n est pas utilis 4 Lecture des Titres pour le...

Страница 157: ...embobinage sont disponibles Utilisez les touches pour s lectionner une vitesse dans l ordre s quentiel suivant ARx2 ARx4 ARx8 ARx16 ARx32 Lecture ou RRx2 RRx4 RRx8 RRx16 RRx32 Lecture En cours d avanc...

Страница 158: ...ppuyer sur MUET pour annuler cet tat 14 ZOOM Compatible avec les disques DVD Super VCD VCD Mp3 et JPEG Appuyez sur la touche ZOOM pour effectuer un zoom avant sur l image 3 niveaux de ZOOM sont dispon...

Страница 159: ...lectionner Utilisez les touches num riques pour s lectionner les l ments lire directement Pour les nombres au del de 10 appuyez sur 0 en premier Ex Fichier num ro 15 appuyez sur 0 puis sur 5 Durant la...

Страница 160: ...rt des diffusions TV ce format d affichage est s lectionn par d faut Le format d affichage est 4 3 Lorsque vous s lectionnez ce format d affichage en cours de lecture d un disque DVD l image est tir e...

Страница 161: ...point o vous avez arr t et l appareil reprend les derni res r glages D sactiv l appareil retourne automatiquement vers les r glages standards Derni re m moire 3DJH GH FRQILJXUDWLRQ XGLR Dolby 5HPL DJ...

Страница 162: ...ectionner le format d affichage du t l viseur DVD PAL Ce format est utilis au Europe il s agit galement de l option par d faut Multi DVD joueur r gler le syst me TV en fonction du disque NTSC Ce forma...

Страница 163: ...op rationnel que lorsque le code pin est verrouill Mais n alt re ni le code pin ni la classification Mot de passe Par d faut il est verrouill Aucune Contr le parental ou modification de code pin n es...

Страница 164: ...4 UTILISATION DU DVD...

Страница 165: ...nfiguration de l affichage x Fr quence de balayage Hor 30KHz 75KHz x Fr quence de balayage Ver 50 Hz 75Hz PROBLEMES AUDIO ET TELE Sympt me Causes et rem de Impossible d allumer x Assurez vous que la p...

Страница 166: ...anger le syst me de couleurs 2 R initialisez le syst me de couleurs Lecture de disque impossible 1 Le disque est ray ou sale 2 Le disque est mal plac 3 Condensation sur la t te laser 1 Nettoyez le dis...

Страница 167: ...5 L R 0 5 0 3 Vrms Param tres audio R ponse en fr quence Signal TV 100 Hz 12 KHz 3 dB AV 100 Hz 15 KHz 3 dB DVD Type de disque DVD VIDEO MPEG4 SVCD VCD 1 0 1 1 2 0 version CD DA Connecteur d entr e T...

Страница 168: ...s produits lectriques et lectroniques usag s Respecter les consignes de mise au rebut de cet appareil permet d viter les dangers ventuels sur l environnement et la sant qu un traitement inad quat des...

Отзывы: