- 26 -
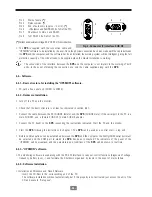
Pin 2.
Mains failure.
(*)
Pin 4.
Optos common.
(*)
Pin 5.
End of autonomy (approx <2 min).
(*)
Pin 6.
+Shutdown and RxD RS-232 (to TxD of the PC).
Pin 7.
Shutdown common and RS-232.
Pin 9.
TxD RS-232 (to RxD of the PC).
(*)
Current and maximum voltage 48 V DC 30 mA non inductive.
• The
SPS
is supplied with the connection cable and
"UPSMON" software to be installed by the user. Once the physical connection has been made with the cable between
the
SPS
and the computer, and the software has been installed, the working system will be intelligent, giving the full
protection capacity of the critical loads to be supplied when the whole installation is working.
The connection of the interface between the
SPS
and the computer is not implicit to the working of both
units. In the event of making the connection, use only the cable supplied along with the
SPS
.
6.6.- Software.
6.6.1.- Basic structure for installing the "UPSMON" software.
• PC with a free serial port (COM1 to COM4).
6.6.2.- Hardware Installation.
• Turn off the PC and the monitor.
• Check that the basic structure is at least as indicated in section 6.6.1.
• Connect the cable between the PC (SUB-D9 female) and the
SPS
(SUB-D9 male). If the serial port in the PC is a
male SUB-D25, use a female SUB-D25 to male SUB-D9 adapter.
• Connect the PC (load) to the
SPS
, respecting the instructions indicated. Start the PC and the monitor.
• Start the
SPS
following the instructions in chapter 7. The
SPS
can be used as a central start – stop unit.
• Before communications can be established between the
SPS
and the computer, the Config./COM serial port must
be selected and the COM port to which the
SPS
has been connected. The indicators of the panel of the
"UPSMON" will be visualised, and the parameters and conditions of the
SPS
will be shown in real time.
6.6.3.- "UPSMON" software.
• The monitoring software is used along with the RS-232 interface to carry out control functions (diagnosis of voltage,
frequency, battery level,...) and facilitate the Shutdown organised by levels in the event of mains failure.
6.6.4.- Software Installation.
• Installation on Windows and Novell Netware.
- Insert the CD-Rom in the corresponding unit of the PC.
- The software installation will boot automatically, but if this property is not activated, just access the unit of the
CD and execute "Setup.exe".
Fig. 2. Connector (3) interface SUB D9.
5
6
9
1
6
9
1
5
Содержание SPS.1000.TOP
Страница 4: ... 4 ...
Страница 18: ... 18 ...
Страница 32: ... 32 ...
Страница 48: ...salicru com 08460Palautordera Tel 34938482400 sat salicru com ...


