background image

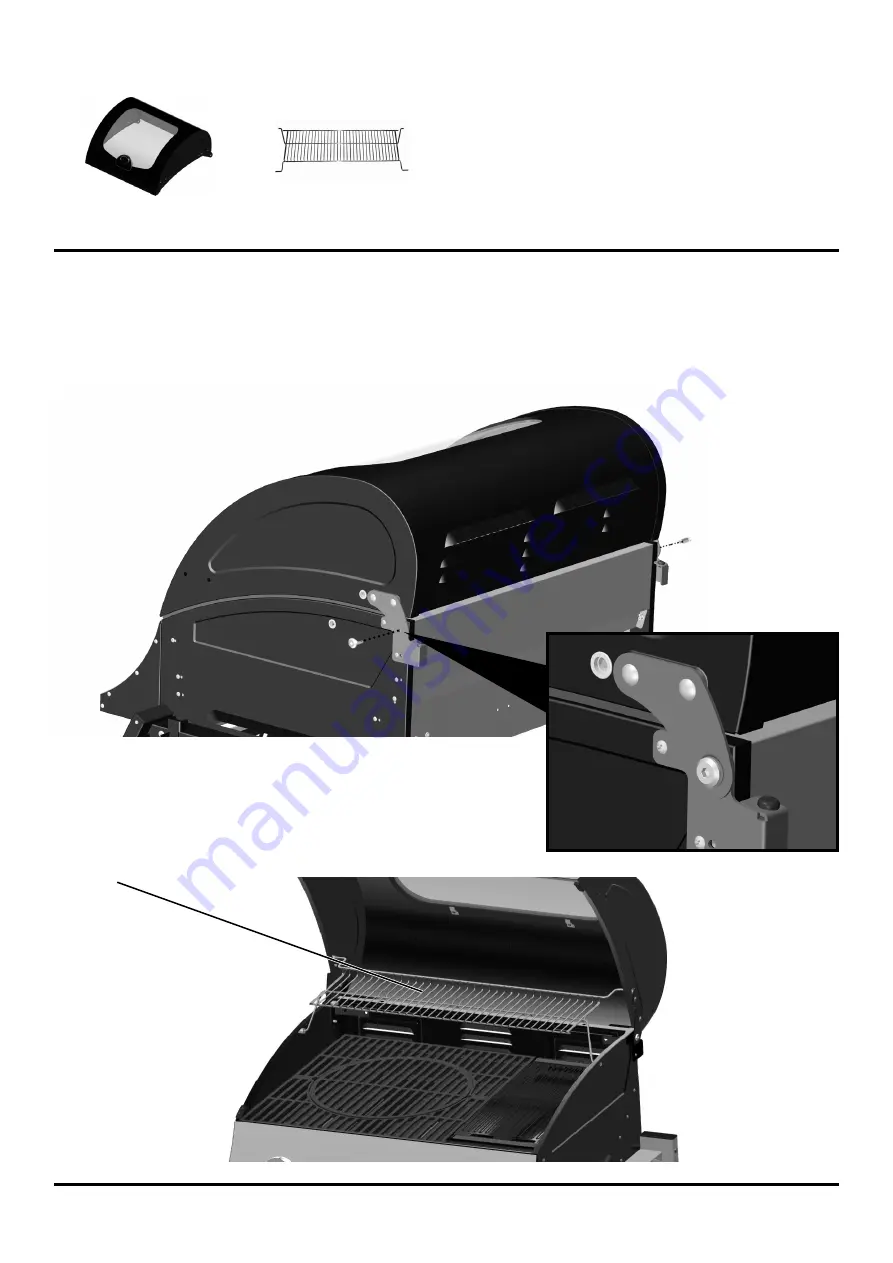
1. Position the barbecue lid onto the barbecue sink and align the brackets.

2. Secure on either side of the hood using the pre-fitted bolts (M6x12mm

    Hex Bolt).

3. Place the warming rack into position as shown below.

Warming Rack x1

Warming Rack

Barbecue Lid x1

Page 9

Assembly Step 5

Содержание S375

Страница 1: ...y be dangerous and will invalidate your warranty This does not affect your statutory rights Retain these instructions for future reference Leak test your barbecue annually Check the hose connections a...

Страница 2: ......

Страница 3: ...9 20 21 22 23 Large Wheel Left Side Frame Right Side Frame Base Panel Base Trim Cylinder Brackets Sink Searing Grill Cooking Grill Vapourising Bar Barbecue Lid Warming Rack Left Side Tray Right Side T...

Страница 4: ...carton is cut open and spread out on the floor and used as a protective surface during assembly Refer to the assembly diagrams as necessary Important while every precaution has been made in the manufa...

Страница 5: ...e side frames and base trim to the base panel The base trim must be positioned on the base panel before the side frames are attached Note Do not fully tighten bolts Fit the 2 large wheels to the side...

Страница 6: ...Page 6 Assembly Step 2 Cylinder Brackets x2 Fit the two cylinder brackets using 5 of the M6 x 12 Hex Bolts ref A M6 x 12 Hex Bolt ref A x5...

Страница 7: ...clean surface on the ground and fit the barbecue sink to the frame as shown using 4 of the M6 x 80 Bolts ref B and 4 spacers ref C Note Fully tighten all bolts at this stage Frame Barbecue Sink Posit...

Страница 8: ...nto the barbecue sink as shown below 2 Place the searing grill and cooking grill into the barbecue sink as shown Note Ensure that the cooking grill is positioned directly above the vapourising bars Se...

Страница 9: ...arbecue sink and align the brackets 2 Secure on either side of the hood using the pre fitted bolts M6x12mm Hex Bolt 3 Place the warming rack into position as shown below Warming Rack x1 Warming Rack B...

Страница 10: ...Secure left side tray onto the side frame using the 2 pre fitted M6 wing bolts and nuts like below Left Side Tray x1 Note side tray can be folded down for easy storage Page 10 Assembly Step 6...

Страница 11: ...de tray to the frame with 4 x M6 x 45 bolts ref E screwing in from the underside of the frame as shown in Fig 2 Fit the handle to the hood using 4 of the M6 x 12 Hex Bolts M6 x 45 Bolt ref E x4 Right...

Страница 12: ...underside of the side shelf locate the flex tube and bend it down to connect it to the BBQ sink Tighten the nut with the 19mm head of the 19 22mm spanner provided and leak test at both connections Not...

Страница 13: ...racket to the grease tray using 1 of the M6x12 Hex Bolts ref A and then slide the grease cup into the grease cup bracket Slide the grease tray into the back of the barbecue as shown below Front Panel...

Страница 14: ...towel rail as shown on the left side tray and secure with one M4x10 Bolt ref D Assembly Step 10 Page 14 Bin Bag Wire x1 2 Fit the bin bag wire as shown using two of the M8x23 bolts ref F M4x10 Bolt r...

Страница 15: ...tles indoors For optimal performance we suggest the following This barbecue is intended for use with LPG bottled gas only A regulator of 28mbar must be used for Butane gas or 37mbar for Propane gas Th...

Страница 16: ...or at least 10 seconds to ensure the burner stays lit 5 If burner does not light or stay lit after holding dial in for 10 seconds turn the dial to OFF position and wait for 1 minute and try again Do n...

Страница 17: ...usage burning off the residue after cooking will keep the burners clean The burners should be removed and cleaned annually or whenever heavy build up is found to ensure that there are no signs of blo...

Страница 18: ...urface or ground When positioning ensure the unit is a minimum of 1 metre from flammable items or structure This barbecue is not intended for use with charcoal or other similar fuel Always leak test t...

Страница 19: ...ing uncooked meat and before eating ALWAYS keep raw meat away from cooked meat and other foods Before cooking ensure barbecue grill surfaces and tools are clean and free of old food residue DO NOT use...

Страница 20: ...arbecue Universal Innovations strive to lead the field in product design and innovation If you have any comments regarding this product we would be delighted to hear from you Troubleshooting Problem P...

Отзывы: