English
EN-13
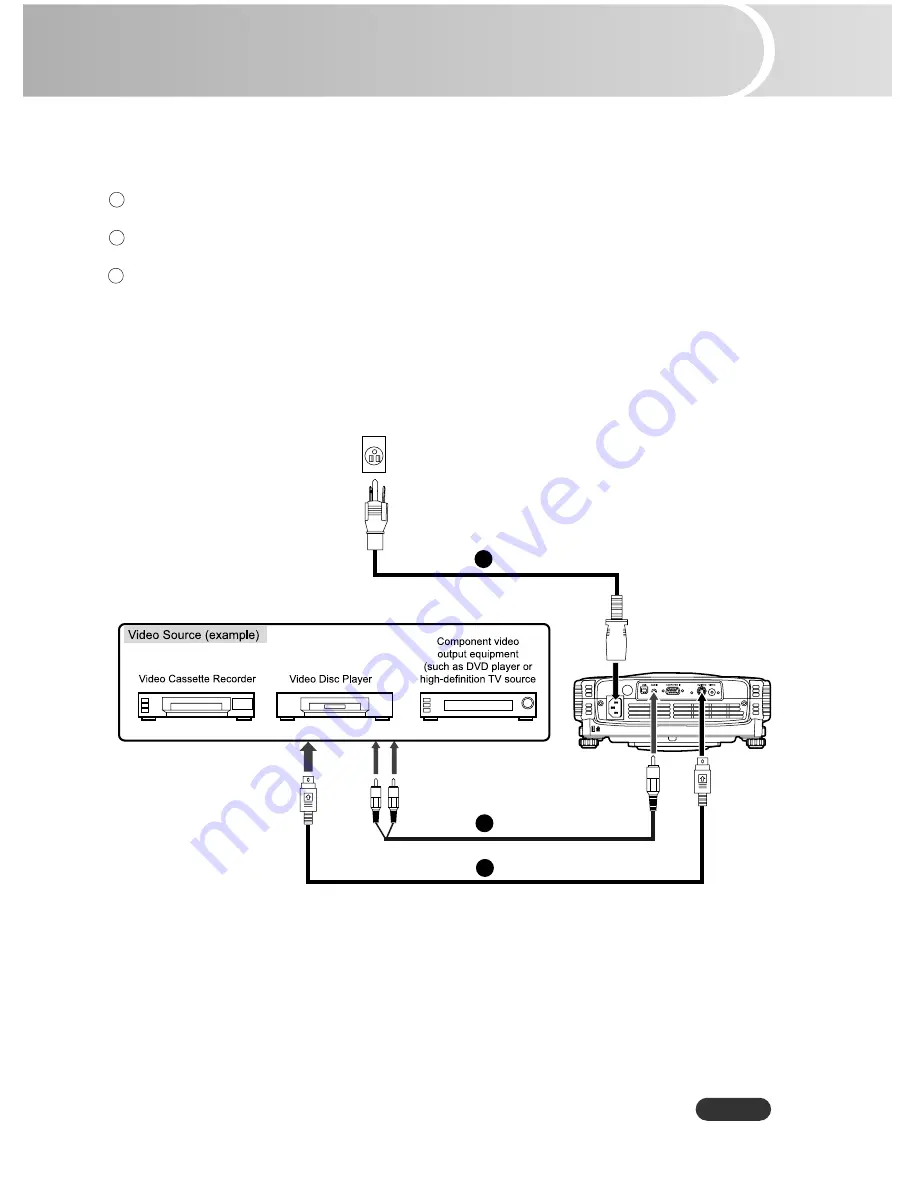
B. Connecting to a Video Source
1.Connecting with S-Video Cable
1
AC Power Cord
2
S-Video Cable
3
Audio Cable
Страница 1: ...ion If this equipment does cause harmful interference to radio or television reception detectable by turning the equipment in question off and on the user is encouraged to try to correct the interfere...
Страница 2: ...o not place the projector where the cord can be stepped on as this may result in fraying or damage to the lead or the plug Be alert to tripping hazards 8 Never look into the projector lens when the la...
Страница 3: ...ure degradation or damage to the projector 15 When you replace the projector lamp never touch the new bulb with your bare hands The invisible residue left by the oil on your hands may shorten the bulb...
Страница 4: ...es dealer This projector is equipped with a grounding type AC line plug Make sure that your outlet fits the plug Do not defeat the safety purpose of this grounding type plug We highly recommend using...
Страница 5: ...e Projector 16 Adjusting the Projected Image 17 Adjusting the Projector Zoom and Focus 18 Adjusting Projection Image Size 18 Using the Projector 20 Control Panel 20 Remote Control 21 Menu Options 24 I...
Страница 6: ...r portability 1 2x manual zoom lens Auto image re sizing Auto Sync to 800 x 600 full screen with scaling compression compatibility for VGA SVGA XGA and SXGA State of the art motion adaptive hardware d...
Страница 7: ...ship your unit For maximum protection repack your unit as it was originally packed at the factory Accessories and components may vary by retailer and region Projector with Lens Cap AC Power VGA Cable...
Страница 8: ...tor Projector Components Front View 1 Lens cap 2 Lens cap strap 3 Lens 4 Ventilation holes intake 5 Zoom ring 1 2 3 6 7 8 9 10 4 5 6 Focus ring 7 Controlpanel 8 Speaker 9 Front IR remote control senso...
Страница 9: ...r View 1 Interface connector 2 Rear IR remote control sensor 3 Security lock receptacle 4 AC power socket 5 Ventilation holes intake 6 Foot adjuster 7 Foot adjuster button Bottom View 1 Lamp cover 1 2...
Страница 10: ...4 1 USB connector This connector is used for engineering purpose 2 AUDIO input connector Connect an audio output from video equipment to this jack 3 COMPUTER IN D SUB connector Connect image input sig...
Страница 11: ...Components 1 Power button 2 Four direction buttons 3 Menu button 4 Enter button 5 Keystone c d buttons 6 Volume c d buttons 7 Source button 8 Mute button 9 Blank button 10 4 3 16 9 button 11 Auto but...
Страница 12: ...EN 12 Installation Connecting the Projector A Connecting to a computer 1 AC Power Cord 2 VGA Cable D SUB to D SUB Desktop type Laptop type 1 2...
Страница 13: ...English EN 13 B Connecting to a Video Source 1 Connecting with S Video Cable 1 AC Power Cord 2 S Video Cable 3 Audio Cable 1 2 3...
Страница 14: ...EN 14 2 Connecting with Composite Video Cable 1 AC Power Cord 2 CompositeVideo Cable 3 Audio Cable 1 2 3...
Страница 15: ...h EN 15 3 Connecting with HDTV Cable 1 AC Power Cord 2 D SUBtoHDTVCable 3 Audio Cable When connecting cable power cords of both a projector and external equipment should be disconnected from AC outlet...
Страница 16: ...rojector simultaneously press the SOURCE button on the Projector Control Panel or the Source button on the Remote Control to select the desired source Warning Never look into the lens when the lamp is...
Страница 17: ...e buttons to lock the foot adjusters into position To lower the projector 1 Lift up the rear side of the projector and press the foot adjuster buttons on the two sides 2 Lower the projector and then r...
Страница 18: ...mage Rotate to the left to enlarge the image 2 Focus the image by rotating the focus ring A still image is recommended for focusing Adjusting Projection Image Size Refer to the graphic and table below...
Страница 19: ...26 2 105 1 6 165 0 137 5 151 4 126 2 7 192 5 160 4 176 6 147 2 8 220 0 183 3 201 9 168 2 9 247 5 206 2 227 1 189 3 10 275 0 229 1 252 4 210 3 This table is for user reference only Position the project...
Страница 20: ...the OSD On ScreenDisplay menu Use the directional buttons and MENU ENTER button to navigate through the OSD On Screen Display menu and select choices 3 KEYSTONE S T Adjusts image distortion caused by...
Страница 21: ...onavigatethroughtheOSD On Screen Display menu 4 Enter Confirms the selection 5 Keystone c d Adjustsimagedistortioncausedbytilting the projector 6 Volume c d Press the Volume c button to increase the v...
Страница 22: ...ut of the reach of children There is a danger of death by accidentally swallowing the battery Do not recharge the used battery or expose the battery to fire or water Do not dispose of the used battery...
Страница 23: ...on the remote sensor Operate the remote control from a position where the remote sensor is visible Do not drop the remote control or jolt it Keep the remote control out of locations with excessively h...
Страница 24: ...tects the source 1 Press the MENU ENTER button on the Projector Control Panel or the Menu button on the Remote Control 2 Select the menu tab with the e f buttons either on the Projector Control Panel...
Страница 25: ...e f buttons Press the e button to lighten the image Press the f button to darken the image Keystone Adjusts image distortion caused by tilting the projector Select the desired setting with the e f bu...
Страница 26: ...lack Blue Gray Red Green Yellow Cyan Magenta Gamma Selects Gamma Mode Select the desired setting with the e f buttons Film Dark video image mode Photographic Computerphotomode RGB Computertextmode Vid...
Страница 27: ...the f button to increase the color temperature Green Manually adjusts green Select the desired setting with the e f buttons Press the e button to decrease the color temperature Press the f button to i...
Страница 28: ...to increase the amount of color in the image Tint Adjusts the color balance of red and green Select the desired setting with the e f buttons Press the e button to increase the amount of green in the i...
Страница 29: ...requency of your computer graphic card If you experience a vertical flickering bar use the tracking function to make an adjustment Select the desired setting with the e f buttons Press the e button to...
Страница 30: ...guage for menu and message displayed Select the language you prefer with the c d buttons and confirm the selection with the MENU ENTER button on the Projector Control Panel or the Enter button on the...
Страница 31: ...image is inverted vertically Press the MENU ENTER button on the Projector Control Panel or the Enter button on the Remote Control to active this function ECO Mode Uses this function to dim the project...
Страница 32: ...th the e f buttons Factory Reset Resets the projector to its factory default settings PresstheMENU ENTERbuttonontheProjectorControlPanelorthe Enter button on the Remote Control to enter its sub menu s...
Страница 33: ...specifically indicated in this User s Manual do not attempt to service this product yourself Refer all servicing to qualified service personnel Cleaning the Lens Gently wipe the lens with lens cleani...
Страница 34: ...urs of use as its lifetime draws to an end Risk of explosion may differ according to the environment or conditions in which the projector and lamp are being used Wear protective gloves and eyeglasses...
Страница 35: ...e with the new lamp 7 Placebackthescrewsonthebottom of lamp assembly 8 Place the panel and screw back the screws on the lamp cover Dispose of the used lamp according to local regulations Ensure that s...
Страница 36: ...eo Video Scanning Frequency HorizontalFreq 31 79 KHz Vertical Freq 50 85 Hz PixelRate 108MHz Digital Keystone Correction Vertical 15 degrees Analog RGB input signal D Sub connector HDTV Display 720p 6...
Страница 37: ...fe and must be changed soon The lamp will continue to operate until it fails Change the lamp If the lamp is off then the ballast will become malfunction The projector is shutting The fan motor is cool...
Страница 38: ...188 H V 1040 SVGAVESA 75 Hz 46 875 75 000 H V 1056 SVGAVESA 85 Hz 53 674 85 061 H V 1048 1024 x 768 XGA VESA 60 Hz 48 363 60 004 H V 1344 XGA VESA 70 Hz 56 476 70 069 H V 1328 XGA VESA 75 Hz 60 023 75...
Страница 39: ...al Frequency kHz Vertical Frequency Hz 480i 15 8 kHz 60 Hz 480p 31 5 kHz 60 Hz 576i 15 6 kHz 50 Hz 576p 31 3 kHz 50 Hz 720p 45 0 kHz 60 Hz 720p 37 5 kHz 50 Hz 1080i 33 8 kHz 60 Hz 1080i 28 1 kHz 50 Hz...