background image

38

TO REMOVE SEAT INSERT
To remove the seat insert, undo the buckle 
and pull the insert out. 
TO REPLACE SEAT INSERT
Feed the buckle through the opening slot in 
the seat insert and fasten buckle assembly.  

TO REMOVE BELT MATES
To remove the belt mates, simply undo press 
studs and unwrap from harness straps.
TO REPLACE BELT MATES
Fit belt mates to harness straps by wrapping 
around straps and closing press studs.

VERY IMPORTANT: 

Only replace the cover with a manufacturer’s supplied 

replacement cover with identical shoulder height markers 

or a replacement cover meeting AS/NZS 8005.

WARNINGS

Care and Maintenance

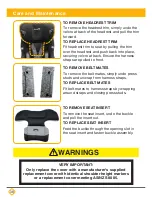
TO REMOVE HEADREST TRIM
To remove the headrest trim, simply undo the 
velcro at back of the headrest and pull the trim 
forward.
TO REPLACE HEADREST TRIM
Fit headrest trim to seat by pulling the trim 
over the headrest and push back into place, 
securing velcro at back. Ensure the harness 
straps are pulled to front.

Содержание Summit ISO 30

Страница 1: ...NVERTIBLE CAR SEAT SUMMIT ISO 30 Suitable for newborn to 4 years Discover life safely 4yrs 0m Illustrations and designs may vary IMPORTANT KEEP THIS BOOKLET IN THE PLACE PROVIDED ON THE CHILD RESTRAIN...

Страница 2: ...2 QUICK START INSTALLATION REARWARD FACING USING SEATBELT PUSH DOWN PULL OUT SLACK CLICK NEWBORN UP TO 30 MONTHS APPROX...

Страница 3: ...3 QUICK START INSTALLATION FORWARD FACING USING SEATBELT PUSH DOWN SASH LAP PULL OUT SLACK CLICK SELECT RECLINE 1 2 3 TODDLER 12 MONTHS APPROX UP TO 4 YEARS...

Страница 4: ...4 QUICK START INSTALLATION REARWARD FACING USING ISOGO CLICK BOTH SIDES NEWBORN UP TO 30 MONTHS APPROX...

Страница 5: ...TOP TETHER STRAP Press the child restraint firmly down into the vehicle seat whilst pulling on the ISOGO straps tip Always check for GREEN at eye level Pull loose end of the strap until you get a maj...

Страница 6: ...6 QUICK START INSTALLATION FORWARD FACING USING ISOGO CLICK BOTH SIDES SELECT RECLINE 1 2 3 TODDLER 12 MONTHS APPROX UP TO 4 YEARS...

Страница 7: ...aint firmly down into the vehicle seat whilst pulling on the ISOGO straps PUSH PULL PULL ATTACH TOP TETHER STRAP tip Always check for GREEN at eye level Pull loose end of the strap until you get a maj...

Страница 8: ...INSTALLATION Configuring Harness Straps 24 AdjustingHeadrestHeightandHarness Height 25 To Fasten Buckle Assembly 26 Adjusting Top Tether Strap 27 Rearward Facing Installation Using Seatbelt 28 Forwar...

Страница 9: ...ears of comfort and safety No child restraint can guarantee absolute protection from a crash However proper use of this restraint may reduce the risk of injury or death BEFORE YOU START www Safety1st...

Страница 10: ...s are at risk of serious injury if they face forward too early Children are at risk of serious injury if they move to booster seats too early Children who have outgrown this restraint are safest in a...

Страница 11: ...the top tether strap to prevent it hanging out of the car or being accessible by the child ALWAYS ATTACH HOOK AND REMOVE SLACK THIS RESTRAINT IS NOT SUITABLE FOR USE WHERE THE TOP TETHER STRAP MAY FAL...

Страница 12: ...her than the front seats are being used by children under seven years children aged between four and six years inclusive may travel in the front seat provided they use an approved child restraint or b...

Страница 13: ...to place the infant seat in your vehicle consult your vehicle s owner s handbook Vehicle Seat Location Requirements Children are safer when properly restrained in rear vehicle seating positions Whene...

Страница 14: ...14 Correct Forward Facing Vehicle Position CORRECT USE CORRECT USE INCORRECT USE...

Страница 15: ...n station wagons vans and hatchbacks Make sure that you do not confuse the luggage hook in the back of a station wagon with anchor points Refer to your owner s manual An extension strap may be needed...

Страница 16: ...here is no slack in the top strap and the attachment clip is upright in the anchorage fitting INCORRECT The clip must not lie flat on the anchorage fitting INSTALLATION CORRECT Make sure there is no s...

Страница 17: ...the seating position as shown in Figure 2 Install the anchor bolt as shown in Figure 3 It is recommended that this installation be carried out by a child restraint fitting station or licenced motor me...

Страница 18: ...METAL OR TO WOOD OR SYNTHETIC STRUCTURES WHEN DRILLING THE 9mm HOLE DO NOT DRILL THROUGH FUEL LINES FUEL TANKS ELECTRICAL WIRING OR RADIO SPEAKERS WEBBING STRAPS MUST BE PROTECTED FROM SHARP CORNERS A...

Страница 19: ...orrect direction for rearward facing application Refer to page 28 DO NOT wrap baby in a blanket or swaddled as infant can be ejected and killed in an accident Ensure the harness fits the baby firmly E...

Страница 20: ...Protect Cell x2 3 Multi Purpose Utility Straps 4 Belt Mates x2 5 Harness 6 Buckle 7 Padded Insert 8 Belt Path Opening both sides 9 Centre Front Adjuster under cover 10 Seat Base 11 Adjuster Strap 12 B...

Страница 21: ...uction Manual ISOGO storage pocket 18 Top Tether ISOGO storage pocket 19 ISOGO Lower Connectors x2 attached to shell 20 Splitter Plate 21 Recline Indicator 22 Rearward Facing Belt Path 23 Forward Faci...

Страница 22: ...T AT HIGHEST POSITION 3 4 1 2 2010 2013 SHOULDERS BELOW THIS LINE WHEN HEADREST AT HIGHEST POSITION ABOVE THIS LINE MUST BE REAR FACING WHEN SHOULDERS BELOW THIS LINE SHOULDERS BELOW THIS LINE WHEN HE...

Страница 23: ...t in a larger child restraint with an in built harness or a booster seat until their shoulders reach the upper shoulder height marker of the restraint The child restraint is unsuitable for the occupan...

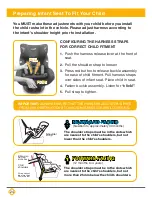
Страница 24: ...assembly Listen for click 5 Pull strap to tighten CONFIGURING THE HARNESS STRAPS FOR CORRECT CHILD FITMENT The shoulder straps must be in the slots which are nearest to the child s shoulders but not l...

Страница 25: ...and to guide the headrest Move headrest up or down into position Ensure bar is secured in slot The seat is fitted with 3 forward facing recline positions The 4th and most reclined position is for rear...

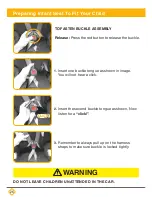
Страница 26: ...he red button to release the buckle TO FASTEN BUCKLE ASSEMBLY CLICK WARNING 1 Insert one buckle tongue as shown in image You will not hear a click 2 Insert the second buckle tongue as shown Now listen...

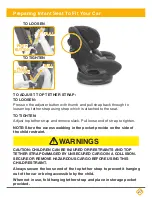
Страница 27: ...e excess webbing in the pocket provide on the side of the child restraint CAUTION CHILDREN CAN BE INJURED OR RESTRAINTS AND TOP TETHER STRAP DAMAGED BY UNSECURED CARGO IN A COLLISION SECURE OR REMOVE...

Страница 28: ...accessory locking clip Please see instructions provided with locking clip for installation WARNING 4 Place restraint facing rearwards on back seat of vehicle in line with a top tether strap anchorage...

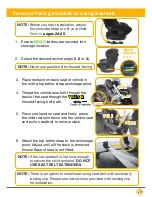
Страница 29: ...child Refer to pages 24 25 NOTE There is an option to install seat using seat belt with accessory locking clip Please see instructions provided with locking clip for installation Forward Facing Instal...

Страница 30: ...back into position before tightening 2 Seat seat to position 4 full recline for rearward facing 3 Place restraint facing rearwards on back seat of vehicle in line with a top tether strap anchorage poi...

Страница 31: ...E CHILDREN UNATTENDED IN THE CAR WARNING 7 Attach the top tether strap to the top anchorage point in the vehicle 8 Ensure there are no twists in the belt and adjust until all slack is removed from top...

Страница 32: ...ICK BOTH SIDES 2 Select the desired recline angle 1 2 or 3 3 Place restraint on back seat of vehicle in line with a top tether strap anchorage point 4 Locate low anchorage points You can find this by...

Страница 33: ...tether strap to the top anchor age point in the vehicle 8 Ensure there are no twists in the belt and ad just until all slack is removed from top tether Do not attach the lower attachment connectors of...

Страница 34: ...above the lower shoulder height marker approximately 6 months of age until the child s shoulders reach the upper shoulder height marker approximately 8 years of age To be used with a lap sash seatbel...

Страница 35: ...ckle should always fasten with an audible CLICK If sticky liquids such as baby food fruit juice etc get into the buckle it may become sluggish and you will not hear a CLICK REMOVING BUCKLE 1 Set seat...

Страница 36: ...tching the buckle several times Repeat steps above DO NOT oil any part of the buckle Allow buckle to completely dry If the buckle does not return to original working order contact Dorel Australia Cust...

Страница 37: ...seat Seat trim may be removed for cleaning Don t forget to remove the instruction manual Machine washable on lukewarm setting delicate cycle Tumble dry 10 15 minutes on low heat Do not dry clean All o...

Страница 38: ...by wrapping around straps and closing press studs VERY IMPORTANT Only replace the cover with a manufacturer s supplied replacement cover with identical shoulder height markers or a replacement cover m...

Страница 39: ...eglect Please retain your receipt as proof of purchase and contact our Customer Service team on Ph 1300 809 526 or alternatively via our website at www dorel com au for any difficulties with your prod...

Страница 40: ...Specifications are subject to change without notice Copy or reproduction without permission is prohibited 2017 Dorel Australia Pty Ltd All Rights Reserved www dorel com au GMXA4 2013L 017505 02 17...

Отзывы: