background image

Check all parts against Parts List before

beginning assembly.  Allow all parts to warm to

room temperature prior to assembly.

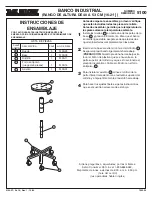
Install   A  Casters into each of the legs of the  B

Base.  Press firmly into place.  Be sure the caster is

inserted completely into leg for proper stability.

Insert the  C  Cylinder into the base, tapered end

down.  Secure the cylinder by applying a little down-

ward pressure (

CAUTION

:  When applying downward

pressure, avoid plastic button at top of cylinder, as

pressure will release pneumatic lift)  Place  D  Dust

Cover over exposed cylinder.

Install the  E  Seat by aligning the hole on the under-

side with the shaft of the cylinder; push down firmly on

seat.

Make the final stool adjustments following the

instructions on the reverse side.

A
B

C
D

E

Caster

    5

5100-25

Base

    1

5100-03

Cylinder

    1

5100-11

Dust Cover (3 pc set)

    1

5100-14

Seat

    1

5100-01

o

o

o

o

o

5100-37: 1 of 6;  Rev. 1, 10/00

7993.00

5100

MODEL

NUMBER

ASSEMBLY INSTRUCTIONS

READ  THESE  INSTRUCTIONS  BEFORE  STARTING;

FOLLOW  THE  ASSEMBLY  PROCEDURES  CAREFULLY

LETTER

CODE

DESCRIPTION

QTY. PART  NO.

PARTS LIST

1

o

A

o

B

o

E

o

D

o

C

o

3

2

o

4

INDUSTRIAL STOOL (16"-21" Range)

o

o

o

For questions or concerns, please call

Safco Consumer Hot Line 1-800-664-0042

available Monday-Friday 8:00 AM to 4:30 PM (Central Time)

(English-speaking operators)

Содержание TASK MASTER 5100

Страница 1: ...ylinder Install the E Seat by aligning the hole on the under side with the shaft of the cylinder push down firmly on seat Make the final stool adjustments following the instructions on the reverse side A B C D E Caster 5 5100 25 Base 1 5100 03 Cylinder 1 5100 11 Dust Cover 3 pc set 1 5100 14 Seat 1 5100 01 o o o o o 5100 37 1 of 6 Rev 1 10 00 7993 00 5100 MODEL NUMBER ASSEMBLY INSTRUCTIONS READ TH...

Страница 2: ...ir small cuts in polyurethane apply a few drops of quick drying glue into the cut and press the sides together until the glue sets ADJUST THE HEIGHT RANGE The lever under the seat pneumatically adjusts the height of the seat over a range of about 5 Always pull up on handle do not push down The proper height should be determined by a combination of variables the height of the work surface the task ...

Страница 3: ... sur le haut du cylindre car une pression sur le bouton déclencheral élévateurpneumatique Glisserletube anti poussière D sur le cylindre Installer le siège E en alignant le trou sur le dessous avec l arbre du cylindre Pousser le siège fermement vers le bas Faire les derniers règlements du tabouret en suivant les instructions au verso 5100 NUMÉRO DEMODÈLE INSTRUCTIONS DE MONTAGE LIRE CES INSTRUCTIO...

Страница 4: ... et la retourner dans les 30 jours suivant l achat du produit L amélioration de nos produits se poursuit sans cesse et il se peut donc que les photographies ou les illustrations ne correspondent pas dans tous les détails à l apparence du produit ENTRETIEN L élévateur pneumatique du cylindre a reçu un graissage permanent à l usine et n a pas besoin d être graissé NE JAMAIS GRAISSER L ÉLÉVATEUR PNEU...

Страница 5: ...rte superior del cilindro ya que esto accionaría el elevador neumático Cubra el cilindro con el forro antipolvo D Para instalar el asiento E alinee el orificio de la parte inferior del asiento con el extremo superior del cilindro y empuje firmemente el asiento hacia abajo Para hacer los ajustes finales siga las instrucciones que se encuentran al reverso de esta hoja 5100 NÚMERO DEMODELO INSTRUCCIO...

Страница 6: ... garantía adjunto dentro de los primeros 30 días siguientes a su compra Debido a que continuamente actualizamos y mejoramos nuestros productos la apariencia real exacta del producto podría ser distinta a las fotografías o ilustraciones MANTENIMIENTO El elevador neumático del cilindro viene con lubricación permanente desde la fábrica y no requiere lubricación adicional NUNCA LUBRIQUE EL ELEVADOR NE...

Отзывы: