background image

• 16 •

• 16 •

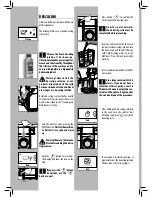
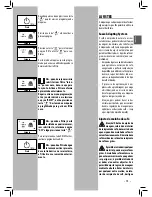
DESCALING

Limescale build-up is normal with the use 
of this appliance.

The display informs you when descaling 
is necessary:

Orange

•  Press button  “

” to confirm the 

activation of the descaling cycle.

From this point forward, 
the descaling cycle must be 

completed before proceeding.

Warning! Remove the Intenza 
fi lter before adding the desca-

ling solution.

•  Turn the machine on by pressing the 

ON/OFF button. 

Wait for the machine 

to fi nish its rinse cycle and warm 
up. 

Only use the Saeco descaling 
solution. It has been spe-

cifi cally developed to preserve perfor-
mance and functionality throughout 
the lifetime of the machine and to 
ensure, with regular use, a high quality 
delivered product.  

Warning! Never drink the 
descaling solution or any 

products dispensed until the cycle 
has been carried out to the end. Never 
use vinegar as a descaling solution.

Before descaling, remove the Pannarello 
attachment from the steam/hot water 
wand as described in the “Cleaning and 
Maintenance” section.

•  Hold the  “

“ button for 5 seconds. 

The display will show the icon on the 
side.

If you press the  “

“ button 

by mistake, use the  “

“ 

button to quit.

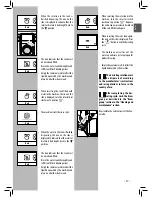
•  Pour the entire content of the Saeco 

concentrated descaling solution into 
the water tank, and then fi ll the tank 
with fresh drinking water up to the 
MAX level. Place the tank back in the 
machine.

•  Insert a container below the steam/hot 

water wand. 

Use a large container for this 
process. If you do not have a 

container of this capacity, once it is 
fi lled close the knob, empty the con-
tainer and then place it again under 
the wand and repeat the procedure. 

•  After adding the descaling solution 

in the tank, turn the selector dial 
clockwise to position  “

” to start the 

descaling cycle.

•  The machine will start dispensing, at 

regular intervals, the descaling solution 
(the bar shows the cycle progress).

Red

Red

Red

Содержание RI9837/43

Страница 1: ...I 40041 Gaggio Montano Bologna Tel 39 0534 771111 Fax 39 0534 31025 www saeco com The manufacturer reserves the right to change the features of the product without prior notice O fabricante reserva se...

Страница 2: ...TING INSTRUCTIONS INSTRU ES DE UTILIZA O READ THESE OPERATING INSTRUCTIONS CAREFULLY BEFORE USING THE MACHINE LEIAATENTAMENTE ESTAS INSTRU ES DE UTILIZA O ANTES DE UTILIZAR A MAQUINA English Portugu s...

Страница 3: ...p Danger of scalding Intended Use Do not make any technical changes or use the machine for unauthorized purposes since this would create serious hazards The equipments is not to be used by persons wit...

Страница 4: ...e power button to 0 Remove the plug from the socket Wait for the machine to cool down Never immerse the machine in water It is strictly forbidden to tamper with the internal parts of the machine Water...

Страница 5: ...trong coffee brew button Long coffee brew button Coffee hot water steam dial ON OFF button Brew group Dregdrawer Service door Grinder adjustment knob Pre ground bypass doser Coffee bean hopper Dispens...

Страница 6: ...play Warnings Never remove the drip tray when the machine is turned on Wait a couple of minutes after turning on off since the machine will be carrying out a rinse self cleaning cycle see section Rins...

Страница 7: ...ng out a preset quantity of water through the steam hot water wand Pannarello ifsupplied Thebar under the icon shows the operation progress At the end of the priming process the display shows an icon...

Страница 8: ...8 Turntheselectorswitchclockwisetoset it to the position The following icon will be displayed 9 Dispense water until the no water sig nal is displayed then turn the selector switch counter clockwise...

Страница 9: ...valid for one measurement Check how many squares change colour and refer to the table The letters correspond to the references that are located in the base of the Intenza filter Thefiltermustbeadjuste...

Страница 10: ...working Do not pour ground and or instant coffee into the coffee bean hopper Do not insert any material other than coffee beans into the hopper The grinder contains movingpartsthatmaybedangerous Ther...

Страница 11: ...cordingtoyourneeds and select the aroma or the pre ground coffee Green Green bean hopper Do not pour coffee beans when the coffee grinder is working Themachineallowsslightadjustmentsto the coffee grin...

Страница 12: ...the coffee The system sets the aroma ac cording to the personal taste of the user After selecting Strong Aroma the func tion for brewing coffee with pre ground coffee is displayed This selection is d...

Страница 13: ...r Add only 1 scoop of pre ground coffee to the compartment Use the measur ingscoopsuppliedwiththemachineto performthisoperation Then closethe cover Green Green Warning Onlyaddpre ground coffee to the...

Страница 14: ...everages Danger of scalding Brewing may be preceded by small spurts of hot water The steam hot waterwandmayreachhightempera tures Nevertouchitwithbarehands Important Note After using the steam hot wat...

Страница 15: ...nd cleaning operations can only be carried out when the ma chineiscoldanddisconnectedfromthe power supply Do not immerse the machine in water Do not wash any of its parts in the dishwasher Do not use...

Страница 16: ...hebase Press the PUSH button to make sure that the brew group is in the correct position Lubricate the brew group af ter approximately 500 brew ing cycles The brew group lubricant may be purchased at...

Страница 17: ...vinegar as a descaling solution Before descaling remove the Pannarello attachment from the steam hot water wand as described in the Cleaning and Maintenance section Hold the button for 5 seconds The...

Страница 18: ...e wash the brew group as described in the Brew group section in the Cleaning and maintenance section Reassemble the external part of the Pan narello Red Red Red Red Red Red Red The icon indicates that...

Страница 19: ...de if the user does not do anything for 30 seconds The settings that were changed but not confirmed will not be stored The and buttons allow youtochangethevalueofthefunction among those appearing on t...

Страница 20: ...ent section INTENZA WATER FILTER This function allows you to manage the Intenza water filter For more details see the section related to filter handling Programming example In this example we want to...

Страница 21: ...g Green Green Green Green The machine is ready for pre ground coffee brewing The machine is in the steam dispensing phase The machine is in the hot water dispensing phase Themachineisprogrammingtheamo...

Страница 22: ...circuit Insert the dregdrawer Empty the dregdrawer and the drip tray Fill the water tank Alarm Signals Return the hot water steam knob to its proper position Red Red Red Red Open the knob to carry out...

Страница 23: ...ter tank and prime the circuit section Using the Machine for the FirstTime Brew group is dirty Clean the brew group section Brew Group Circuit is not primed Prime the circuit section Using the Machine...

Страница 24: ...ty Mechanisms Thermal fuse MACHINE DISPOSAL The packing materials can be recycled Appliance Unplug the appliance and cut the power cord Deliver the appliance and power cord to a service center or publ...

Страница 25: ...a quente em direc o a partes docorpo toquecuidadosamentenotubodevapor guaquente agarrando opela pega adequada perigo de queimaduras Utiliza o prevista proibido efectuar modifica es t cnicas e qualquer...

Страница 26: ...el desligar a m quina com a tecla ON OFF depois coloque o interruptor geral no 0 e desligue a ficha da tomada de corrente Al m disso deve esperar que a m quina arrefe a Nunca mergulhe a m quina em gua...

Страница 27: ...de caf gua quente vapor Tecla ON OFF Grupo caf Gaveta de recolha das borras Portinhola de servi o Bot o de ajuste da moagem Compartimento de caf pr mo do Recipiente de caf em gr os Distribuidor de ca...

Страница 28: ...nta ao utilizador atrav s do visor LCD posicionado no painel de comando NUNCE retire a bandeja de limpeza com a m quina liga da Aguarde alguns minutos depois de ligar e ou desligar a m quina enquanto...

Страница 29: ...amento autom tico do circuito fazendo com que saia uma quantidade de gua predefinidadopannarello visualizando o enchimento progressivo da barra debaixo do s mbolo No final do processo de carregamento...

Страница 30: ...t o ponto No visor ser visualizado o seguinte s mbolo 9 Distribua gua at a sinaliza o de fal ta de gua em seguida vire o selector no sentido contr rio ao dos ponteiros do rel gio at coloc lo na posi o...

Страница 31: ...novamente o reservat rio de gua Pressione a tecla ON OFF para colocar a m quina em Stand by 2 3 4 A B C Intenza Aroma System Programa o dureza m quina 1 Medi o da dureza da gua Amedi odadurezada gua...

Страница 32: ...caf mo doe ousol velnorecipiente de caf em gr os proibidointroduzirqualquer material quen osejacaf em gr os Omoinhodecaf cont mcom ponentesemmovimentoquepodem ser perigosos proibido introduzir os dedo...

Страница 33: ...f pr mo do Verde Verde Preto a m quina e desprenda a ficha da tomadadecorrente N ocoloquecaf em gr os quando o moinho de caf estiver em funcionamento A m quina permite efectuar um ligeiro ajuste do gr...

Страница 34: ...da selec o do caf Desta forma determina se a intensidade do sabor conforme os gostos pessoais Depoisdeterseleccionadoo aromaforte seleccionada a fun o que permite dis tribuir caf com o caf pr mo do Es...

Страница 35: ...com a m quina De seguida volte a fechar a tampa Aten o no compartimento verta apenas caf pr mo do A introdu o de outras subst ncias e objectos poder causar danos gravesnam quinan ocobertospela garant...

Страница 36: ...bui o podemverificar sebrevessalpicosde gua quente O tubo de distribui o podeatingirtemperaturaselevadas evite toc lo directamente com as m os Obs importante logodepois de utilizar o vapor para criar...

Страница 37: ...recolha das borras As outras opera es de manuten o e limpezas podemserrealizadasquan doam quinaestiverfriaedesligadada corrente el ctrica N o mergulhe a m quina em gua N o introduza os componentes re...

Страница 38: ...Retire a gaveta de recolha das borras Abra a portinhola de servi o RetireoGrupoCaf segurando ocoma pegaapropriadaepressionandoatecla PUSH OGrupoCaf s podeserlava do com gua t pida sem detergente Lave...

Страница 39: ...do durante 5 segundos a tecla e no visor aparecer o s mbolo ao lado Ligue a m quina com a tecla ON OFF Esperequeam quinatermineopro cessodeenxag eeaquecimento Deite todo o conte do da garrafa de desca...

Страница 40: ...icante e ou pelas normas vigentes no pa s de utiliza o Depoisdeterrealizadoociclo de descalcifica o proceda comalavagemdogrupocaf confor medescritonopar grafo Grupocaf docap tulo Limpezaemanuten o Mon...

Страница 41: ...sam 30 segundos sem a interven o do utilizador N o ser o memorizadas as programa es com modifica es n o confirmadas As teclas e permitem modificar o valor da fun o entre os valores presentes na p gina...

Страница 42: ...dadureza da gua FILTRO DE GUA INTENZA Esta fun o permite gerir o filtro de gua Intenza Para mais detalhes veja o par grafo rela tivo ao tratamento do filtro Exemplo de programa o Noexemplo queremosexp...

Страница 43: ...af em gr os e de gua quente Verde Verde Verde Verde Verde Verde Verde Verde Verde M quina pronta para a distribui o de caf com caf pr mo do M quina em fase de distribui o de vapor M quina em fase de d...

Страница 44: ...r o recipiente poss vel reiniciar o ciclo Desligueeap s30segundosliguenovamen te a m quina Experimente 2 ou 3 vezes Seam quinaN Oiniciar contacteocentro de assist ncia O Grupo Caf deve ser inserido na...

Страница 45: ...i Ver obs Falta de gua Encha o reservat rio de gua e recarregue o circuito par grafo Primeira utiliza o Grupo Caf sujo Limpe o Grupo Caf par grafo Grupo caf Circuito n o est carregado Recarregue o cir...

Страница 46: ...s 8 Press o da bomba 15 bar Caldeira Inox Dispositivos de seguran a Termofus vel DESMANTELAMENTO Este produto est conforme a directiva EU 2002 96 EC O simbolo impresso no produto ou na sua embalagem i...

Страница 47: ...46...

Страница 48: ...47 Portugu s...

Отзывы: