background image

- 21 -

Video 60 Plus EFP

Manual

5

The modular system

Due to the Video 60 Plus EFP fluid heads modular design you
may perform certain modifications yourself. In order to safe time
you can do all work with an allen wrench #4 unless otherwise
specified.

The following modifications can be performed:

Conversion of the Video 60 Plus EFP to include V-shaped
wedge plate

Conversion of pan bars and rosette

Conversion of Video 60 Plus EFP to include flat base

Conversion of the Video 60 Plus EFP to include Mitchell

5.1 Conversion of the Video 60 Plus EFP to include

V-shaped wedge plate

Open the 2 screws of the spindle fixation with allen wrench
# 2 and remove the fixation piece.

Open the lock of the balance plate by pushing back red
lever underneath the balance plate as far as possible.

Keep on turning the knob of the spindle to the left until you
can remove the balance plate.

Loosen the 4 screws (now visible) of the base plate under-
neath and remove it.

Take at your hand the Studio set up from the Sachtler
accessory range.

With this set up it is likely that you have to remove the
balance plate from the base plate first. Therefore you have
to remove the fixation screw in the spindles top end. Open
the lock of the balance plate and keep on turning the knob
of the spindle to the left until you can remove the balance
plate.

Screw the base plate onto the head. Fasten the allen scr-
ews hand-tight.

Guide the balance plate with spindle into the base plate.

Содержание Video 60 Plus EFP

Страница 1: ...Video 60 Plus EFP Bedienungsanleitung Manual Hydrokopf Fluid Head...

Страница 2: ...tum Issue date 03 02 Bestellnr Order no sko16t050a sachtler GmbH Co KG Gutenbergstrasse 5 Postfach P O BOX 1648 D 85716 Unterschleissheim D 85706 Unterschleissheim Germany Germany Telefon 49 89 321582...

Страница 3: ...3 6 Einstellen der Kamerabalance 5 3 7 Einstellen der D mpfung 7 3 8 Bremsen 8 3 9 Sucherlupenst tze 8 3 10 Austausch der Batterien 8 4 Technische Daten 8 4 1 Allgemeine Daten 8 4 2 Abmessungen 9 5 Da...

Страница 4: ...e 17 3 7 Setting of the Damping 19 3 8 Brakes 19 3 9 Support for view finder extension 19 3 10 Change of the batteries 19 4 Technical specifications 20 4 1 General data 20 4 2 Dimensions 20 5 The modu...

Страница 5: ...Beim L sen der Vertikalbremse mu sichergestellt sein da die Kamera gegen pl tzliche Bewegung gesichert ist Kopf ber darf der Hydrokopf nur mit ausreichender Sicherung z B Stahlseile eingesetzt werden...

Страница 6: ...r Video 60 Plus EFP verf gt ber eine Libelle um das Nivellieren zu erleichtern Schlie en Sie die Vertikalbremse des Video 60 Plus EFP und sichern Sie die Kamera mit einer Hand L sen Sie die Klemmschal...

Страница 7: ...en der Kamera Befestigen Sie die Kameraplatte ungef hr im Schwerpunkt der Kamera an der Stativadapterplatte Kamera Zubeh r Stellen Sie den Drehknopf des Gewichtsausgleichs auf Position 9 Schlie en Sie...

Страница 8: ...Der Kopf l t sich mittels der Schwenkarme nicht mehr neigen Fassen Sie die Kamera mit der einen Hand Verriegelungshebel mit Daumen und Zeigefinger der anderen Hand greifen und den roten runden Sperrk...

Страница 9: ...e die Kameraplatte an eine andere Position der Stativadapterplatte 3 6 Einstellen der Kamerabalance Halten Sie die Hand am Schwenkarm und schalten Sie ber den Drehknopf des Gewichtsausgleichs schritt...

Страница 10: ...L sen Sie die Klemmung der Kamera Balanceplatte indem Sie den vorderen roten Hebel unterhalb der Balanceplatte nach links oben ziehen Drehen Sie den Knopf der Spindel so lange nach links bis die Balan...

Страница 11: ...ingriff und Sie k nnen die Balanceplatte ungebremst ver schieben wenn Sie in etwa die Position erreicht haben in der die Kamera zentriert sein m sste geben Sie den Druckknopf frei nachdem die Balancep...

Страница 12: ...es spit zen Gegenstandes Schraubenzieher o ffnen Sie die ses Fach Vergewissern Sie sich da die neuen Batterien entsprechend der plus und minus Kennzeichnung des Batteriefaches eingelegt werden Ein Sat...

Страница 13: ...olgend beschriebene Modifikationen k nnen selber durch gef hrt werden Um l ngere Umbauzeiten zu vermeiden ist wenn nicht anders beschrieben ein Inbusschl ssel 4 das ein zige ben tigte Werkzeug Umbau d...

Страница 14: ...anceplatte gel st werden Dazu die Fixierschraube an der vorderen Spindelspitze ent nehmen L sen Sie die seitliche Klemmung der Balance platte und drehen Sie den Knopf des Spindeltriebs solange nach li...

Страница 15: ...rden Allein f r Quickfixanschl sse und alle Sachtler Pedestale mu die Multi Disc aus dem Zubeh rprogramm verwendet werden Sie wird in den 4 Schraubenanschlu am Kopf eingeschraubt 5 4 Umbau des Video 6...

Страница 16: ...ner nicht autorisierten Service Stelle ge ffnet wurde nderungen die dem technischen Fortschritt dienen sind vorbehalten Bezeichnung Code nr Verwendung Studioaufbau 6050 mit V f rmiger Keilplatte Roset...

Страница 17: ...nce it will snap back When releasing the vertical brake make sure that the came ra is secured against any sudden movement Do not operate the fluid head upside down without the necessary securing devic...

Страница 18: ...ng Apply the vertical brake of the Video 60 Plus EFP and hold the camera with one hand Open the clamping screw of the fluid head and move the head in such a way that the bub ble moves into the levels...

Страница 19: ...ce engage automatical ly by tilting the camera through the horizontal position audible clicking Lock the head with the tilt safety lock The blocking and clicking into position of the tilt safety lock...

Страница 20: ...lock of sliding balance plate On the Video 60 Plus EFP you have to push back red lever underneath the balance plate as far as possible By turning the spindle forwards and backwards move the camera un...

Страница 21: ...y effective in any tilt position An increase of the counterbalance setting will only be effective in the horizon tal position Springs must click in audibly 3 6 1 Engaging and disengaging of fixed coun...

Страница 22: ...out The spring is engaged if you can t see the silver head of the screw anymore because the screw is scr ewed in bring back the balance plate into its normal position apply the lock of the balance pl...

Страница 23: ...egree of the horizontal and vertical damping is identical and thus enables precise diagonal panning movements without jerks and vibrations 3 8 Brakes The horizontal brake applies the lock for the pan...

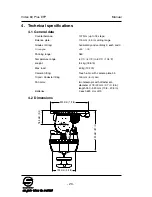
Страница 24: ...ture range Panning range 90 75 horizontally and vertically 9 each and 0 115 mm 4 5 in sliding range 137 Nm up to 18 steps 40 C 40 F to 60 C 104 F 360 150 mm 6 in ball Touch Go with camera plate 35 60...

Страница 25: ...allen wrench 2 and remove the fixation piece Open the lock of the balance plate by pushing back red lever underneath the balance plate as far as possible Keep on turning the knob of the spindle to th...

Страница 26: ...can use other pan bars 5 3 Conversion of Video 60 Plus EFP to include flat base Put the Video 60 Plus EFP upside down so that you can access the bottom of the head Next to the centre bolt you will se...

Страница 27: ...n screws The fluid head is tightened onto the tripod via the Mitchell locking knob 6 Accessories Parts from the Sachtler accessory range in order of their appearance parts code no used with Studio set...

Страница 28: ...anty Warranty expires if The fluid head was operated improperly or not in line with the specified technical data or the head housing was opened by unauthorised personnel We reserve the right to make c...

Отзывы: