


FBX2020P-OpGuide-031104.pmd - hto
7
9. Now lower the master volume slightly so that the system
is not on the verge of another feedback point. This is the
maximum volume level that the FBX will be able to provide.
Higher levels will cause uncontrollable feedback.
10. We recommend you press LOCK FIXED to lock the Fixed
filters at their current depth. See the Features section
below for a complete explanation.
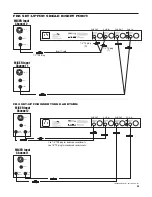
11. Channels A and B must be set individually and separately.
To set the second channel, turn down the volume for the first
channel, then bypass the first channel and repeat this
system initializing procedure.
12. You’re ready to go. Make sure TURBO mode is off (clip LED
not flashing). ClipGuard™ will automatically match the
input level to the best internal dynamic range.
How To Use FBX2020-Plus Features
Using the “LOCK FIXED” feature:
In rare situations the FBX may mistake music for feedback and
drive the fixed filters deeper than necessary, such as in a church
with a pipe organ or during a performance with a great deal of
intentional sustained electric guitar feedback. You can prevent
the fixed filters from deepening beyond their preset depth by
pressing the “LOCK FIXED” button on the front panel. The
“LOCK FIXED” LED will light to indicate that the FBX is in “LOCK
FIXED” mode. The fixed filters will stay locked until you press
the “LOCK FIXED” button again. The dynamic filters are not
affected.
Selecting filter width:
If you’re using the FBX for a music application, the standard 1/10-
octave constant “Q” filter is most effective. However, in spoken
word applications, such as lectures or teleconferencing, we
recommend using the wider 1/5-octave filter for more robust
feedback control. You may enable the 1/5-octave filters by
pressing the “FIFTH OCTAVE” button, and the built-in LED will
light. Only filters set after pressing the button in will be 1/5-octave.
Press the button again to set subsequent filters to standard 1/10-
octave filters.
Important Operating Considerations
Memory:
The FBX stores the positions and depths of the filters in
nonvolatile internal memory when the unit is turned off or during
a power failure. The unit will return all filters to their previous
frequencies and depths when it is turned back on.
Bypass Mode:
The FBX has a true power-off bypass. The signal is unaffected
in BYPASS MODE even if the unit is turned off. Please note that
if a combination of BALANCED and UNBALANCED inputs and
outputs is used, the signal may be disconnected or attenuated
in BYPASS MODE.
Resetting the filters:
You must reset the FBX if the microphones or speakers are
moved significantly. To reset the unit, place the PA system’s
master volume to minimum and then press the reset button until
all the FILTER LEDs stop flashing. Then follow the system
initialization procedure explained previously. Or you can reset
only the Dynamic filters by pressing and releasing the reset
button after the Dynamic filter LEDs stop flashing. This may be
useful in certain situations, for example, after extensive wireless
microphone use.
Reset Options
The Reset button has two functions: You can reset all the FBX
filters, or just the Dynamic Filters. Hold the reset button in and
all the filter LEDs will begin flashing. To clear only the Dynamic
filters, release the Reset button when the Dynamic filter LEDs
go off (after three flashes). To clear all the filters, do not release
the Reset button until all the filters LEDs go off. A full reset is
recommended whenever you change speaker or microphone
positions. NOTE: Factory default is 9 Fixed and 3 Dynamic
filters, so if you reset Dynamics only those three lights will go
out during reset. And remember, whenever you perform a full
reset you will automatically be in TURBO mode.
WARNING:
Do not reset all filters during the program. This
releases all the feedback you eliminated during setup.
Use
extreme caution when resetting the Dynamic filters, because
you may need those filters at that moment during the show.
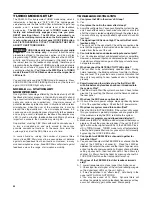
How To Operate The FBX2020-Plus
Follow these steps to obtain the maximum gain before feed-
back without changing the tonal quality of your program.
(Important note: Set up only one channel at a time. Do not
attempt to ring out both channels of your sound system for
feedback simultaneously.)
1
1. Place the speakers and microphones in the positions
where they will be used during the program. Avoid placing
microphones directly in front of speakers.
1
2. Place both FBX channels in BYPASS mode.
1
3. Set the mixer's master volume controls to their lowest
positions. Turn on the mixer, then the FBX, then any other
accessories and finally the power amp. If you are using a
graphic EQ, adjust only for the desired tonal qualities, but
DO NOT NOTCH FOR FEEDBACK. Adjust the balance for
each mixer channel, and set the sound system’s master
volume to minimum.
1
4. Press RESET for 3 LED flashes to clear dynamic filters, and
an additional 4 flashes to clear ALL filters set previously.
5. OPTIONAL:
Set the total number of FBX filters.
(Factory
default is 12 filters per channel - skip to #7 if default is OK
for your application) You can limit the number of available
FBX filters. Hold down the SET TOTAL NO. button for 4
seconds. The LEDs will flash 4 times. Release the SET
TOTAL NO. button. The LEDs will begin to light in se-
quence. When the LED corresponding to the desired
number of filters lights, press the SET TOTAL NO. button.
You've successfully set the total number of filters.
6. OPTIONAL: Set the number of Fixed filters (Factory default
is 9 fixed and 3 dynamic per chan-
nel - skip to #7 if default is OK for
your application). Depress the
SET FIXED button for 4 seconds.
The filters LEDs will flash 4 times
and then go out. Release the SET
FIXED button, and the LEDs will
begin to light in sequence. When
the LED corresponding to the de-
sired number of Fixed filters lights,
press the SET FIXED button. You’ve successfully set the
number of fixed filters. The remaining filters will be your
dynamic filters.
7. Press the Bypass button to put the FBX in active mode for
the channel you want to set (red LED off).
8. Slowly raise the sound system’s master volume for the
channel being set until feedback occurs. The FBX will
quickly remove the feedback. The first FILTER LED will then
blink to indicate a filter has been set. Repeat this procedure
until all of the FIXED FILTERS and one of the DYNAMIC
FILTERS are set. TURBO setup mode goes off automati-
cally.
IMPORTANT TIP:
You can mix 1/10- and 1/5-
octave filters in the same
channel. If you have an espe-
cially bad feedback problem,
try making the first few filters
1/5-octave and the remain-
ing filters 1/10-octave.


