background image

OPERATOR'S MANUAL

Oscillating Spindle Sander
OSS500 - Double Insulated

RYOBI TECHNOLOGIES INC.

1428 Pearman Dairy Road

Anderson, SC 29625

Post Office Box 1207

Anderson, SC 29622

www.ryobitools.com

Phone 1-800-525-2579

983000-146
      9-02

• SERVICE

Now that you have purchased your tool, should a need ever exist for repair parts or
service, simply contact your nearest Ryobi Authorized Service Center. Be sure to
provide all pertinent facts when you call or visit. Please call 1-800-525-2579 for your
nearest Ryobi Authorized Service Center. You can also check our Web site at
www.ryobitools.com for a complete list of Authorized Service Centers.

• MODEL NO. AND SERIAL NO.

The model number and serial number of this product are found on the label attached to the
rear of the cabinet. Please record the serial number in the space provided below.

• HOW TO ORDER REPAIR PARTS

WHEN ORDERING REPAIR PARTS,
ALWAYS GIVE THE FOLLOWING INFORMATION:

MODEL NUMBER

SERIAL NUMBER

OSS500

EXTENSION CORD CAUTION

When using a power tool at a considerable distance from a
power source, be sure to use an extension cord that has the
capacity to handle the current the tool will draw. An under-
sized cord will cause a drop in line voltage, resulting in over-
heating and loss of power. Use the chart to determine the mini-
mum wire size required in an extension cord. Only round jack-
eted cords should be used.

When working with a tool outdoors, use an extension cord
that is designed for outside use. This is indicated by the letters
"WA" on the cord's jacket.

Before using any extension cord, inspect it for loose or ex-
posed wires and cut or worn insulation.

**Ampere rating

    (on tool faceplate)

0-2.0

2.1-3.4

3.5-5.0

5.1-7.0

7.1-12.0 12.1-16.0

Cord Length

Wire Size (A.W.G.)

25'

16

16

16

16

14

14

50'

16

16

16

14

14

12

CAUTION: 

Keep the extension cord clear of the working

area. Position the cord so that it will not get caught on
lumber, tools or other obstructions while you are working
with a power tool.

**Used on 12 gauge - 20 amp circuit.

Содержание OSS500

Страница 1: ...tor safety Properly cared for it will give you years of rugged trouble free performance WARNING To reduce the risk of injury the user must read and understand the operator s manual Thank you for buyin...

Страница 2: ...ses with side shields and a full face shield when needed We recommend Wide Vision Safety Mask for use over eyeglasses or standard safety glasses with side shields Always wear eye protection which is m...

Страница 3: ...ed service technician at an autho rized service center Stay constantly aware of cord location and keep it well away from the moving parts of the tool USE OUTDOOR EXTENSION CORDS When tool is used outd...

Страница 4: ...WET SANDING Failure to comply can result in electrical shock causing serious injury DO NOT OPERATE THIS TOOL WHILE UNDER THE INFLUENCE OF DRUGS ALCOHOL OR ANY MEDICATION STAY ALERT AND EXERCISE CONTR...

Страница 5: ...ctions vital to the operation or maintenance of the equipment SAVE THESE INSTRUCTIONS DOUBLE INSULATION Double insulation is a concept in safety in electric power tools which eliminates the need for t...

Страница 6: ...the packing materials from around the tool Lift the tool carefully from the box and place it on a level work surface NOTE The sander is heavy Ask for assistance if necessary Do not discard the packin...

Страница 7: ...m tall however you can only sand material up to 3 11 16 in 93 7 mm thick The 1 2 in 12 7 mm sanding sleeve fits directly on the 1 2 in 12 7 mm spindle and requires no rubber spindle It is secured in p...

Страница 8: ...nd could result in a hazardous condition leading to possible serious personal injury SPINDLE HEX NUT SANDING SLEEVE 1 in 25 4 mm THROAT PLATE TABLE TOP THROAT PLATE STORAGE AREA WRENCH STORAGE AREA SW...

Страница 9: ...face is uniform NOTE Do not use the sander without a sanding sleeve Doing so will damage the rubber spindle Select and install the desired sanding sleeve for your particular application As mentioned p...

Страница 10: ...washer down The fins help push dust through the dust exhaust port opening preventing buildup of dust Dust in this area may cause the oscillating motion to stop Always use the lower spindle washer with...

Страница 11: ...The fins help push dust through the dust exhaust port opening preventing buildup of dust Dust in this area may cause the oscillating motion to stop Always use the lower spindle washer with all sanding...

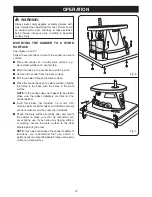
Страница 12: ...face Place the sander back on the work surface aligning the holes in the base with the holes in the work surface NOTE If the sander does not appear to be stable make sure the rubber stabilizers are in...

Страница 13: ...control of the workpiece COLLECTING DUST See Figure 10 A dust exhaust port is provided to help keep dust to a minimum It is located under the table top on the back of the sander The end of a standard...

Страница 14: ...r are subject to accelerated wear and possible premature failure as the fiberglass chips and grindings are highly abrasive to bearings brushes commutators etc Consequently we do not recommend that thi...

Страница 15: ...15 NOTES...
Страница 16: ...VE THE FOLLOWING INFORMATION MODEL NUMBER SERIAL NUMBER OSS500 EXTENSION CORD CAUTION When using a power tool at a considerable distance from a power source be sure to use an extension cord that has t...

Отзывы: