background image

10

Getting started

2

1

1

2

3

Wear Personal Protective Equipment 

(PPE). Wear full eye protection, ear 

protection, non-slip heavy-duty gloves, 

substantial footwear, and protective 

clothing at all times while operating the 

product. Do not operate the product 

when barefoot or wearing open sandals.

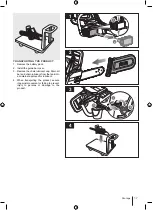
Remove the guide bar cover.

Loosen the sprocket cover screw.

1

2

7

8

Close the oil tank, and tighten the cap. 

Wipe off any spillage.
Press the oil tank cap once to pump oil 

to the chain before starting the product.

NOTE:

 To keep the chain lubricated 

while cutting, press the oil tank cap 

once every few minutes.

NOTE:

 Never work without chain 

lubricant. If the saw chain is running 

without lubricant, the guide bar and 

the saw chain can be damaged. Before 

and while using the chainsaw, check 

the oil level in the oil level gauge.

Insert the battery pack into the product. 

Make sure that the latch of the battery 

pack clicks in place and that the battery 

pack is fully seated and securely 

attached before beginning operation.

WARNING:

 Grip both handles with 

the thumbs and fingers encircling the 

handles. Ensure that the left hand is 

holding the front handle so that the 

thumb is underneath.

Содержание OCS1825

Страница 1: ...FRONT PAGE R18CHS12 OCS1825...

Страница 2: ...wer tool in a damp location is unavoidable use a residual current device RCD protected supply Use of an RCD reduces the risk of electric shock PERSONAL SAFETY Stay alert watch what you are doing and u...

Страница 3: ...Always hold the chainsaw with your right hand on the rear handle and your left hand on the front handle Holding the chainsaw with a reversed hand configuration increases the risk of personal injury a...

Страница 4: ...he saw as it cuts free from the wood Failure to do so could result in possible serious personal injury Do not stop the saw in the middle of a cutting operation Keep the saw running until it is already...

Страница 5: ...before cuts are started The escape path should extend back and diagonally to the rear of the expected line of fall Before felling starts consider the natural lean of the tree the location of larger b...

Страница 6: ...storing or transporting Remove all foreign materials from the product Store the product in a cool dry and well ventilated place that is inaccessible to children Keep the product away from corrosive ag...

Страница 7: ...f the chainsaw steady while cutting When cutting push the product forward until the spikes dig into the edge of the wood then move the rear handle up or down in the direction of the cutting line to he...

Страница 8: ...8 Original Instructions SYMBOLS IN THIS MANUAL Parts or accessories sold separately Note Warning Wear eye and face protection Wear upper body protection Wear leg protection Stop the product...

Страница 9: ...Front hand guard Front handle Rear handle Switch trigger Chain lubricant cap Trigger release Sprocket cover screw Sprocket cover Chain tensioning screw Chain catcher Hex key Guide bar cover Chain lub...

Страница 10: ...ting the product NOTE To keep the chain lubricated while cutting press the oil tank cap once every few minutes NOTE Never work without chain lubricant If the saw chain is running without lubricant the...

Страница 11: ...ation causing the chain to stretch Check the chain tension frequently and adjust as required A chain that is tensioned while warm may be too tight upon cooling Make sure that the chain tension is corr...

Страница 12: ...12 p 16 p 18 p 13 Replacing the bar and chain Transporting the product Adjusting the chain tension Cleaning the product Storing the product p 15 p 17...

Страница 13: ...e direction of chain rotation If the saw chain faces backwards turn the loop over Hold the chain in position on the bar and place the loop around the drive sprocket Lower the bar and place it flush ag...

Страница 14: ...14 Maintenance 6 6 Tighten the sprocket cover screw...

Страница 15: ...e the chain tension turn the chain tensioning screw counterclockwise NOTE Frequently check the chain tension while turning the chain tensioning screw NOTE The temperature of the chain increases during...

Страница 16: ...CLEANING THE PRODUCT 1 Remove the battery pack 2 Use a brush to remove loose dirt and saw dust from around the front hand guard Use a soft dry cloth to clean the plastic parts WARNING Do not use wate...

Страница 17: ...ck 2 Install the guide bar cover 3 Remove the chain lubricant cap Drain all bar and chain lubricant from the tank into a container approved for lubricant 4 When transporting the product secure it agai...

Страница 18: ...the tank into a container approved for lubricant 4 When transporting the product secure it against movement or falling to prevent injury to persons or damage to the product Store the product in a coo...

Страница 19: ...NT PARTS BAR AND CHAIN Manufacturer TRILINK Chain CL14340PB Bar M1431040 1041RY The chain must be fitted with the bar from the same manufacturer according to above combinations WARNING The declared vi...

Страница 20: ...3149 Melbourne Australia Techtronic Industries N Z Limited Unit C 70 Business Parade South Highbrook Auckland 2013 New Zealand RYOBI is a trade mark of Ryobi Limited and is used under license TRILINK...

Отзывы: