Folding up the Rollator
1.
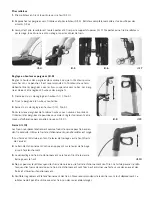
Fold the Rollator up by pulling the strap upwards (pic. 4).
2.
Push the handles inwards and the Rollator together (pic. 5). The fully folded Rollatoris locked with magnets (pic. 6).
3.
When folded, the rollator can easily be carried or pulled by the basket holder (pic. 7). Do not carry or pull the rollator by
the seat, the strap for folding or the brake cables.
Height adjustment of the handles (pic. 8)
Adjust the height of the handles so that the user can walk upright, wit-
hout bending over. It is recommended that the user stands upright with
arms at their sides between the handles. The grips should be adjusted to
the height of their wrists.
1.
Loosen the height adjustment screw (pic. 1, No. 5).
2.
Move the handle to the desired height.
3.
Tighten the height adjustment screw (pic. 1, No. 5).
Adjust both handles in the same height. The printed numbers on the inside
of the push handles help you easily adjust your personal grip level again
(pic. 9).
pic. 4
pic. 5
pic. 6
pic. 7
pic. 8
pic. 9
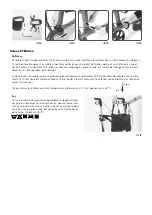
Brake (pic. 10)
The built-in brake functions as an operating brake for slowing down when
moving. The parking brake can be used when the rollator is stopped.
1.
Speed is reduced by pulling the brake lever upwards (operating brake).
2.
The parking brake is activated by pressing the brake lever down until it
engages.
3.
The parking brake is released from its locked position by pulling the brake
lever upwards.
4.
The rollator should not be pushed while the operating or parking brakes have
been applied. If the rollator is pushed while the operating or parking brakes
have been applied, the tyres and brakes may be subject to excessive wear and deteriorate.
5.
Regularly check that the brakes work satisfactorily. We recommend checking before every use.
The rollator must not be used with damaged brakes or damaged wheels.
pic. 10


