background image


21 

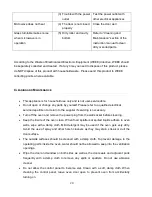
  If  steam  accumulates  inside  or  around  the  outside  of  the  oven  door,  wipe  with  a  soft 

cloth.  This  may  occur  when  the  microwave  oven  is  operated  under  high  humidity 

condition. And it is normal. 

  It is occasionally necessary to remove the glass tray for cleaning. Wash the tray in warm 

soapy water or in a dishwasher. 

  The  roller  ring  and  oven  floor  should  be  cleaned  regularly  to  avoid  excessive  noise. 

Simply wipe the bottom surface of the oven with mild detergent. The roller ring may be 

washed  in  mild  soapy  water  or  dishwasher.  When  removing  the  roller  ring  from  cavity 

floor for cleaning, be sure to replace in the proper position. 

  Remove  odors  from  your  oven  by  combining  a  cup  of  water  with  the  juice  and  rind  of 

one  lemon  in  a  deep  microwaveable  bowl,  microwave  for  5  minutes.  Wipe  thoroughly 

and dry with a soft cloth. 

  When it becomes necessary to replace the oven light, please consult a dealer to have it 

replaced. 

  The  oven  should  be  cleaned  regularly  and  any  food  deposits  removed.  Failure  to 

maintain  the  oven  in  a  clean  condition  could  lead  to  deterioration  of  the  surface  that 

could  adversely  affect  the  life  of  the  appliance  and  possibly  result  in  a  hazardous 

situation. 

  Please  do  not  dispose  this  appliance  into  the  domestic  rubbish  bin;  it  should  be 

disposed to the particular disposal center provided by the municipalities. 

  Do not use bleach or other abrasive substance or solvents to clean your appliance as it 

can be damaging to the finish. 


S

TORING 

T

HE 

A

PPLIANCE


  Unplug the unit from the wall outlet and clean all the parts as instructed above. Ensure 

that all parts are dry before storing.  

  Store the appliance in its box or in a clean, dry place.  

  Never store the appliance while it is still wet or dirty. 

  Never wrap the power cord around the appliance. 


Содержание RHEM22L

Страница 1: ...INSTRUCTIONS AND WARRANTY MODEL NO RHEM22L RUSSELL HOBBS 20L ELECTRONIC MICROWAVE OVEN...

Страница 2: ...everage 250ml Beverage 500ml Potato 0 85kg Potato 0 65kg and Fish 60 minute cooking timer with end signal Defrost by weight With quick start and delay start functions Elegant mirror finish front Stain...

Страница 3: ...urer or its service agent or a similarly qualified person in order to avoid a hazard 11 This appliance is not intended for use by persons including children with reduced physical sensory or mental cap...

Страница 4: ...roup 2 Class B ISM equipment The definition of Group 2 which contains all ISM Industrial Scientific and Medical equipment in which radio frequency energy is intentionally generated and or used in the...

Страница 5: ...by improper or incorrect use or for repairs carried out by unauthorised personnel 38 In case of technical problems switch off the machine and do not attempt to repair it yourself Return the appliance...

Страница 6: ...n for any damage such as a misaligned or bent door damaged door seals and sealing surface broken or loose door hinges and latches and dents inside the cavity or on the door If there is any damage do n...

Страница 7: ...e 7 The socket must be readily accessible so that it can be easily unplugged in an emergency 8 Blocking the intake and or outlet openings can damage the oven 9 Remove any protective film found on the...

Страница 8: ...oven Reposition the receiving antenna of the radio or television Relocate the microwave oven with respect to the receiver Plug the microwave oven into a different outlet so that microwave oven and re...

Страница 9: ...through the container and heat the food A microwave cannot penetrate metal so metal utensils or dishes with metallic trim should not be used Do not use recycled paper products when microwave cooking...

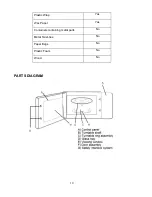
Страница 10: ...10 Plastic Wrap Yes Wax Paper Yes Containers containing metal parts No Metal Twist ties No Paper Bags No Plastic Foam No Wood No PARTS DIAGRAM...

Страница 11: ...enu OPERATING INSTRUCTIONS HOW TO SET THE OVEN CONTROLS The LED display will flash 3 times once the microwave has been plugged into a power supply The display will flash prompting you to input the coo...

Страница 12: ...time on the numbers will no longer flash Note If the clock is not programmed set by the user then it will not show when the microwave is switched on During the process of setting the clock if you pres...

Страница 13: ...play will count down to show a running time throughout the cooking process You can change the cooking time during the cooking cycle If you have had to interrupt the cooking cycle for example to turn t...

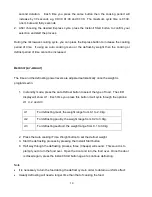
Страница 14: ...Defrost button to select the type of food The LED display will show d 1 Each time you press this button it will cycle through the options d 1 d 2 and d 3 d 1 For defrosting meat the weight range from...

Страница 15: ...crowave power for three 3 minutes then 20P microwave power for nine 9 minutes This would be considered as setting only two 2 stages To program the first selection 100P microwave for three 3 minutes 1...

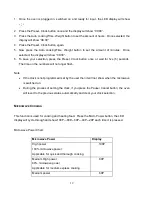
Страница 16: ...Preset Clock button The display will show 00 00 2 Set hours by pressing the Time Weight button The display will show 12 00 3 Press the Preset Clock button again to confirm the hours 4 Set the minutes...

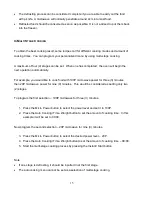
Страница 17: ...the cooking process by pressing the Instant Start button The LED display will count down to show the running time Choose the appropriate menu according to the food type and weight Strictly observe the...

Страница 18: ...h some herbs and spices Cover the dish with a thin film to prevent water loss After cooking let it settle stand for 2 minutes The ambient temperature of food before cooking should be at approximately...

Страница 19: ...will sound at an interval of every three 3 minutes TROUBLE SHOOTING Normal Dim oven light During cooking with low microwave power the oven light may become dim It is normal Steam accumulating on door...

Страница 20: ...rself Please refer to a qualified electrical service department or return to the supplier if servicing is necessary Turn off the oven and remove the power plug from the wall socket before cleaning Kee...

Страница 21: ...pe thoroughly and dry with a soft cloth When it becomes necessary to replace the oven light please consult a dealer to have it replaced The oven should be cleaned regularly and any food deposits remov...

Страница 22: ...ng Proof of purchase is attached A reason is provided for why it is being returned If the supply cord is damaged it must be replaced by the manufacturer or an authorised service agent in order to avoi...

Страница 23: ...his warranty subject to legislative requirements This warranty shall be valid only where the customer has not broken the product himself or used the product for something that it is not supposed to be...

Отзывы: