


17
10. Press the Clock button to confirm the delayed start menu. Now the program has
been activated and the cooking process with start at 14:30 in the afternoon.
11. You may check the starting time at any time by pressing the Clock button.
Note: The digital clock must be set/ programmed by the user. If it is not set/ programmed, then
the delay start function will not work.
A
UTO
C
OOKING
M
ENU
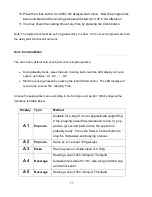
The oven has a default auto cooking menu for simple operation.
During standby mode, press the Auto Cooking button and the LED display will cycle
options as follows: A.1,
A.2 …… A.8
Start the cooking process by pressing the Instant/ Start button. The LED display will
count down to show
the
‘running’ time.
Choose the appropriate menu according to the food type and weight. Strictly observe the
directions the table below.
Display
Type
Method
A.1
Popcorn
Suitable for a bag of corn at approximate weight 85g.
If the
‘popping’ speed has decreased to one (1) pop
per two (2) second interval then the popcorn is
probably ready. Press the Pause/ Cancel button to
stop the microwave and popping process.
A.2
Popcorn
Same as A.1 except 100g weight.
A.3
Pizza
Warm a piece of chilled pizza of 0.15kg.
A.4
Beverage
Heating a cup of 250 ml liquid. The liquid
temperature is about 5-10
℃
. Use a big mouthed cup
and do not seal it.
A.5
Beverage
Heating a cup of 500 ml liquid. The liquid


