background image


www.ruptela.com


[email protected] | +370 5 2045030


 5


Installation 

For faster and easier installation, it is highly recommended to use the 

tachograph harness

. 


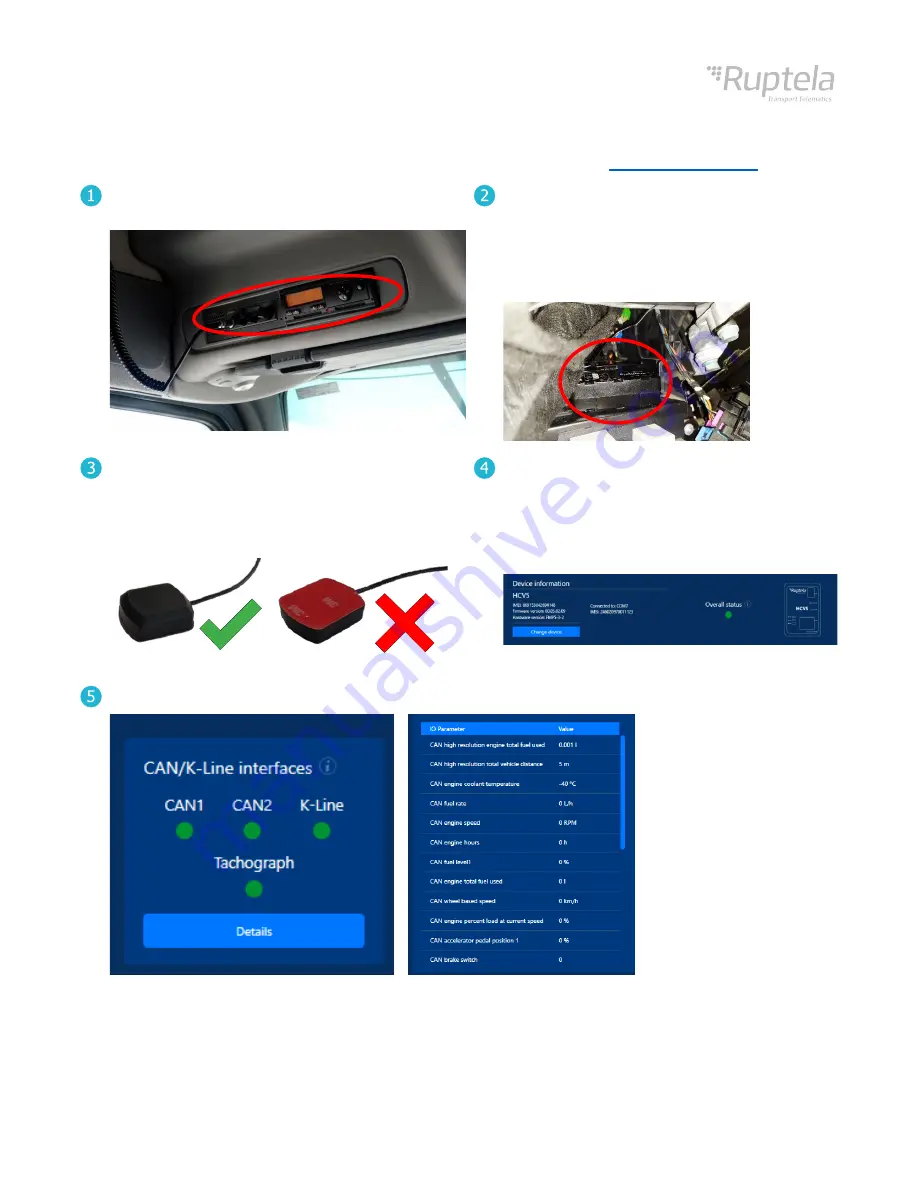
Locate the vehicle tachograph. 
It is usually located on the driver side above the head. 


Install the device in the vehicle using zip-ties. 

Make sure it is secured tightly. 

Connect the device using the tachograph 
harness 

(recommended)

Alternatively, connect the device according to 
the wiring diagram on Page 6. 


Install the GNSS antenna facing towards the sky. 

Follow the recommendations: 


Install behind the dashboard  


Install as close to the window as possible 


Avoid installing near metal surfaces 


Turn on the ignition. 

Test your device using the Device Center 
installation assistant tool. If the Overall status is 

green, then the device is properly installed. If 
the status is red, click the 

Troubleshoot 

button 

for troubleshooting.  


Check what parameters are received by clicking 

Details

 in the 

CAN/K-Line Interfaces

 section. 


Correct 

Incorrect 

Содержание HCV5 Series

Страница 1: ...cro Type B cable A tachograph harness recommended Device overview Indication LEDs Opening handles Grooves for zip ties GNSS antenna port 16 Pin port Micro USB port Audio port 14 Pin port Indication LED patterns LED Pattern Description GNSS Once every second Accurate signal Once every 0 4 seconds No signal Cellular Once every 4 seconds Connected to network and internet Once every second Connected t...

Страница 2: ...Black Digital input 2 6 CAN2 L Blue CAN Low 6 AIN4 White Green Analogue input 4 7 K Line Brown K Line 7 CAN1 L Blue Red CAN Low 8 GND Black Ground 8 GND Black Ground 9 DOUT2 Orange Digital output 2 9 PortC 485 B Yellow Brown RS485 line B 10 1W 5V Red Yellow 1 Wire power 10 PortA RS232 RX Blue Yellow PortA RS232 RX 11 AIN2 Green Analogue input 2 11 PortB RS232 RX Red Cyan PortB RS232 RX 12 AIN1 Gre...

Страница 3: ...r Install device drivers if prompted Click Configure device in the main menu Connect the device to your computer using a USB cable Click Connect device Select your device Open the Connection settings Configure Fleet Management System Main Server settings TrustTrack server settings are entered by default Configure GSM provider APN settings ...

Страница 4: ...Peripherals and interfaces Turn on the CAN1 CAN2 and K Line interfaces in Vehicle interface settings If you are using the tachograph harness for CAN1 set the Tacho read mode Select the required Baudrate Click Save to device to upload the config to the device ...

Страница 5: ...tively connect the device according to the wiring diagram on Page 6 Install the GNSS antenna facing towards the sky Follow the recommendations Install behind the dashboard Install as close to the window as possible Avoid installing near metal surfaces Turn on the ignition Test your device using the Device Center installation assistant tool If the Overall status is green then the device is properly...

Страница 6: ...icle ID CAN tacho driver 1 card CAN tacho driver2 card CAN tacho vehicle motion CAN tacho vehicle overspeed CAN tachograph performance TCO first driver card TCO second driver card TCO first driver ID TCO second driver ID TCO first driver state TCO second driver state Further reading Documentation website https doc ruptela lt User manual https doc ruptela lt pages viewpage action pageId 37683334 De...

Страница 7: ...hould read the same data period file from the tachograph front via a special device and check your file validity with an authorized third party software If the entire file is invalid then there is a problem with your tachograph 5 Q What should I do if there are corrupted tachograph data fields A Please check for the following error in the DDD file Events and fault block Events data part Vehicle un...

Отзывы: