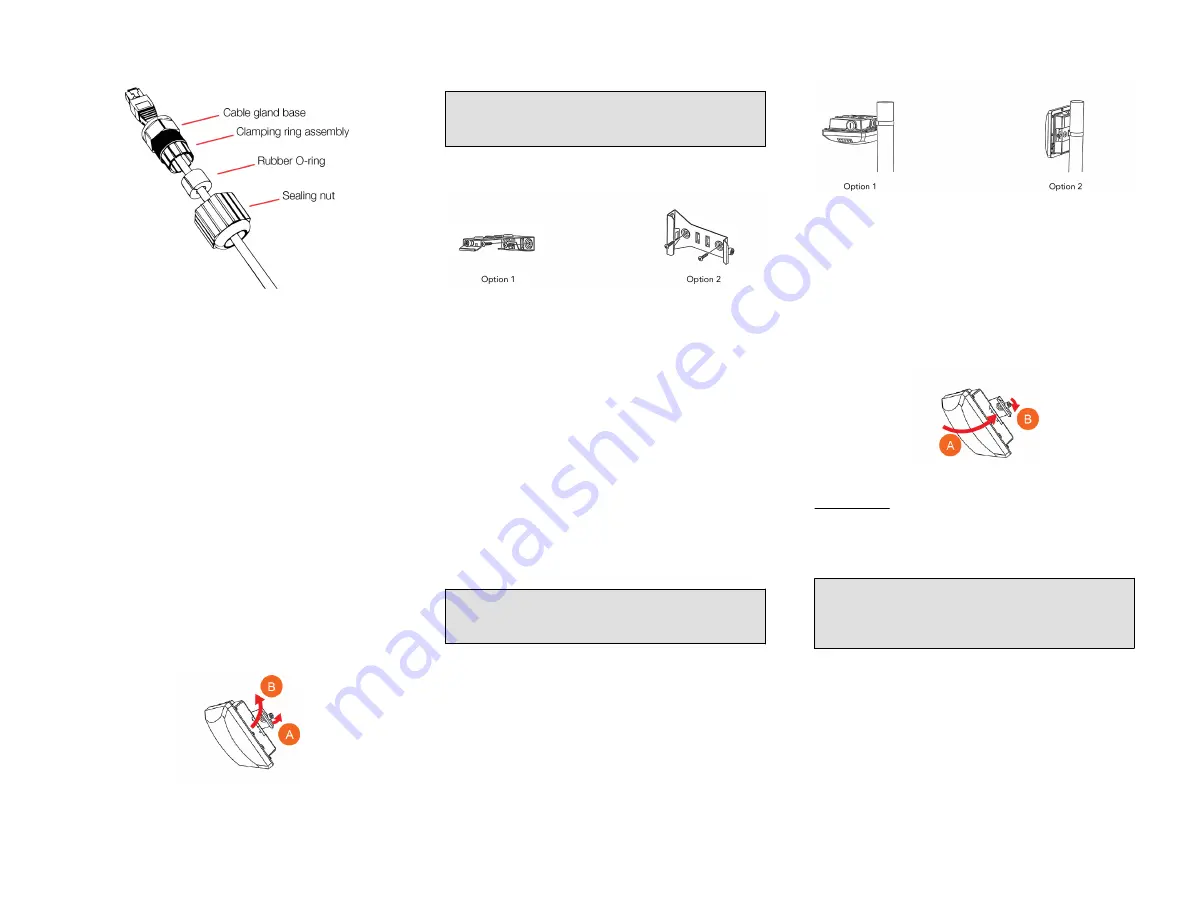
FIGURE 3 RJ-45 cable and cable gland assembly
2. Use a wide flat-blade screwdriver to remove the required
(PoE IN) blanking cap from the AP.
3. Connect the cable to the Ethernet port on the AP.
4. Tighten the cable gland base into the AP chassis to 7 N.m
or 62 in-lbs.
5. Wrap the clamping ring assembly around the rubber O-
ring. Make sure that the clamping ring assembly fully
encloses the rubber O-ring.
6. Seat the clamping ring assembly and rubber O-ring in the
cable gland base.
7. Hand-tighten the sealing nut.
Attaching the Mounting Bracket To A Flat
Surface
1. The AP mounting bracket attaches to the AP using a
captive screw. Use a medium flat-blade or No. 2 Phillips
screwdriver to loosen the captive screw (A in the Figure
below) and pull up on the end of the bracket to remove
the bracket from the AP (B in the Figure below).
FIGURE 4 Removing the mounting bracket
2. Using either of the two options shown in Figure 5, hold
the mounting bracket at the location on the mounting
surface where you want to mount the AP. Use the holes
on the mounting bracket as a template to mark the
locations of the mounting holes.
NOTE: The mounting bracket can be mounted to a
vertical or horizontal surface to support the AP in the
required orientation.
FIGURE 5 Mounting bracket on a flat surface
3. Remove the mounting bracket from the mounting surface.
4. Drill holes required for the customer-supplied mounting
hardware.
5. Attach the mounting bracket to the flat surface using the
mounting hardware.
6. Using the mounting hardware instructions, tighten the
hardware to secure the mounting bracket.
7. Continue with Mounting the AP.
Attaching the Mounting Bracket to a Pole
1. The AP mounting bracket attaches to the AP using a
captive screw. Loosen the screw (A in Figure 4) and pull
up on the end of the bracket to remove the bracket from
the AP (B in the Figure above).
2. Insert the open end of one steel clamp (D in the Figure
above) into two of the slots on the mounting bracket.
NOTE: The mounting bracket can be mounted to a
vertical or horizontal pole to support the AP in the
required orientation.
3. Using either of the two options shown, use the clamp(s) to
attach the mounting bracket to the pole. Tighten the
clamps to 3 N.m or 27 in-lbs, or per manufacturer’s
specifications if the factory-supplied clamps are not used.
4. If necessary, daisy-chain the other steel clamps to
accommodate larger poles.
FIGURE 6 Mounting bracket on a pole
5. Continue with Mounting the AP.
Mounting the AP
1. Snap the AP back onto the mounting bracket (A in the
Figure below), and use a medium flat-blade or No. 2
Phillips screwdriver to tighten the captive screw to 1.1
N.m or 10 in-lbs to secure the bracket to the AP (B).
FIGURE 7 Attaching the mounting bracket to the AP
2. Optional Step: If you also need to lock the mounting
bracket to the AP, then use a matching security
screwdriver to screw the customer-supplied locking
stainless steel 6mm M3 panhead security screw through
the mounting bracket and into the AP chassis.
CAUTION!
Make sure that the customer-supplied
locking stainless steel M3 panhead security screw is no
longer than 6mm. If the security screw is longer than
6mm, it can damage the AP chassis.
Copyright
®
2017 Ruckus Wireless, Inc.
Page 2 of 3
Published September 2017, Part Number 800-71622-001 Rev A


