


81
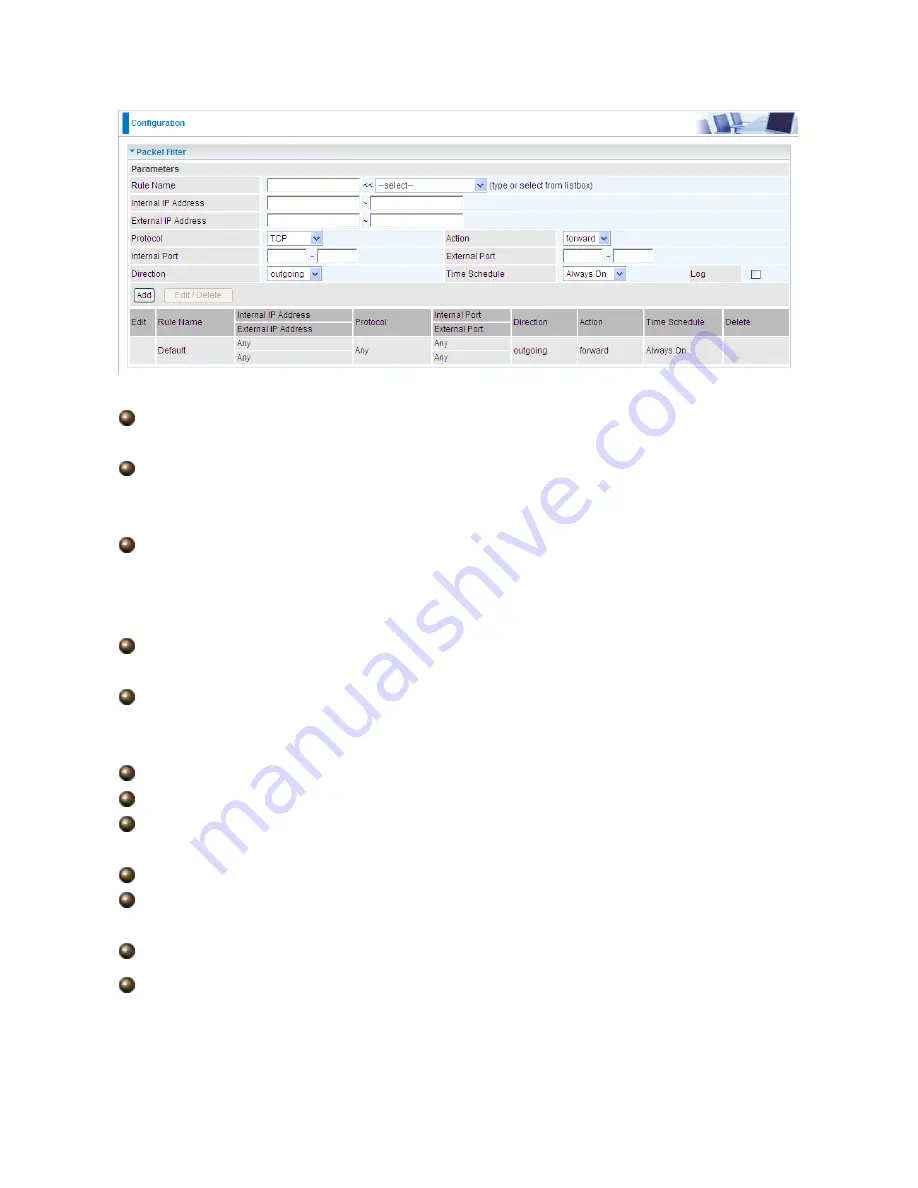
Rule Name:
Users-define description to identify this entry. The maximum name length is
32 characters, and then can choose application that they want from listbox.
Internal IP Address / External IP Address:
This is the Address-Filter used to allow or
block traffic to/from particular IP address(es). Input the range you want to filter out. If you
leave empty or 0.0.0.0, it means any IP address.
Protocol:
Specify the packet type (TCP, UDP, ICMP, etc.) that the rule applies to.
Select
TCP
if you wish to search for the connection-based application service on the remote
server using the port number. Or select
UDP
if you want to search for the connectionless
application service on the remote server using the port number.
Action:
If a packet matches this filter rule,
Forward (allows the packets to pass)
or
Drop (disallow the packets to pass)
this packet.
Internal Port:
This Port or Port Range defines the ports allowed to be used by the
Remote/WAN to connect to the application. Default is set from range
0 ~ 65535.
It is
recommended that this option be configured by an advanced user.
External Port:
This is the Port or Port Range that defines the application.
Direction:
Determine whether the rule is for outgoing packets or for incoming packets.
Time Schedule:
It is self-defined time period. You may specify a time schedule for your
prioritization policy. For setup and detail, refer to
Time Schedule
section.
Log:
Choose “log” if you wish to generate logs when the filer rule is applied to a packet.
Add:
Click this button to add a new packet filter rule and the added rule will appear at the
bottom table.
Edit:
Check the Rule No. you wish to edit, and then click “Edit”.
Delete:
Check the Rule No. you wish to delete, and then click “Delete”.
Содержание BEC 7300N
Страница 1: ...BEC 7300N 802 11n draft ADSL2 Firewall Router User Manual...
Страница 3: ...3 5 5 Restart 114 5 6 Logout 115 Chapter 6 116...
Страница 9: ...9 1 3 Applications of the BEC 7300N...
Страница 25: ...25 9 Congratulations You ve completed the setup procedure and you are now ready to surf the Internet enjoy...
Страница 54: ...54 Step 7 WPS set up complete And you have set up security enabled Wi Fi networks...
Страница 56: ...56 Step 4 Enter the AP SSID and apply Next button...


