


39
Remove all power from the furnace, and if an UPS or EPS is installed,
locate and shut off the unit. Remove all side covers, completely
exposing all lamp terminations.
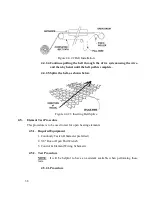
Using the schematic as a reference, locate the bus bars linking the
elements in each zone. The bus bars are made from aluminum, and are
connected to the lamp terminal screws.
Starting at the front of the furnace, remove the bus bars for only zone 1
(top & bottom), taking note of which terminals the bus bars were
connected to. Using the multimeter on ohms scale, and a technician on
either side of the furnace, check each lamp by measuring the resistance
across the terminations of the lamp. If the resistance is less than 10
ohms, the element is good. If resistance is greater, replace the element
following the procedure in section 3.3 of the manual. Next, check the
bottom half of the zone in the same manner. After verifying the top and
bottom lamps, replace the bus bars on the proper terminals, and securely
tighten all hardware.
Following the same procedure, check the other zones, one at a time,
throughout the furnace.
Once the elements have been completely tested, replace the top and
bottom covers on the furnace. Turn on the EPS/UPS (if so equipped)
and power to the furnace. Bring the furnace up to temperature, and,
next, run a profile verifying that no leaks occurred around the lamps that
were replaced.
The procedure is now complete.
Содержание 2115150301
Страница 23: ...22 Figure 3 8 1 1 Event Logging ...
Страница 44: ...43 Section 6 PRODUCT SPECIFICATION 6 PRODUCT SPECIFICATION ...
Страница 62: ...61 View Product Tracking ...
Страница 83: ...82 ...


