


PEARL Owner's Manual
19
RSF Woodburning Fireplaces
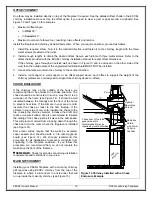
OFFSET CHIMNEY
An elbow may be installed directly on top of the fireplace if required. See the detailed offset charts in the EXCEL
chimney installation manual. Use the offset option if you need to clear a joist or pass around a cupboard. See
Figure 12 and Figure 13 for examples.
•
Maximum offset angle:
•
In
USA
: 30°;
•
In
Canada
: 45°.
•
Maximum number of elbows: four, resulting in two offsets and returns.
Install the fireplace and chimney as described earlier. When you require an elbow, proceed as follows:
1. Install the required elbow. Turn it in the desired direction, and fasten it to the chimney length with the three
metal screws provided at the joints.
2. Install enough lengths to obtain the desired offset. Secure each joint with three metal screws. Refer to the
offset charts provided with the EXCEL chimney installation manual for exact offset dimensions.
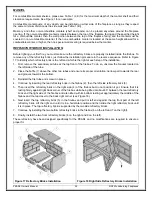
If the chimney goes through an outside wall as shown in Figure 13 and is enclosed on the other side of the
wall, then the outside plate of the angled wall rediation shield MUST NOT be installed.
3. Use another elbow to return the chimney to the vertical direction.
4. Install a roof support, a wall support, or an offset support above each offset to support the weight of the
chimney (elbows are not designed to support the chimney above an offset).
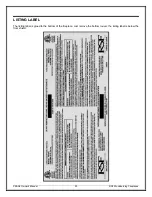
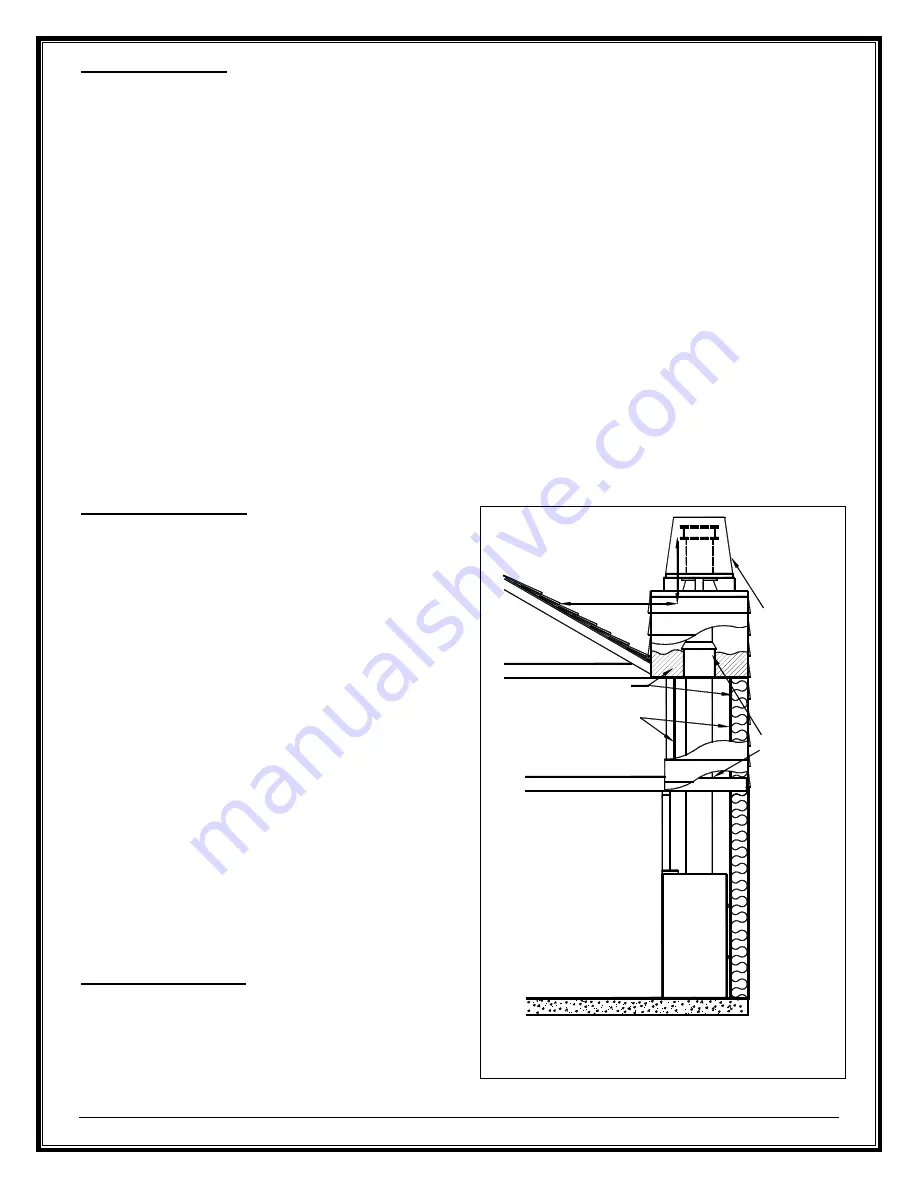
CHASE ENCLOSURE
If the chimney runs up the outside of the house, we
recommend that it be enclosed in a chase structure. The
chase should be constructed in such a way that it is an
extension of the home (see Figure 14). It should be well
insulated between the footings and the floor of the home
to prevent heat loss. If the climate in your area is mild,
insulate the chase at least to the first firestop. If the
climate in your area is very cold, insulate the chase to the
top to keep the chimney warmer, increase the draft, and
reduce creosote buildup. We also recommend to insulate
the ceiling of the chase just as if it were in the attic space.
This will prevent cold air from dropping down through the
chase and into the room where the fireplace is installed
(see Figure 14).
Some local codes require that the walls be insulated,
vapor sealed and sheathed with a fire rated gypsum
board (see Figure 14). We strongly recommend this
procedure for all installations to prevent cold drafts from
originating in the fireplace enclosure. If you follow this
procedure, we recommend that you do not insulate the
wall above the front of the fireplace.
REMEMBER:
Check local codes concerning installation
requirements and restrictions in your area.
MASONRY CHIMNEY
Installing your PEARL fireplace with a masonry chimney
still requires using EXCEL chimney from the top of the
fireplace to where it will connect to a listed liner that will
run up inside the masonry chimney (see Figure 15).
Figure 14 Chimney Installed with a Chase
Enclosure Example
10'
2' min.
Optional
Decorative
Shroud
Insulation
Chase liner of fire rated
gypsum board is
recommended (may be
required by local authorities)
Radiation
Shield,
with Storm
Collar in
the Attic
RSF
Fir
ep
lac
e


