background image

ORACLE2 Owner's Manual 

11 

RSF Woodburning Fireplaces 

CEILING CLEARANCE 

Ceiling clearance is the distance from the base of the fireplace to the ceiling. If you vent the fireplace enclosure, 
you can then have a lower ceiling clearance as specified in Table 1 (C) for a vented enclosure.  

For a vented enclosure, you MUST install regular venting 3"x10" grilles or larger into holes cut within 1" of both 
the floor and the ceiling, to allow room air to circulate through the fireplace enclosure and reduce heat buildup. 
These venting grilles may be placed vertically or horizontally. 

Under no circumstances should the distance between the ceiling firestop and the base fireplace be less than the 
dimension specified in Table 1 (C). 

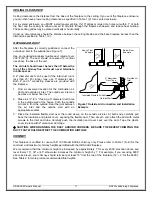
OUTSIDE AIR DUCT 

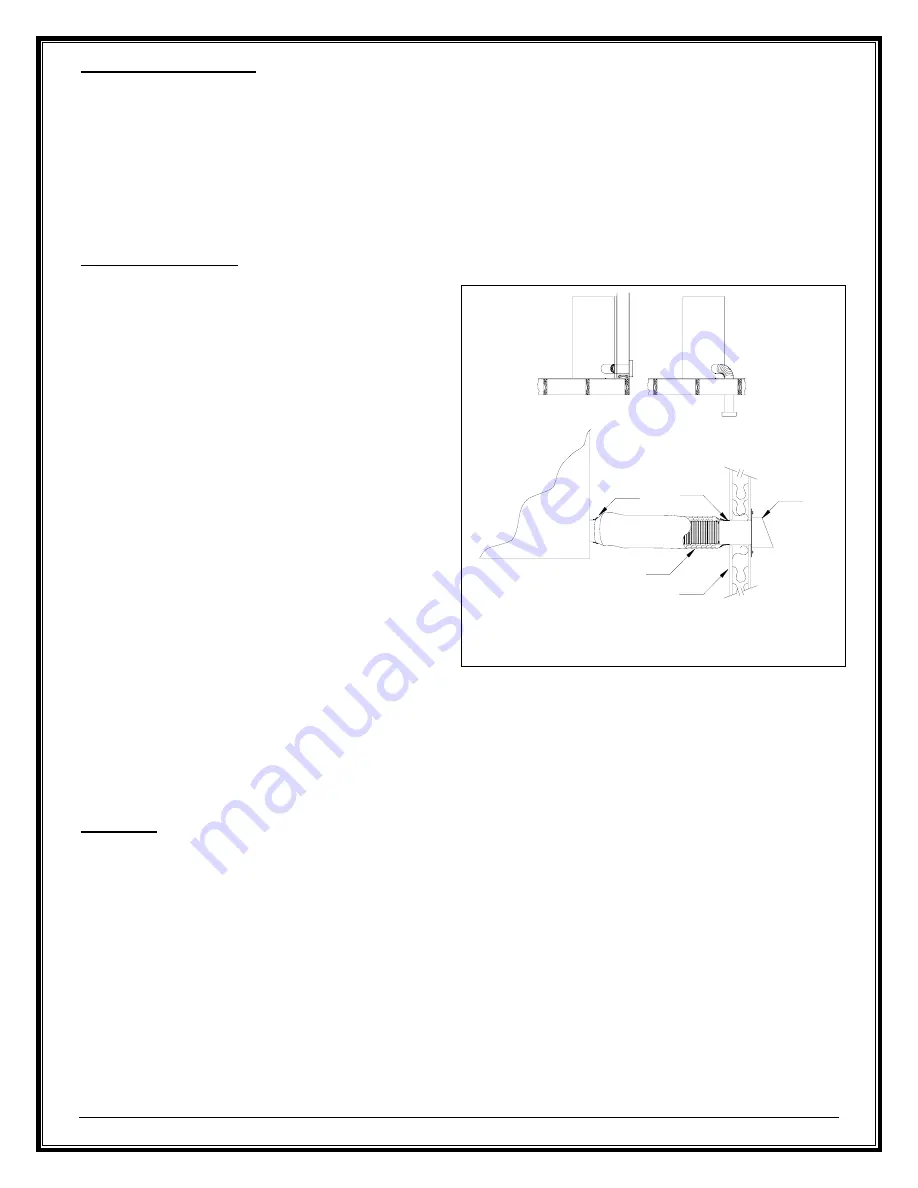
After the fireplace is correctly positioned, connect the 
outside air inlet to the outside (see Figure 7). 

Use an insulated aluminium flexible duct rated at over 
200°F (93°C). The duct should not exceed 12' vertical 
rise above the base of the unit.  

The air inlet should never be less than 5' below the 
top of the chimney flue and must never terminate 
in attic spaces. 

A 4" diameter duct can be used if the total duct run is 
less than 25'. For longer runs, use 5" diameter duct. 
Both 4" and 5" connecting sleeves are provided with 
the fireplace. 

1.  Find a convenient location for the combustion air 

duct and outside air inlet. The outside air inlet can 
be above or below floor level. 

2.  Make a 4 ¼" (5 ¼" if using a 5" diameter duct) hole 

in the outside wall of the house. Push the outside 
air inlet in from the outside. Seal the joint between 
the air inlet and the outside wall with an 
appropriate sealant. 

3.  Place the insulated flexible duct over the round sleeve on the outside air inlet. At both ends, carefully pull 

back the insulation and plastic cover, exposing the flexible duct. Then at each end, attach the duct with metal 
screws to the inlet and tube. Carefully push the insulation and cover back over the duct. Tape the plastic 
cover in place with 2" aluminium duct tape. 

™

 CAUTION: WHEN RUNNING THE DUCT AROUND CORNERS, BE SURE TO PREVENT CRIMPING THE 

DUCT THAT WOULD RESTRICT THE COMBUSTION AIRFLOW. 

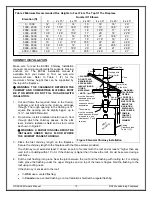
CHIMNEY 

This fireplace is certified for use with 8" ICC Model EXCEL chimney only. Please refer to Table 1 (D-E) for the 
minimum and maximum chimney heights permitted with the ORACLE2 fireplace. 

We recommend that the minimum height be increased by approximately 1' for every 2000' elevation above sea 
level. Every 15°, 30° or 45° elbow also increases the minimum height by 1'. For example, if you are living 6000' 
above sea level, your chimney should terminate at least 15' from the top of the fireplace (12' + 3' for the 6000'). 
See Table 2 for more precise recommended flue heights. 

Above Floor

Example

Below Floor
Example

R

S

F

Fi

re

pl

ac

e

R

S

F

Fi

re

pl

ac

e

R

S

F

Fi

re

pl

ac

e

2" Aluminium

Duct Tape

Insulated Flexible Air Duct

Outside Wall

Outside Air

Inlet


Figure 7 Outside Air Connection and Installation 
Example 

Содержание ORACLE2

Страница 1: ...RSF IIR2_2010 04 Owner s Manual Residential Factory Built Fireplace Operation Maintenance Installation ORACLE2 Keep these instructions for future use ...

Страница 2: ... Woodburning Fireplaces Team March 2009 TABLE OF CONTENTS SAFETY FIRST 3 DO S AND DONT S 3 CREOSOTE FORMATION AND REMOVAL 3 GENERAL SPECIFICATIONS 4 CONTROLLING THE HEAT OUTPUT 4 OPTIONS 4 UNIT DIMENSIONS AND CLEARANCES 5 OPERATION 6 FUEL 6 FIRST FIRES 6 LIGHTING 6 CONTROLLING THE FIRE 6 REFUELING 7 TROUBLESHOOTING PROBLEMS 7 MAINTENANCE 7 GENERAL CLEANING 7 PAINT 7 GLASS CLEANING 7 CHIMNEY CLEANI...

Страница 3: ...ards 7 DO keep all combustible materials furniture firewood etc at least 4 away from the front of the fireplace 8 DO NOT use a fireplace grate or other products not specified for use with this fireplace NOTE We strongly recommend that our products be installed and serviced by professionals who are certified by the National Fireplace Institute in the U S or by Wood Energy Technology Transfer Inc in...

Страница 4: ...tyle by adding decorative trims to your cast iron doors gold plated FO NDTG or pewter plated FO NDTP To simplify the installation of thin non combustible materials such as ceramic tile or sliced brick we have designed a rock retainer kit FO KR It is not designed or required for full brick or stone Thin materials can also be installed directly on the face of the ORACLE2 using high temperature silic...

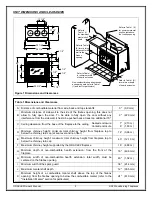
Страница 5: ... the door without any interference from the side wall it has to be pushed back at least an additional 10 9 229 mm C Ceiling clearance from the base of the fireplace to the ceiling Sealed enclosure Vented enclosure 7 6 2 13 m 1 83 m D Minimum chimney height minimum total chimney height from fireplace top to below the chimney rain cap at sea level and no offset 12 3 66 m E Maximum chimney height max...

Страница 6: ... metal The odor may be strong enough to set off your smoke detector Open the doors and windows to allow the room to properly ventilate Before the first fire be absolutely sure to use regular dish soap and water to wipe off all fingerprints and debris from the gold plating if you have chosen this option The plating cures during this first fire the acid from your finger prints will permanently etch ...

Страница 7: ...high heat paint and plating can be cleaned with a soft damp cloth Use a mild detergent and water Do not use abrasive cleaners PAINT You can touch up the face of the ORACLE2 with Stove Bright Metallic Black high temperature paint which is available at most fireplaces dealers Follow the directions outlined on the spray can DO NOT attempt to paint the fireplace while it is still warm Keep the spray c...

Страница 8: ...door onto the door gasket If the door gasket is worn or damaged to the point where the seal is not adequate as described above then remove and replace the gasket Replacement kits are available from your RSF dealer To insure a proper seal you need to adjust the tightness of the door against the front of the fireplace as follows 1 To tighten the left side of the door slightly loosen the screws holdi...

Страница 9: ...alant with insulation or any other material LOCATION Your ORACLE2 fireplace may be installed without any special floor reinforcement see Figure 5 We recommend that you take the time to plan your entire installation fireplace chimney and options before beginning the actual installation refer to Figure 6 Dimensions of the fireplace along with clearances are shown in Figure 1 and Table 1 WARNING IF T...

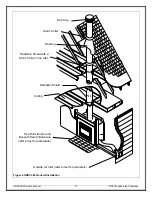
Страница 10: ...ap Storm Collar Flashing Radiation Shield with a Storm Collar in the Attic Ceiling Radiation Shield Hearth Extension and Beneath Hearth Extension refer to text for particulars Outside Air Inlet refer to text for particulars Figure 6 ORACLE2 General Installation ...

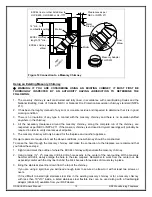
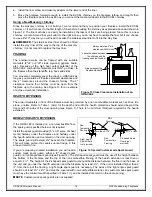
Страница 11: ... inlet can be above or below floor level 2 Make a 4 5 if using a 5 diameter duct hole in the outside wall of the house Push the outside air inlet in from the outside Seal the joint between the air inlet and the outside wall with an appropriate sealant 3 Place the insulated flexible duct over the round sleeve on the outside air inlet At both ends carefully pull back the insulation and plastic cover...

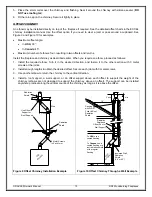
Страница 12: ...ed using a roof brace 4 Put the roof flashing into place Seal the joint between the roof and the flashing with roofing tar For sloping roofs place the flashing under the upper shingles and on top of the lower shingles Nail the flashing to the roof using roofing nails If the chimney is enclosed to the roof In USA use a vented flashing In Canada use a vented flashing or a roof radiation shield with ...

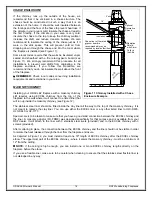
Страница 13: ...er section with 3 metal screws at the joints 2 Install enough lengths to obtain the desired offset Secure each joint with 3 metal screws 3 Use another elbow to return the chimney to the vertical direction 4 Install a roof support a wall support or an offset support above each offset to support the weight of the chimney elbows are not designed to support the chimney above an offset The support can ...

Страница 14: ...nect to a listed liner that will run up inside the masonry chimney see Figure 12 The stainless steel liner should be fitted inside the clay liner all the way to the top of the masonry chimney It is not meant to replace the clay liner You can use either the EXCEL liner or any other listed liner to ULC S635 ULC S640 or UL 1777 Special care is to be taken to make sure that you have a good solid conne...

Страница 15: ...are respected as per NBC or NFPA 211 If the masonry chimney is enclosed in drywall openings will probably be required in order to verify clearances at all points 5 The masonry chimney will only be used for the fireplace and no other appliance If major repairs are required to meet the above conditions a new chimney should be constructed To make the hole through the masonry chimney and make the conn...

Страница 16: ... tile stone or slate Refer to Table 1 G H for the depth and width the hearth protection should extend beyond the front and both sides of the door opening see Figure 1 There is no minimum thickness required for the hearth extension BENEATH HEARTH EXTENSION If the ORACLE2 is installed on a non combustible floor the spark guard specified below is not required Install the spark guard provided 5 x 36 p...

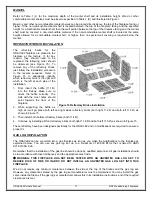
Страница 17: ...to orient the baffle correctly The side with the most holes should point towards the floor of the fireplace 2 While supporting the baffle as high as it will go place both left and right sides refractory bricks both right 11 2 R and both left 11 3 R as shown in Figure 15 3 Then install both bottom refractory bricks both 11 4 R 4 Continue by installing all front refractory bricks both right 11 6 R a...

Страница 18: ...nd half way between both doors They should be 6 spaced apart center to center and centered between both side refractory bricks 4 The right side refractory bricks 11 2 R already have a hole to allow the gas line through You only need to clean out the gray sealant out of the hole on the selected installation side to be able to pass the gas line through and into the firebox 5 Make sure to leave the f...

Страница 19: ...ORACLE2 Owner s Manual 19 RSF Woodburning Fireplaces LISTING LABEL ...

Страница 20: ...laces COMPLETE OPTIONS LIST Electricity required FO D Gravity Vent Damper FO FDGRK3 Gasket Replacement Kit FO FDM8 Masonry Chimney Adapter 8 FO KR Rock Retainer Kit FO NDTG Decorative Trims Gold FO NDTP Decorative Trims Pewter FO V2 Gravity Vent Kit ...

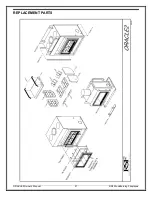
Страница 21: ...ORACLE2 Owner s Manual 21 RSF Woodburning Fireplaces REPLACEMENT PARTS ...

Страница 22: ...ORACLE2 Owner s Manual 22 RSF Woodburning Fireplaces ...

Страница 23: ...acked refractory components Repairs or replacements necessitated by vandalism neglect abuse over firing improper fuel or fuel loads or failure to adequately service the unit as stated in the owner s manual Repairs or replacements particularly charges for travel and labor not authorized by RSF Woodburning Fireplaces in advance LIMITATIONS All items found to be defective will be replaced or repaired...

Отзывы: