RS Components AIRCLIK Скачать руководство пользователя страница 19

19

GB

WARNING:

The earth connection must be achieved according to the industrial safety 
standards (EN 60204).
The plug of the power supply cable must not be used as a switch but 
must be plugged into a power socket that is controlled by a suitable 
differential switch (magneto thermal switch).

STARTING

Make sure that the mains voltage corresponds to that indicated on the 
electrical data nameplate (fi g. 8), the admitted tolerance range must 
remain within ± 5%.

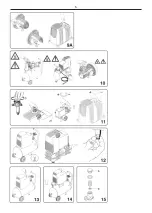
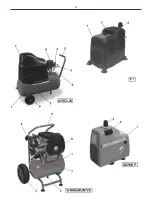
COMPRESSOR WITH TANK (Fig. 20):

 Turn or press, depending on the 

type of pressure switch fi tted on the equipment, the knob situated in the 
upper part to «0» (fi g. 9).
Put the plug in the power socket (fi g. 7) and turn the knob to «I». Attach 
the rubber hose or the spiral type hose to the appropriate fi tting situated 
near the pressure switch (fi g.25).
The compressor runs in a completely automatic manner and is controlled 
by the pressure switch that stops it when the pressure inside the tank 
reaches the maximum pressure and starts it again when the pressure 
falls back down to the minimum level.
The difference in pressure is usually 2 bar (29 psi) roughly between the 
maximum and minimum value.
I.e.: the compressor stops when it reaches 8 bar (116 psi) (max. running 
pressure) and is automatically re-started when the pressure inside the 
tank falls to 6 bar (87 psi).
After having connected the compressor to the electrical power supply 
line, load to the maximum pressure and check the correct effi ciency of 
the machine.

COMPRESSOR WITHOUT TANK (Fig. 21)

: Put the plug in the power 

socket (fi g. 7). Press the starting push button situated at the side of the 
compressor (fi g. 9A).  This type of compressor is provided with a device 
that automatically controls the maximum working pressure even if the 
user is not using compressed air. The compressor automatically releases 
the excess air from a valve situated on the head.  The compressor 
does not stop automatically. Use the ON/OFF push button to stop the 
compressor.
Attach the rubber hose or the spiral type hose to the appropriate fi tting 
situated at the top of the compressor, near the gear motor (fi g. 25).

NOTE:

The head/cylinder/delivery hose unit situated beneath the panelling may 
reach high temperatures therefore be careful when working near these 
components and do not touch them to avoid getting burned (fi g. 10).

WARNING

The electric compressors must be connected to a power socket that is 
safeguarded by a suitable differential switch (magneto thermal switch).
 

ADJUSTING THE WORKING PRESSURE 

(fi g. 11)

It is not always necessary to use the maximum working pressure, on the 
contrary the pneumatic tool usually requires less pressure.
Adjust the working pressure accurately in compressors provided with 
pressure regulators.
Release the knob of the pressure regulator by pulling it outwards, 
adjust the pressure to the desired value by turning the knob clockwise 
to increase it and anti-clockwise to decrease it.  Once the ideal pressure 
has been reached, block the knob by pushing it downwards (fi g. 11). In 
the case of pressure regulators supplied without a gauge, the calibration 
pressure may be seen on the graduated scale situated on the casing 
of the actual regulator.
In the case of pressure regulators supplied with a gauge, the calibration 
pressure may be seen on the actual gauge.
WARNING: Some pressure regulators do not have “push to lock”, 
therefore simply turn the knob to adjust the pressure. 

MAINTENANCE

Before servicing the compressor make sure that:
-  the main line ON/OFF switch is on «0».
-  the pressure switch or the line switch is on «0».
-  there is no pressure in the air tank (only for model with tank).
The compressor generates condensate that accumulates in the tank.
The condensate must be drained from the tank at least once a week 
by opening the discharge tap (fi g. 12) underneath the tank (only for 
model with tank).
Be careful if there is any compressed air within the cylinder as the 
water could burst out with some force.  Recommended pressure 1 ÷ 
2 bar max.

RECOMMENDED MAINTENANCE

In units F with 2 poles, replace the whole connecting rod unit every 700 
hours of operation.
In units F with 4 poles, replace the whole connecting rod unit every 
1500 hours of operation.
In units GMS and VS, replace the sliding blocks and the compression 
ring every 1500 hours of operation.
 

LUBRICATING THE BEARINGS

All the bearings are lubricated with grease for life with the exception of 
the roller casing fi tted on the connecting rod side of the GMS and VS 
units which is to be washed with solvent and re-lubricated with “Kluber 
Barrierta L 55/2” grease every 1500 hours of operation (white grease).  
The grease must completely fi ll the spaces between the rollers; excess 
lubricant will be expelled during the initial hours of operation.

CLEANING THE FILTER (F-ECU-GMS-VS Series-AIRCLIK-F 1)

It is advisable to dismantle the suction fi lter every 50 hours of use and to 
clean the fi ltering element by blowing it with compressed air, or replace 
it if the element pointed out by the arrow is clogged.

HOW TO PROCEED WHEN TRIVIAL ANOMALIES

ARE ENCOUNTERED

Loss of air from the valve underneath the pressure switch (only 
model with tank)

This inconvenience is due to the imperfect seal of the non-return valve; 
proceed as follows: (fi g. 13).
Release all the pressure from the tank.
Remove the panelling by unscrewing the four securing screws and lift 
it. (fi g. 13-14)


(

F 1 and AIRCLIK

) .

Unscrew the hexagonal head of the valve (A)(fi g.15).
Carefully clean the small rubber disk (B) and also its seat (fi g.15).
Re-fi t everything accurately.

Loss of air (F-GMS-VS Series)

This may be due to the poor seal of one of the fi ttings.  Check all the 
fi ttings by wetting them with soapy water.

The compressor runs but fails to load

F-GMS-VS series compressors: (fi g.16)
-  This may be due to a breakage of the valve, or a gasket (B1-B2).  

Replace the damaged component.

-  This may be due to a breakage of the valves (C1-C2), or a gasket 

(B1-B2). Replace the damaged component (fi g.16B).

AirClik-F 1 series (fi g. 16A):
-  This may be due to the breakage of the valves (C1 - C2) or of the 

gasket (B1). Replace the damaged part (fi g. 16A).

The compressor fails to start

If the compressor has diffi culty in starting, make sure that:
-  the mains voltage corresponds to that indicated on the data nameplate 

(fi g. 8)

-  electrical extension cables with unsuitable cross-section or length 

are not used.

Содержание AIRCLIK

Страница 1: ...P S I AVVERTENZE Prima di utilizzare il compressore leggere attentamente le istruzioni riportate nel seguente manuale GB WARNING Please read understand this manual before operating the com pressor F AVVERTISSEMENT Vauillez lire attentivement toutes les instructions avant de mettre à la sécurité D HINWEIS Vor der Benutzung des Kompressors die im vorliegenden Handbuch enthaltenen Anweisungen aufmerk...

Страница 2: ... installerar använder eller utför underhållsarbete på kompressorn I RISCHIO DI SCOSSA ELETTRICA Attenzione prima di effettuare ogni intervento sul compressore è obbligatorio disattivare l alimentazione elettrica sulla macchina stessa GB RISK OF ELECTRIC SHOCK Caution before doing any work on the compressor it must be disconnected from the power supply F RISQUE DE DECHARGE ELECTRIQUE Attention avan...

Страница 3: ...ne il compressore potrebbe ripartire in caso di black out e successivo ripristino di tensione GB RISK OF ACCIDENTAL START UP Attention the compressor could start automatically in case of a black out and subsequent reset F RISQUE DE DEPART ACCIDENTEL Attention le compresseur est susceptible de redemarrer automatiquement en cas de black out et retablissement successif de la tension D GEFÄHR EINES UN...

Страница 4: ...4 ...

Страница 5: ...5 ...

Страница 6: ...6 ...

Страница 7: ...7 ...

Страница 8: ...8 ...

Страница 9: ... MANICO HANDLE POIGNEE SCHLAUCH HANDVAT HANK MANIJA ASA KAHVA HANDTAG MOD ECU 1 SERBATOIO TANK RESERVOIR KESSEL TANK BEHOLDER DEPÓSITO DEPÓSITO SÄILIÖ TANK 2 SCARICO CONDENSA CONDENSATE DRAIN EVACUATION CONDENSATION AUSLASS KONDENSWASSER AFVOER CONDENSWATER TØMNING AF KONDENSVAND DESAGÜE DEL CONDENSADO PURGA DA CONDENSAÇÃO KONDENSSIVEDEN TYHJENNYS KONDENSVATTNETS AVLOPP 3 CARENATURA DI PROTEZIONE ...

Страница 10: ...US SKYDDSBEKLÄDNAD 7 VALVOLA DI RITEGNO CHECK VALVE VANNE DE RETENNE RÜCKSCHLAGVENTIL TEGENHOUDKLEP KONTRAVENTIL VÁLVULA DE RETENCIÓN VÁLVULA DE RETENÇÃO TAKAISKUVENTTIILI STOPPVENTIL MOD AIRCLIK 1 SERBATOIO TANK RESERVOIR KESSEL TANK BEHOLDER DEPÓSITO DEPÓSITO SÄILIÖ TANK 2 SCARICO CONDENSA CONDENSATE DRAIN EVACUATION CONDENSATION AUSLASS KONDENSWASSER AFVOER CONDENSWATER TØMNING AF KONDENSVAND D...

Страница 11: ...rruttore del pressostato sia nella posizione OFF prima di collegare il compressore alla fonte elettrica 7 STOCCARE IL COMPRESSORE IN MANIERA APPROPRIATA Quando il compressore non è utilizzato deve essere tenuto in un locale secco al riparo dagli agenti atmosferici Tenere lontano dai bambini 8 AREA DI LAVORO Tenere la zona di lavoro pulita eventualmente liberare l area da utensili non necessari Ten...

Страница 12: ...ANDO IL CAVO DI ALIMENTAZIONE Utilizzare l interruttore O I ON OFF del pressostato per arrestare il compressore 30 CIRCUITO PNEUMATICO Utilizzare tubi utensili pneumatici raccomandati che sopportano una pressione superiore o uguale alla massima pressione di esercizio del compressore I PEZZI DI RICAMBIO Per le riparazioni utilizzare unicamente pezzi di ricambio originali identici ai pezzi sostituit...

Страница 13: ...ccensione posto sul fianco del compressore fig 9A Questo tipo di compressore senza serbatoio ha un dispositivo che regola automaticamente la massima pressione di esercizio anche se l utilizzatore non usa aria compressa Il compressore scarica automaticamente l aria in eccesso da una valvola posta sulla testa Il compressore non si arresta automaticamente Per spegnere il compressore agire sul pulsant...

Страница 14: ...oio in pressione accertarsi sempre che il serbatoio sia scarico Èvietatoeffettuarefori saldatureodeformarevolutamenteilserbatoio dell aria compressa Non eseguire operazioni sul compressore senza prima avere disinserito la spina dalla presa di corrente Temperatura ambiente per un corretto funzionamento 0 C 25 C MAX 45 C Non indirizzare getti d acqua o liquidi infiammabili sul compressore Non posizi...

Страница 15: ...zare sempre tubi pneumatici per aria compressa che abbiano caratteristiche di massima pressione adeguate a quelle del compressore Non cercare di riparare il tubo se difettoso CI RISERVIAMO DI APPORTARE QUALSIASI MODIFICA SENZA PREAVVISO OVE NECESSARIO ...

Страница 16: ...16 ...

Страница 17: ...Keep out of reach of children Lock out the storage area 8 KEEP WORK AREA CLEAN Cluttered areas invite injurues Clear all work areas of unnecessary tools debris furniture etc 9 KEEP CHILDREN AWAY Do not let visitors contact compressor extension cord Alla visitors should be kept safely away from work area 10 DRESS PROPERLY Do not wear loose clothing or jewerly They can be caught in moving parts Wear...

Страница 18: ...have three prong grounding type plugs and three pole receptables that accept the compressor s plug Replace or repair damaged cord Make sure your extension cord is in good condition When using an extension cord be sure to use one heavy enough to carry the current yourproductwilldraw Anundersizedcordwillcauseadropinlinevoltage resulting in loss of power and overheating Table shows the correct size t...

Страница 19: ... gauge the calibration pressure may be seen on the graduated scale situated on the casing of the actual regulator In the case of pressure regulators supplied with a gauge the calibration pressure may be seen on the actual gauge WARNING Some pressure regulators do not have push to lock therefore simply turn the knob to adjust the pressure MAINTENANCE Before servicing the compressor make sure that t...

Страница 20: ... place flammable objects near the compressor When stopped temporarily during its use turn the pressure switch or the ON OFF switch to position 0 OFF turned off Never direct the jet of air towards people or animals fig 24 Do not transport the compressor when the tank is pressurised Be aware that some components of the compressor such as the head and delivery hoses may reach high temperatures theref...

Страница 21: ... transporter le compresseur alors qu il est encore raccordé à sa source d alimentation ou que le réservoir d air comprimé est plein Bien s assurer que le sélecteur de l interrupteur barométrique se trouvesurlaposition OFF arrêt avantderaccorderlecompresseur à son alimentation 7 ENTREPOSER CORRECTEMENT LE COMPRESSEUR Veiller à ce qu il soit hors de portée des enfants Fermer à clé le local d enterpo...

Страница 22: ...vidange et incliner le compresseur pour vider l eau qui s est accumulée 30 NE PAS ARRÊTER LE COMPRESSEUR EN TIRANT SUR LA FICHE Utiliser la position AUTO OFF du sélecteur de l interrupteur barométrique 31 POUR LE CIRCUIT PNEUMATIQUE N UTILISER QUE DES PIÈCES RECOMMADÉES SUPPORTANT UNE PRESSION SUPÉRIEURE OU ÉGALE À 125PSI l y a risque d explosion N utiliser que des pièces pneumatiques recommandées...

Страница 23: ... valeur minimum est généralement de 2 bars 29 psi Ex le compresseur s arrête lorsqu il atteint 8 bars 116 psi pression max d exercice et se remet automatiquement en marche lorsque la pression à l intérieur du réservoir est tombée à 6 bars 87 psi Après avoir branché le compresseur sur la ligne électrique charger à la pression maximum et vérifier le bon fonctionnement de la machine COMPRESSEUR SANS ...

Страница 24: ...te pas uniquement pour les modèles avec réservoir Si le compresseur ne s arrête pas une fois que la pression maximum a été atteinte la vanne de sécurité du réservoir se mettra en marche Il est nécessaire de contacter le centre de service après vente autorisé le plus proche pour la réparation ATTENTION Eviter absolument de dévisser tout raccord lorsque le réservoir est sous pression toujours vérifi...

Страница 25: ...adaptées à celles du compresseur Ne pas chercher à réparer le tuyau s il est défectueux Utiliser des outils pneumatiques aux caractéristiques de pression maximum appropriées à celles du compresseur EN CAS DE NECESSITE NOUS NOUS RESERVONS LE DROIT D APPORTER TOUTE MOD IFICATION NECESSAIRE SANS PREAVIS CONSEILS UTILES POUR UN FONCTIONNEMENT CORRECT AIRCLIK F 1 LES MODÈLES F 1 ET AIRCLIK SONT STRUCTU...

Страница 26: ...26 F ...

Страница 27: ...en bevor Arbeiten zur Reparatur Inspektion Wartung Reinigung oder zum Auswechseln von Bauteilen vorgenommen werden 6 VERSEHENTLICHES EINSCHALTEN Den Kompressor nicht transportieren wenn er an die elektrische Energiequelle angeschlossen ist oder wenn der Kessel unter Druck steht Vor dem Anschießen des Kompressors an die elektrischen Energiequelle sicherstellen dass der Schalter des Druckwächters si...

Страница 28: ...KOMPRESSOR NICHT BENUTZT WIRD Den Knauf des Druckwächters in die Position 0 OFF stellen wenn der Kompressor nicht in Betrieb ist den Kompressor von der elektrischen Speisung abklemmen und den Hahn zum Ablassen der Luft aus dem Kessel öffnen 26 DIE HEISSEN BAUTEILE DES KOMPRESSORS NICHT BERÜHREN Zur Vermeidung von Verbrennungen die Leitungen den Motor und alle sonstigen heißen Bauteile des Kompress...

Страница 29: ...wissern dass die Netzspannung dem am Schild mit den elektrischen Daten Abb 8 angegebenenWert entspricht Der zulässige Toleranzbereich muss innerhalb von 5 liegen KOMPRESSOR MIT BEHÄLTER Abb 20 Den Knopf im oberen Bereich entweder durch Drehen oder Drücken je nach Art des am Gerät montierten Druckschalters auf 0 stellen Abb 9 Den Stecker in die Steckdose stecken Abb 7 und den Knopf auf I stellen De...

Страница 30: ...t werden Die beschädigten Teile erneuern Kompressoren Serie Airclik F 1 Abb 16A Die Störung kann durch eine Beschädigung der Ventilen C1 C2 oder der Dichtung B1 verursacht werden Die beschädigten Teile erneuern Der Kompressor startet nicht Hat der Kompressor Startschwierigkeiten sicherstellen dass die Netzspannung mit der auf dem Kenndatenschild angegebenen übereinstimmt Abb 8 keine Verlängerungsk...

Страница 31: ...80 2 1 5 2850 78 SERIE GMS CV KW U min dB A 0 75 0 55 1450 1750 77 1 5 1 1 1450 1750 77 1 5 1 1 2850 78 SERIE VS CV KW U min dB A 2 1 5 1450 77 2 1 5 1750 80 3 2 2 2850 82 Der Schallpegelwert kann sich abhängig von der Umgebung in der der Kompressor installiert wird von 1 bis 10 dB A erhöhen DRUCKLUFTANSCHLUSS Sicherstellen dass immer Druckluftleitungen verwendet werden die für den max Betriebsdru...

Страница 32: ...32 D ...

Страница 33: ...an de bewegende delen buizen manometers drukreductiemachines pneumatische verbindingen en elk ander deel dat belang kan hebben bij een normale werking controleren Elk beschadigd deel moet correct hersteld of vervangen worden door een geautoriseerde assistentiedienst of vervangen zoals aangeduid in het instructieboekje BELANGRIJKE INFORMATIE Aandachtig alle instructies voor de werking de raadgeving...

Страница 34: ...ere warme delen niet aanraken 27 DE LUCHTSTRAAL NIET RECHTSTREEKS OP HET LICHAAM RICHTEN Om risico s te vermijden nooit de luchtstraal op personen of dieren richten 28 CONDENSWATER VAN DETANK AFVOEREN Dagelijks of elke 4 werkingsuren de tank ontladen Het afvoermechanisme openen en de compressor laten overhellen indien nodig om het verzamelde water te verwijderen 29 DE COMPRESSOR NIET STILZETTEN DO...

Страница 35: ...egelaar fig 25 De werking van de compressor is geheel automatisch Het wordt bestuurd door de drukregelaar die het buiten werking stelt als de druk in de tank het maximum bereikt en die het weer in werking stelt als het tot het minimum daalt Normaal gesproken is het drukverschil tussen de maximum en de minimum waarde ongeveer 2 bar 29 psi BV de compressor stopt als het 8 bar 116 psi maximale werkin...

Страница 36: ...engte Of de werkomgeving niet te koud is onder de 0 C Of het elektriciteitsnet gevoed wordt stekker goed aangesloten thermomagnetisch onbeschadigde zekeringen De compressor stopt niet alleen met tank Als de compressor niet stopt als de maximale druk bereikt is treedt de veiligheidsklep van de tank in werking Het is noodzakelijk om het dichtstbijzijnde geautoriseerde servicecentrum te contacteren v...

Страница 37: ...en voor samengeperste lucht die gekenmerkt zijn door een maximale druk die geschikt is voor die van de compressor Tracht de buis niet te repareren als die beschadigd is Gebruik pneumatische gereedschappen die een maximale druk kunnen verdragen die geschikt is voor die van de compressor WIJ BEHOUDEN HET RECHT WELKE VERANDERING DAN OOK AAN TE BRENGEN ZONDER VOORAFGAAND BERICHT WAAR NODIG NUTTIGE RAA...

Страница 38: ...38 NL ...

Страница 39: ...l pressostaten er indstillet på OFF før kompressoren tilsluttes elnettet 7 KORREKT OPBEVARING AF KOMPRESSOREN Når kompressoren ikke er i brug skal den opbevares i et tørt lokale beskyttet mod atmosfæriske kræfter Den skal holdes uden for børns rækkevidde 8 ARBEJDSOMRÅDE Sørg for at holde arbejdsområdet rent og fjern eventuelt ikke nødvendigt værktøj Sørg for at holde arbejdsområdet godt ventileret...

Страница 40: ...soren 30 TRYKLUFTKREDSLØB Anvendrøroganbefalettrykluftsværktøj dertålersammeellerhøjere temperaturer end kompressorens maksimale driftstryk RESERVEDELE Anvend kun originale resrvedele der er identiske med de udskiftede ved reparationer Reparationerne må kun udføres af et autoriseret servicecenter ADVARSEL VEJLEDNINGER FORTILSLUTNING AF JORDFORBINDELSE Denne kompressor skal være tilsluttet jordforb...

Страница 41: ...g der automatisk regulerer det maksimale driftstryk også selv om brugeren ikke anvender trykluft Kompressoren tømmer automatisk den overskydende luft via en ventil de sidder på topstykket Kompressoren standser ikke automatisk Tryk på ON OFF knappen for at slukke kompressoren Tilslut gummirøret eller spiralrøret i tilslutningen der sidder oven på kompressoren ved siden af begrænseren fig 25 BEMÆRK ...

Страница 42: ... ikke er i brug skal pressostaten indstilles på 0 OFF slukket Ret aldrig trykluftstråler mod personer eller dyr fig 24 Flyt ikke kompressoren når der er tryk i beholderen Vær opmærksom på at nogle af kompressorens dele som topstykke og afgangsrør kan nå meget høje temperaturer Rør ikke ved disse dele for at undgå forbrændinger fig 10 Flyt kompressoren ved at løfte den eller trække i de håndtag ell...

Страница 43: ...43 DK VI FORBEHOLDER OS RET TIL AT FORETAGE ÆNDRINGER UDEN FORUDGÅENDE VARSEL DER HVOR DET ANSES FOR NØDVENDIGT ...

Страница 44: ...trol de piezas 6 ARRANQUES ACCIDENTALES No transportar el compresor mientras está conectado a la fuente de energía eléctrica o cuando el depósito está bajo presión Asegúrese de que el interruptor del presostato esté en la posición OFF antes de conectar el compresor al suministro eléctrico 7 ALMACENAR EL COMPRESOR EN MODO ADECUADO Cuando el compresor no es utilizado hay que almacenarlo en un ambien...

Страница 45: ...s partes calientes 27 NO DIRIGIR EL CHORRO DE AIRE DIRECTAMENTE HACIA EL CUERPO Para prevenir riesgos no dirija jamás el chorro de aire hacia personas o animales 28 DESAGUAR EL CONDENSADO DEL DEPOSITO Descargue el depósito diariamente o sino cada 4 horas de trabajo Abra el dispositivo de desagüe e incline el compresor si es necesario para remover el agua acumulada 29 NO PARAR EL COMPRESOR TIRANDO ...

Страница 46: ... colocado cerca del presostato fig 25 El funcionamiento del compresor es completamente automático mandado por el presostato que lo detiene cuando la presión en el depósito alcanza el valor máximo y lo vuelve a arrancar cuando desciende por debajo del valor mínimo En general la diferencia de presión es aproximadamente 2 bar 29 psi entre el valor máximo y el valor mínimo Por ej el compresor se para ...

Страница 47: ...tensión de red corresponda a las características nominales fig 8 Que no se utilicen prolongaciones de cable de sección o longitud inadecuadas Que el ambiente de trabajo no sea demasiado frío inferior a 0 C Que no se haya producido un corte en la red eléctrica toma bien conectada magnetotérmico fusibles íntegros El compresor no se para Si el compresor no se para al alcanzar la presión máxima entrar...

Страница 48: ...máticos para aire comprimido que tengan características de presión máxima adecuadas a las del compresor No intentar reparar el tubo si es defectuoso Utilizar herramientas neumáticas con características de presión máxima adecuadas a las del compresor NOS RESERVAMOS EL DERECHO DE APORTAR CUALQUIER MODIFICACION SIN AVISO PREVIO SI ES NECESARIO CONSEJOS UTILES PARA UN BUEN FUNCIONAMIENTO AIRCLIK F 1 E...

Страница 49: ...nto estiver ligado à energia eléctrica ou quando o depósito está com pressão Assegurar se que o interruptor do baróstato está na posição OFF antes de ligar o compressor à energia eléctrica 7 ARMAZENAR O COMPRESSOR DE MODO ADEQUADO Quando o compressor não é utilizado deve ser guardado num local seco e protegido dos agentes atmosféricos Manter afastado das crianças 8 ÁREA DETRABALHO Manter limpa a z...

Страница 50: ...ARA O CORPO Para evitar acidentes nunca dirigir o jacto de ar para pessoas ou animais 28 DESCARGA DA CONDENSAÇÃO DO DEPÓSITO Esvaziar o depósito diariamente ou cada 4 horas de trabalho Abrir o dispositivo de descarga e inclinar o compressor se necessário para eliminar a água acumulada 29 NÃO DESLIGAR O COMPRESSOR PUXANDO PELO CABO DE ALIMENTAÇÃO Utilizar o interruptor O I ON OFF do baróstato para ...

Страница 51: ...alor máximo e o valor mínimo Ex o compressor pára quando alcança 8 bar 116 psi pressão máx de funcionamento e arranca automaticamente quando a pressão interna do depósito descer a 6 bar 87 psi Após ter ligado o compressor com a rede eléctrica fazer um carregamento com a pressão máxima e verificar se a máquina funciona regularmente COMPRESSOR SEM DEPÓSITO Fig 21 ligar a ficha com a tomada de corren...

Страница 52: ...a a reparação ATENÇÃO Evitar absolutamente de desapertar qualquer ligação com o depósito sob pressão assegurar se sempre de que o depósito esteja descarregado É proibido efectuar furos soldar ou deformar voluntariamente o depósito do ar comprimido Não efectuar operações no compressor sem primeiro se ter desligado a ficha da tomada de corrente Temperatura ambiente para um correcto funcionamento 0 C...

Страница 53: ...tar reparar o tubo se estiver defeituoso Utilizardispositivospneumáticoscomcaracterísticasdepressãomáxima adequadas àquelas do compressor RESERVAMO NOS O DIREITO DE EFECTUAR QUALQUER MODIFICAÇÃO SEM AVISO PRÉVIO QUANDO NECESSÁRIO CONSELHOS ÚTEIS PARA UN BOM FUNCIONAMENTO AIRCLIK F 1 O MODELO F 1 E AIRCLIK SÃO PARA UM USO INTERMITENTE E NÃO PARA USO CONTINUO ESTES MODELOS SÃO UTILIZADOS SOMENTE PAR...

Страница 54: ...54 P ...

Страница 55: ...äytössä sepitääsäilyttääkuivassapaikassa turvassa ilmastollisilta tekijöiltä Älä jätä lasten ulottuville 8 TYÖALUE Pidä työalue puhtaana vapaana tarpeettomista työvälineistä ja hyvin tuuletettuna Älä käytä kompressoria syttyvien nesteiden tai kaasujen lähettyvillä Toimintansa aikana kompressori saattaa aiheuttaa kipinöitä Älä käytä kompressoria paikoissa missä saattaisi olla maaleja bensiiniä kemi...

Страница 56: ...varaosia jotka ovat samanlaisia kuin vaihdettavat osat Ainoastaan valtuutettu teknillinen asiakaspalvelukeskus saa korjata kompressoria VAROITUKSET MAAJOHDON KYTKENTÄOHJEET Koneenkäyttäjä pitää suojata sähköiskuilta ja siksi kompressori pitää maadoittaa Yksivaihekompressorilla on kaksinapainen ynnä maajohto Kolmivaihekompressorilla on pistotulpaton sähköjohto Ainoastaan ammattitaitoinen teknikko s...

Страница 57: ...aliputki sille kuuluvalle paikalle kompressorin päälle kuva 25 HUOM Ryhmät pää sylinteri putki jotka sijaitsevat suojakannen alla voivat saavuttaa korkeita lämpötiloja Varo näitä osia jos työskentelet niiden lähellä Älä koske niitä sillä ne voivat aiheuttaa palovammoja kuva 10 HUOMIO Sähkökompressorit pitää liittää pistorasiaan joka on suojattu riittävällä differentiaalikatkaisimella lämpökatkaisi...

Страница 58: ...ensijasta kuvat 5 6 Pidä lapset ja eläimet kaukana koneen toiminta alueesta Mikäli käytät kompressoria maalaukseen a Älä työskentele suljetuissa tiloissa tai avotulien läheisyydessä b Varmista että työskentelytiloissa on riittävä ilmanvaihto c Suojaa nenä ja suu tarkoitukseen sopivalla naamarilla kuva 18 Älä käytä kompressoria mikäli sähköjohto tai pistoke ovat vahingoittuneet vaan ota yhteys valt...

Страница 59: ...förvaras i en torr lokal där den är skyddad mot atmosfärisk påverkan Håll kompressorn borta från barn 8 ARBETSOMRÅDEHåll arbetsområdet rent och avlägsna eventuellt de verktyg som inte behövs i arbetsområdet Håll arbetsområdet ordentligt ventilerat Använd inte kompressorn i närheten av brandfarliga vätskor eller gas Kompressorn kan ge upphov till gnistor under bruket Använd inte kompressorn i närhe...

Страница 60: ...icecentraler VARNING INSTRUKTIONER FÖR JORDNING Denna kompressor måste jordas före användning för att skydda användaren mot elektriska stötar Enfaskompressorn har utrustats med en bipolär sladd plus jordsladd Trefaskompressorn har utrustats med en elsladd utan kontakt Elkopplingen får bara utföras av en kvalificerad tekniker Vi rekommenderar dig att aldrig demontera kompressorn eller utföra andra ...

Страница 61: ... differentialbrytare termomagnetisk brytare REGLERING AV ARBETSTRYCK fig 11 Det är inte alltid nödvändigt att använda högsta arbetstryck tvärtom så kräver ofta de pneumatiska verktygen mindre tryck På kompressorer utrustade med tryckreduceringsventiler är det nödvändigt att reglera arbetstrycket noggrant Lossa på knappen vid tryckreduceringsventilen genom att dra uppåt reglera önskat tryck genom a...

Страница 62: ...ens aktionsradie Om du använder kompressorn för att måla a Använd den inte i stängda rum eller i närheten av eld b Se till att arbetsmiljön har ett tillräckligt luftutbyte c Skydda näsa och mun med därför avsett munskydd fig 18 Om elsladden eller kontakten är skadad ska du inte använda kompressorn Vänd dig till närmaste auktoriserade serviceverkstad för att byta ut delen mot en originalreservdel O...

Страница 63: ...or AU Hilfswicklung AM Betriebswicklung NL A VOEDING P DRUKREGELAAR T AUTOMATISCHE THERMISCHE BEVEILIGING TM HANDMATIG TE BEDIENEN STROOMMEETBEVEILIGING 1 2 3 4 5 6 VERBINDINGSKLEMMEN GELEIDERS C CONDENSATOR M MOTOR AU HULPWIKKELING AM WIKKELING VAN DE VERSNELLING DK A FORSYNING P TRYKAFBRYDER T AUTOMATISK OVEROPHEDNINGSSIKRING TM MANUEL AMPERESIKRING 1 2 3 4 5 6 KLEMMER TIL TILSLUTNING AF LEDNING...

Страница 64: ...GARANTIE Les électrocompresseurs sont garantis 12 mois à partir de la date d achat documentée La présente garantie est accordée au client à jour avec les paiements Le compresseur est garanti pour une utilisation normale de 8 heures par jour dans un lieu adapté L installation doit être effectuée selon les règles de l art En cas de pannes à cause de défauts de fabrication constatés durant la période...

Страница 65: ...as Se excluyen siempre de la garantía los motores y otras piezas eléctricas y de desgaste normal GARANTIA Concede se a garantia de 12 meses para os compressores eléctricos a partir da data de venda documentada A presente garantia só é concedida ao cliente se estiver em regra com os pagamentos O compressor é garantido para um funcionamento normal de 8 horas por dia em ambiente adequado A instalação...

Страница 66: ...ääränlaisessa ympäristössä Takuuseen eivät sisälly moottorit ja muut sähköosat ja normaalisti kuluvat osat GARANTI Vi ger en 12 månaders garanti för elektriska kompressorer med start från det dokumenterade försäljningsdatumet Denna garanti ges bara till den kund som skött betalningarna på ett tillfredsställande sätt Garantin för kompressorn gäller ett normalt 8 timmars bruk om dagen i lämplig milj...

Страница 67: ...67 I GB F D NL E P RU PL SF N S TR CS GR CZ RS ...

Страница 68: ...68 Cod 7 34 637 0000 05 05 ...

Отзывы: