14. TECLA DE MAYÚSCULAS:
Presionar para tipear letras mayúsculas o
caracteres especiales.
15. BLOQUEO TECLA DE MAYÚSCULAS:
Presionar para tipeo continuo en
letras mayúsculas o caracteres especiales. Desenganchar el bloqueo de
mayúsculas presionando cualquier tecla de mayúsculas.
16. PALANCA DE CONTROL DE IMPRESIÓN:
Ajusta la presión del golpe de
tecla en el papel.
17. DIBUJO DE LÍNEAS:
Inserte la punta de un lápiz en el agujero y presione la
barra espaciadora con repetición automática para dibujar líneas.
18. AJUSTADOR DE PAPEL:
Mantiene el papel contra la placa y posee una regla
de medida de 21 cm.
19. AJUSTE Y ELIMINACIÓN DE TABULACIÓN:
Para ajustar un límite de
tabulación mueva el control (+); para la eliminar un límite de tabulación presione la
tecla (11), y seleccione el control (-).
16. GUIADOR DEL PAPEL:
Ajusta la presión del golpe de tecla en el papel.
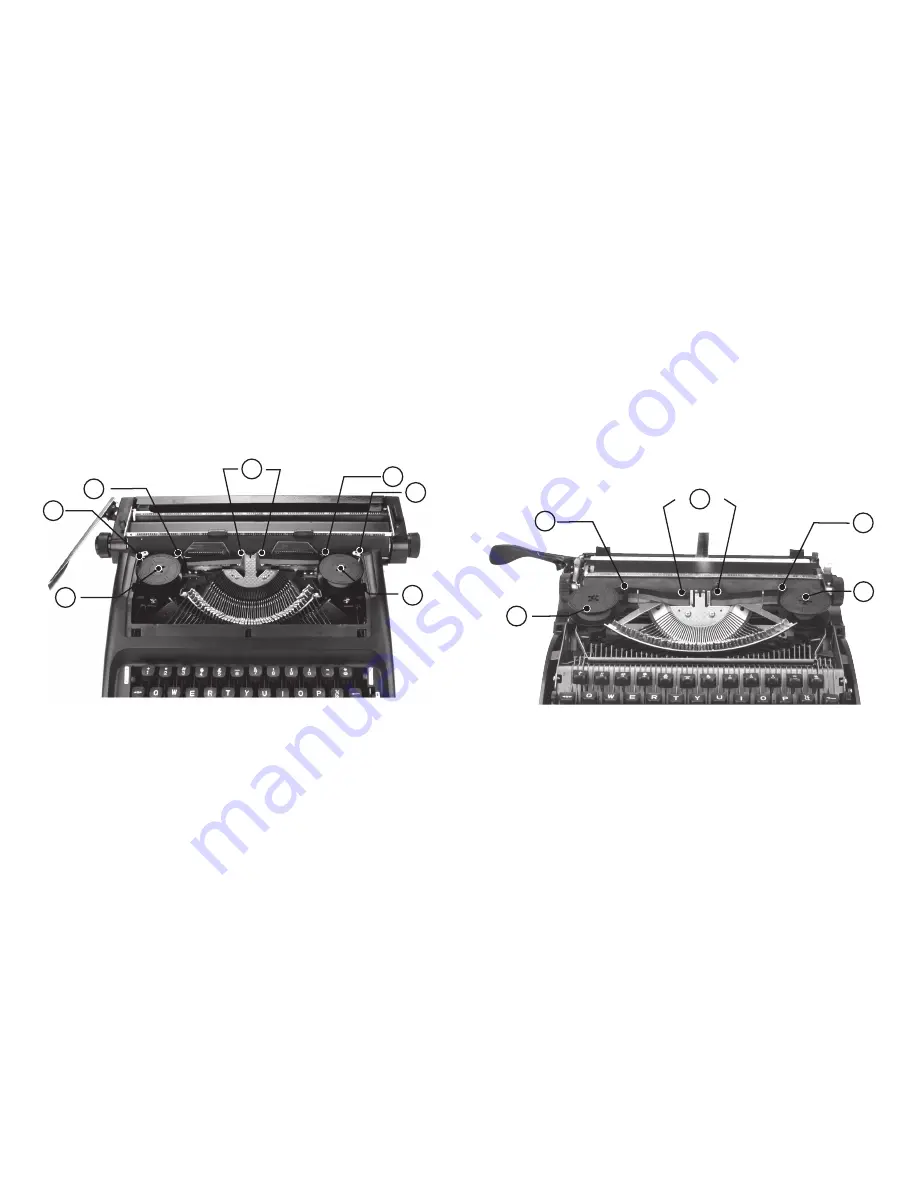
CÓMO CAMBIAR LA CINTA
1.
Remover la cubierta superior (Véase sección REMOCIÓN DE COBERTURA
para instrucciones).
2.
Enrolle la cinta vieja en el carrete anterior y remuévala de los pinchos de soporte
(B) y guías de cinta (A).
3.
Levante los carretes de los carros (C).
4.
Coloque los nuevos carretes de cinta en los carros (C) con el lado negro hacia
arriba.
5.
Rotar cada carrete hasta que el poste de carro este inserto en un agujero
debajo de cada carrete.
6.
Enlazar cada cinta a través de los pinchos de soporte (B) y la guía de cinta central
(A) asegurándose que la ranura esté situada ante los pinchos de soporte (B).
7.
Vuelva a colocar la cobertura.
8.
Nota: La cinta se revertirá a sí misma cuando el carrete termine.
8
14. SHIFT KEY:
Press for typing capital letters or special characters.
15. SHIFT LOCK KEY:
Press for continuous typing in capital letters or special
characters. Disengage lock by pressing either Shift Key.
16. IMPRESSION CONTROL LEVER:
Adjusts the pressure of the keystroke on the
paper.
17. LINE DRAWING: I
nsert pencil tip into hole and depress Space Repeater Key to
draw lines.
18. PAPER BAIL:
Holds paper against platen and features 10 1/2” measuring ruler.
19. TAB SET AND CLEAR:
For the setting of a tab stop move the (+) setting: for
the clearing of a tab stop by operation the tab key (11), and select (-) setting.
20. PAPER GUIDE:
Will keep the edge of the paper flush to the left hand edge when
it is inserted.
Epoch Portable Manual Typewriter
Epoch máquina de escribir portátil
3
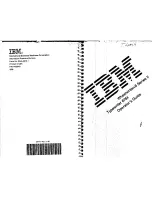
HOW TO CHANGE THE RIBBON
1.
Remove top cover (see COVER REMOVAL section for instructions).
2.
Wind old ribbon onto one spool. Swing back ribbon brake (D) and remove it from
the support forks (B) and ribbon guides (A)
3.
Lift the spools off carriers (C).
4.
Swing Back ribbon brake (D).
Place the new ribbon spools onto the carriers (C)
black ribbon side up.
5.
Rotate each spool until the carrier post is inserted into a hole under each spool.
6.
Thread new ribbon through support forks (B) and center ribbon guide (A) making
sure ribbon eyelet is situated before the support fork (B).
7.
Reattach cover.
8.
Note: The ribbon will reverse itself when the spool ends.
E 3
A
B
D
B
D
C
C
A
B
B
C
C


