background image

5

FR

EN

DE

NL

IT

ES

PT

EL

TR

RU

UK

CS

PL

SL

SK

BG

RO

BS

HU

HR

SR

ET

LT

LV

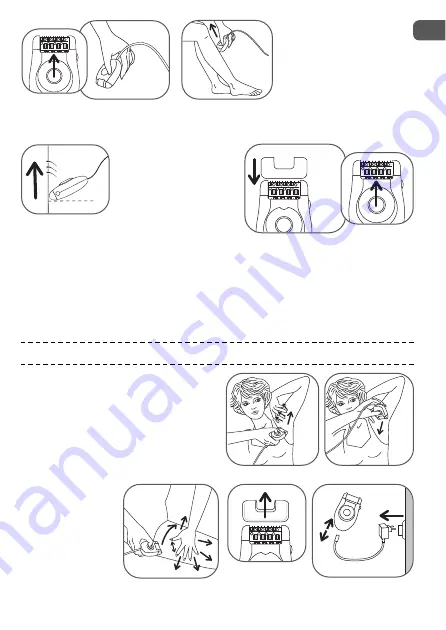
- Positionner    l'interrupteur

sur    “2”.  L’interrupteur  doit
toujours  rester  visible  pen-
dant l’utilisation.

- Epilez-vous à rebrousse-

poils, lentement, sans
appuyer.

7 - EPILATION DES ZONES SENSIBLES

- Pour  une  épilation 

optimale,  nous  vous
recommandons  d’incli-
ner  légèrement  votre
épilateur  vers  votre
peau,  dans  le  sens  de
l’épilation, comme indi-
qué sur le schéma.

• Préparation de la zone à épiler :

- Couper les poils trop longs, supérieurs à 1 cm.
- Sécher parfaitement la zone pour retirer toutes traces de déodorant ou de transpira-

tion.

- Si vous n’avez pas l’habitude de vous épiler les aisselles et le maillot avec un épila-

teur, nous vous recommandons d’utiliser l’accessoire Zones Sensibles.

- Emboiter l’accessoire Zones Sensibles sur la tête d’épilation jusqu’au clic.
- Positionner l'interrupteur sur “1”.

Epilez-vous à rebrousse poils, lentement sans appuyer.

• Pour les aisselles :

- D’abord de bas en haut ...
.. puis de haut en bas.

Impératif : 

a) Garder  le  bras  levé  et  tendu  pendant

toute l’épilation.

b) Tendre la peau, pour plus de facilité.

• Pour le maillot :

Impératif : 

bien tendre la peau.

Après utilisation, retirer l’accessoire Zones Sensibles et débrancher votre appareil.

CLIC!

1

2

Содержание LOVELY EP1007 Series

Страница 1: ...FR EN DE NL IT ES PT EL TR RU UK CS PL SL SK BG RO BS HU HR SR ET LT LV www rowenta com EP1007 EP1008...

Страница 2: ...4 1 5 7 6 2 3 8...

Страница 3: ...t ou apr s une chute des dommages non visibles peuvent tre pr judiciables votre s curit D branchez l appareil avant toute intervention et apr s chaque utilisation N utilisez jamais l appareil s il est...

Страница 4: ...i produit hydratant avant l pilation Si votre m thode d pilation tait le rasoir Lors des premi res s ances d pilation votre peau pourra vous para tre plus sensible car les poils ont t rendus plus pais...

Страница 5: ...arfaitement la zone pour retirer toutes traces de d odorant ou de transpira tion Si vous n avez pas l habitude de vous piler les aisselles et le maillot avec un pila teur nous vous recommandons d util...

Страница 6: ...vement la t te d pilation puis la s cher l aide d une serviette avant de la replacer sur l appareil Vous pouvez galement utiliser la bros sette de nettoyage fournie Nettoyage de l accessoire Zones Sen...

Страница 7: ...arrach s ils dispara tront rapidemment Pour cette raison pilez vous de pr f rence le soir Appliquez si besoin une cr me apaisante apr s pilation 10 PARTICIPONS LA PROTECTION DE L ENVIRONNEMENT Votre a...

Страница 8: ...e appliance in any way other than that specified in these instructions When the depilator is in use it must not come into contact with eyelashes hair clothes or any other objects in order to avoid any...

Страница 9: ...usly used a razor for depilation the first few times you use the depilator your skin may feel more sensitive as sha ving has made your hair thicker and stronger This sensation will lessen the more you...

Страница 10: ...ne with an epilator we recommend you use the Sensitive Area accessory Push the Sensitive Area accessory onto the epilator head until it clicks Move the switch to the on position 1 Shave against the li...

Страница 11: ...with a towel before fitting it to the epilator again You can also use the small cleaning brush supplied Cleaning the sensitive area accessory Cleaning the Exfoliator Head We recommend that you change...

Страница 12: ...ear quickly For s preferable to use your depilator in the evening If necessary apply calming cream after depilation 10 ENVIRONNEMENT PROTECTION FIRST Your appliance contains valuable materials which c...

Страница 13: ...r t zu trennen bei jeder Funktionsst rung vor jeder Reinigung oder Pflege nach dem Gebrauch Ger t und Netzteil nicht in Betrieb nehmen wenn Ger t Anschlusskabel oder Netzteil besch digt sind Epilierge...

Страница 14: ...ie das Ger t nicht wenn die Zuleitung oder der Stecker besch digt sind Um jegliche Gefahr zu vermeiden lassen Sie die Teile durch den Rowenta Kundendienst GUARANTI EIhr Ger t ist nur f r den privaten...

Страница 15: ...ie H rchen die l nger als 1 cm sind ab Trocknen Sie die Hautpartie Es d rfen keine Deodorant oder Schwei spuren mehr vorhanden sein Wenn Sie den Achsel und Bikinibereich gew hnlich nicht mit einem Epi...

Страница 16: ...en Auswurfknopf und nehmen Sie den Scherkopf ab 3 Sp len Sie den Scherkopf 5 bis 10 Sekunden lang unter flie endem kalten Leitungswasser ab und drehen Sie ihn dabei hin und her 4 Sch tteln Sie den Sch...

Страница 17: ...en ausbleichen k nnen 9 PFLEGE DER HAUT Nach der Haarentfernung k nnen sich auf der Haut kleine rote P nktchen bilden Dies ist eine nat rlich Reaktion Diese R tungen werden schnell wieder zur ckge hen...

Страница 18: ...op een veilige wijze te gebruiken tenzij zij van tevoren instructies heb ben ontvangen betreffende het gebruik van dit apparaat door een verantwoordelijke per soon Er moet toezicht zijn op kinderen zo...

Страница 19: ...araat niet aan zonlicht bloot Dompel het niet onder in water en houd het niet onder de kraan GARANTIE Dit apparaat is alleen bestemd voor huishoudelijk gebruik Het kan niet voor bedrijfsma tige doelei...

Страница 20: ...ven op het schema Voorbereiding van de te ontharen zone Knip de langere haartjes langer dan 1 cm af Drog de te ontharen zone zorgvuldig om eventuele resten van deodorant of transpira tie te verwijdere...

Страница 21: ...iniging van de epileerkop 1 Haal de stekker van het apparaat uit het stopcontact 2 Druk op de uitwerpknop van de kop en verwijder de epileerkop 3 Houd de epileerkop onder de koude kraan en laat de kop...

Страница 22: ...at te behouden Geen metalen of scherp gereedschap gebruiken 9 HUIDVERZORGING Dit is een normaal verschijnsel dat snel zal verdwijnen Om dezereden is het ver standig om u s avonds te ontharen Breng ind...

Отзывы:

Похожие инструкции для LOVELY EP1007 Series