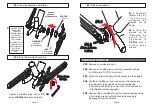
#2.
Drive-side Assembly Installation.
#3.
Fixing of Drive-side Assembly.
Tighten drive-side alloy bolt to
35 Nm
using an
8mm
allen torque wrench.
Allen 8mm
35 Nm
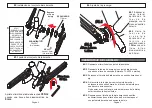
CRANKSET REMOVAL
#4.
Preload adjustment.
#4.1
Eliminate
lateral play by
t i g h t e n i n g
c l o c k w i s e t h e
preload nut by
hand.
#4.2
Lock the
preload nut by
t i g h t e n i n g t h e
p i n c h b o l t
c l o c k w i s e t o
1.2Nm
with a
2 . 5 m m a l l e n
wrench.
#R1.
Remove drive-side alloy bolt.
#R2
. Remove drive-side steel nut using a cassette lockring
tool (Shimano TL-LR15 or similar).
#R3.
Screw the drive-side alloy bolt clockwise into the spindle.
#R4.
Flip the drive-side nut over and screw it clockwise into
the crank arm to be used as a self-extracting cap.
It must be in flush with the outer face of the arm and all
of its threads must be engaged.
#R5.
Unscrew the drive-side alloy bolt counter-clockwise using
a 8mm allen wrench until the drive-side assembly
disengages from the spindle.
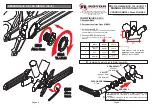
Grease
the cone
of the spindle
O N LY N E E D E D
WHEN BEARINGS
A R E P R E S S E D
DIRECTLY INTO
THE FRAME.
IN FRAMES WITH
PRESS FIT CUPS,
T H E C U P S
REPLACE BOTH
T H E B E A R I N G
AND SEAL.
*
SPACER
11.5mm
*
BEARING
30x42x7
(Not included)
*
SEAL
1.6mm width
(Not included)
#4.1
#4.2
Allen 2.5mm
1.2Nm


