background image

Issue 5 

Original version 

     Nov 2014 

12 


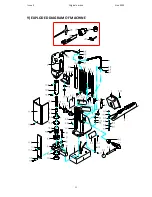
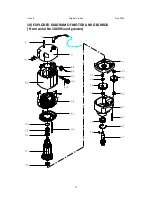
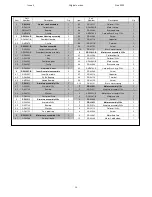
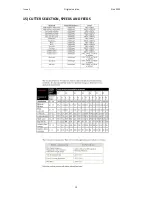
Component parts list for Rotabroach Puma CM/300/1 & CM/300/3 From serial number 107621 


Item 

Part number 

Discription 

Quantity 

Item 

Part number 

Discription 

Quantity 

RD23094 

Control panel assembly 110v. 

8.6 

RD43093 

Screw. 

RD23095 

Control panel assembly 230v. 

8.7 

RD43116 

Spacer block 

RD23081 

Magnet assembly 110v. 

RD23014 

Bearing bracket assembly. 

RD23083 

Magnet assembly 230v. 

9.1 

RD33099 

Bearing bracket. 

2.1 

RD45606 

Protection Switch 

9.2 

RD4518 

Bearing 

RD23008 

Capstan assembly. 

10 

RD23015 

Arbor sleeve assembly. 

3.1 

RD33088 

Capstan spindle. 

RD23014 

Bearing bracket assembly. 

3.2 

RD43091 

Capstan ball. 

10.1 

RD33100 

Ejector sleeve. 

3.3 

RD33089 

Capstan arm. 

10.2 

RA353 

Pin. 

3.4 

RD33090 

Capstan pinion sleeve. 

10.3 

RD4519 

Thrust washer. 

3.5 

RD33092 

Bearing. 

10.4 

RD43084 

Circlip. 

3.6 

RD4098 

M6 Socket head cap screw. 

11 

RD23016 

Guard assembly. 

3.7 

RD4207 

M6 Spring washer. 

11.1 

RD33101 

Guard. 

RD23064 

Motor & Gearbox assy 110v. 

11.2 

RD33102 

Guard bracket 

RD23065 

Motor & Gearbox assy 230v. 

11.3 

RD43092 

Screw. 

RD23009 

Mains cable assembly 110v. 

11.4 

RD43096 

Screw. 

RD23012 

Mains cable assembly 230v. 

11.5 

RD43097 

Ball plunger 

RD23003 

Housing assembly. 

11.6 

RD43098 

Shakeproof washer. 

6.1 

RD33094 

Housing. 

11.7 

RD4252 

M3 screw 

6.2 

RD4102 

Tension pin. 

12 

RD23019 

Arbor assembly. 

6.3 

RD33077 

Logo plate. 

12.1 

RD33137 

Arbor spindle. 

6.4 

RD4077 

Screw. 

12.2 

RD4056 

Circlip. 

6.5 

RD43093 

Screw. 

12.3 

RA354 

Button. 

6.6 

RD4069 

Shakeproof washer. 

12.4 

RD3319 

Spring. 

6.7 

RD4068 

Nut. 

12.5 

RD4066 

M8 Socket screw. 

6.8 

RD43094 

Earth tag. 

13 

RD23018 

Gib strip assembly 

6.9 

RD4070 

Washer. 

13.1 

RD33103 

Fixed gib strip 

6.10 

RD4312 

Screw. 

13.2 

RD33104 

Adjustable gib strip 

6.11 

RD4302 

Information plate. 

13.3 

RD33105 

Gib support strip 

6.13 

RD4077 

M4 x 8 Pan head 

14 

RD33106 

Motor support bracket. 

6.14 

RD43113 

M4 spring washer 

15 

RD4157 

M6 Socket head screw. 

6.15 

RD43117 

Mains cable clamp 

16 

RD4096 

M6 Shakeproof washer. 

6.16 

RD33145 

Depth Guage 

17 

RD4091 

M5 Socket head screw. 

6.17 

RD33146 

Rivet 

18 

RD4092 

M5 Shakeproof washer. 

6.18 

RD33144 

Rubber Handle 

19 

RD33107 

Bearing spacer. 

6.19 

RD43093 

Screw 

20 

RD4319 

M8 Bolt 

RD23010 

Motor supply cable assembly. 

21 

RD4079 

M8 Shakeproof washer 

7.1 

RD33095 

Cable assembly. 

22 

RD4078 

M8 Washer 

7.2 

RD43095 

cable clip. 

23 

RD4098 

M6 Socket head cap screw. 

7.3 

RD43346 

Motor cable elbow 

24 

RD4095 

M6 Washer. 

7.4 

RD43112 

Connector 

25 

RD4329 

Safety Strap 

RD23004 

Slide assembly 

26 

RD4088 

4mm Allen Key 

8.1 

RD33096 

Slide. 

27 

RD43099 

13mm Drill Chuck 

8.2 

RD33097 

Rack. 

28 

RD33153 

Drill Chuck Adaptor 

8.3 

RD4325 

M5 socket head screw. 

29 

RD33154 

Drill Chuck Key 

8.4 

RD4092 

M5 Shakeproof washer. 


8.5 

RD4069 

Shakeproof washer. 


Содержание SMARTPUMA1

Страница 1: ...E Model No SMARTPUMA1 SMARTPUMA3 This machine Serial No is CE approved Rotabroach Ltd Imperial Works Sheffield Road Sheffield South Yorkshire United Kingdom S9 2YL Tel 44 0 114 2212 510 Fax 44 0 114 2212 563 Email sales rotabroach co uk Web site www rotabroach co uk ...

Страница 2: ...art Puma magnetic drill We would really like your feedback on the machine Other Products by Rotabroach Thank you for your purchase of our product For more information please visit our website at www rotabroach co uk Or contact our sales department on 44 0 114 2212 510 ...

Страница 3: ...uctions 7 5 Cutsmart Feature 8 6 Mounting of cutters 9 7 Remedies for hole making problems 9 8 Wiring Diagram 10 9 Exploded diagram of machine 11 10 Exploded diagram of motor and gearbox 13 11 Pipe adaptor Kit 15 12 Chuck conversion 16 13 Maintenance 16 14 Trouble shooting 18 15 Cutter Selection Speeds and Feeds 19 16 Warranty 20 ...

Страница 4: ...them away from the work area 5 Store idle tools when not in use All tools should be stored in a dry locked up place out of reach of children 6 Do not force the machine It will do the job better and safer at the rate for which it was intended 7 Use the right tool Do not force small tools to do the job of a heavy duty tool Do not use this tool for purposes not intended e g do not use the magnetic dr...

Страница 5: ... this instruction manual may present a risk of personal injury 23 Have your machine repaired by a qualified Rotabroach technician This electric tool complies with the relevant safety rules Qualified persons using original spare parts should only carry out repairs otherwise this may result in considerable danger to the user 24 Never operate the machine if parts are missing or damaged 25 Never direc...

Страница 6: ...sible substitute material should be positioned under the magnet and work piece to equate to a suitable material thickness If this is not possible an alternative secure method of restraining the machine MUST be used 8000N Maximum hand arm vibration magnitude measured at handle during operation in accordance with ISO5349 using a 22mm dia cutter through 13mm mild steel plate 2 95 m s Estimate of vibr...

Страница 7: ... that coolant does not enter the motor unit Cutting tools may shatter ALWAYS position the guard over the cutter before activating the machine Failure to do so may result in personal injury On completion of the cut a slug will be ejected DO NOT operate the machine as the ejected slug may cause injury When not in use ALWAYS store the machine in a safe and secure location ALWAYS ensure that approved ...

Страница 8: ...is put on the machine the LED will eventually turn RED and the motor will cut off and will not be allowed to be turned back on for approximately 5 seconds This is a safety feature to protect you and the machine from damage Ideally to get the most out of your machine you need to keep the LED green when drilling If it starts to turn orange release some pressure The panels are set to cut off when the...

Страница 9: ...s on motor bushing support bracket main casting or loose gib adjusting set screws See causes and remedies above Replace Only a few thousandths wear permissible New arbor bushing is needed Light pressure only is needed until a groove is cut The groove then serves as a stabilizer Replace or re sharpen Sharpening service is available Improve centre punch and or replace worn parts Replace part or part...

Страница 10: ... 10 8 WIRING DIAGRAM No Function Wire Colour 1 Magnet 1 110v 230v Magnet Black 2 Magnet 2 110v 230v Magnet Red 3 Motor Blue 4 Magnet reed switch Black 5 Motor Brown 6 N C 7 Mains Neutral Blue 8 Magnet reed switch Red 9 Mains Live Brown ...

Страница 11: ...Issue 5 Original version Nov 2014 11 9 EXPLODED DIAGRAM OF MACHINE ...

Страница 12: ...252 M3 screw 1 6 2 RD4102 Tension pin 2 12 RD23019 Arbor assembly 1 6 3 RD33077 Logo plate 1 12 1 RD33137 Arbor spindle 1 6 4 RD4077 Screw 4 12 2 RD4056 Circlip 1 6 5 RD43093 Screw 1 12 3 RA354 Button 1 6 6 RD4069 Shakeproof washer 1 12 4 RD3319 Spring 1 6 7 RD4068 Nut 2 12 5 RD4066 M8 Socket screw 4 6 8 RD43094 Earth tag 1 13 RD23018 Gib strip assembly 1 6 9 RD4070 Washer 1 13 1 RD33103 Fixed gib...

Страница 13: ...Issue 5 Original version Nov 2014 13 10 EXPLODED DIAGRAM OF MOTOR AND GEARBOX From serial No 106991 and greater ...

Страница 14: ... casing 1 3 5 RD43087 Circlip 1 6 4 RD33086 Brush end cap 2 3 6 RD33083 Intermediate gear 1 6 5 RM297630 Carbon Brush assy 230v 2 4 RD23007 B Inner Gear plate assembly 1 6 6 RD43089 Screw 2 4 1 RD23007 Inner Gear plate 1 6 7 RD43118 Capacitor 1 4 2 RD43088 Ph Bz Bearing 1 6 8 RD43119 Terminal 1 4 4 RM22880 Needle Bearing 2 6 9 RD43120 Screw 4 5 RD23011 Armature assembly 110v 1 6 10 RD43121 Brush c...

Страница 15: ...at the magnet is in line with the longitudinal axis of the pipe Switch on the magnet and move the sliding plates down to the outside diameter of the pipe Tighten the screws on both sides by hand then check once again that the full length of the moving plates is touching the pipe at the front and back fasten the plate securely Feed the safety strap through the lugs at the front of the housing aroun...

Страница 16: ...ny job make sure the machine is in good working order and that there are no damaged or loose parts Any loose parts must be tightened Before proceeding with any maintenance work be certain that the power supply is disconnected Description Every operation 1 week 1 Month Visual check of machine for damage X Operation of machine X Check brush wear X Check magnetic base X Check alignment of the machine...

Страница 17: ...ith the middle screws gently feed in all the screws until slight resistance is encountered 4 Operate the slide up and down a few times to test the movement and make any further necessary adjustments Try to ensure that all the screws are exerting a uniform pressure on the slide from top to bottom A perfectly adjusted slide will operate freely up and down without any sideways movement 5 Now raise th...

Страница 18: ...mming big sparks and motor has no force Armature burned Field burned Carbon brushes worn out Motor does not start or fails Damaged or defective wiring Dirt in sensor of Speed Control Unit Defective Speed Control Unit Defective speed control or its wiring Defective or loose magnet on top of armature Damaged or defective brushes Guiding takes a great deal of effort Guide is set too tight Guide is dr...

Страница 19: ...Issue 5 Original version Nov 2014 19 15 CUTTER SELECTION SPEEDS AND FEEDS ...

Страница 20: ...aintenance 3 Defects caused by using accessories components or spare parts other than original Rotabroach parts 4 Tools to which changes or additions have been made 5 Electrical components are subject to manufacturer s warranty Your online registration can be submitted on www rotabroach co uk The warranty claim must be lodged within the warranty period This requires the submission or sending of th...

Отзывы: